
A bowtie risk assessment is a visual tool. It maps out a risk from its causes to its consequences. It gets its name from its shape, which looks like a bowtie. This shape separates the preventive controls on the left from the recovery controls on the right.
Understanding the Bowtie Risk Assessment Method
Let’s get practical. Picture a crane on a busy construction site, lifting a heavy precast panel over an active work area. The hazard is that suspended load. A standard risk matrix might just put a "high risk" label on it, but a bowtie tells the whole story. It makes the risk clear.
The diagram's center, the knot in the bowtie, is the "Top Event". This is the moment you lose control. In our crane scenario, the top event is the load unexpectedly falling.
From Causes to Consequences
To the left of this central event, you map out all the potential causes, or Threats. These are the real-world things that could trigger the top event. Think of things like:
- Mechanical failure of the crane’s main cable.
- An overloaded or damaged sling that finally snaps.
- A moment of operator error during a complex lift.
Then, to the right of the falling load, you list the Consequences. These are the outcomes if the top event actually happens.
- Injury or fatality to the crew working below.
- Serious damage to the structure you're building.
- Project delays and massive financial losses.
This visual structure helps teams see the direct lines from specific causes to specific outcomes. It’s easier to grasp than a complex spreadsheet.
The Role of Barriers
The real value of the bowtie risk assessment is its focus on Barriers (also called controls). These are the concrete measures you put in place to manage the risk.
A barrier is a specific, active system designed to either stop a threat from causing the top event or to stop that top event from leading to a catastrophe. On the diagram, they cut across the risk pathways.
Preventive barriers sit on the left-hand side, stopping the threats. For our crane example, these would be things like a strict crane maintenance schedule, using certified rigging equipment for every lift, and ensuring operators are fully trained and proven competent.
Recovery barriers are on the right, reducing the impact if the worst happens. This could be clearly marked exclusion zones, mandatory hard hats, or having a well-rehearsed emergency response plan ready to go.
The bowtie method gained traction after the investigation into the 1988 Piper Alpha oil rig disaster. In Australia, it’s been widely adopted in high-risk sectors like mining and oil and gas. For instance, some Australian offshore platforms that integrated bowtie risk management reported up to a 30% decrease in safety incidents within five years. If you're interested in the history, Wolters Kluwer has a good article on the effectiveness and background of the method.
Key Components of a Bowtie Diagram
To make sense of it all, the bowtie diagram is built from five core components. Each one plays a specific role in telling the risk story.
Here's a quick rundown of what they are and what they do.
| Component | Description |
|---|---|
| Hazard | The source of potential harm. In our example, the suspended load. |
| Top Event | The central point where control is lost; the knot of the bowtie. For us, the load falling. |
| Threats | The potential causes on the left that could lead to the top event (e.g., cable snapping, operator error). |
| Consequences | The potential outcomes on the right if the top event occurs (e.g., injuries, project delays). |
| Barriers | The controls put in place to prevent threats (left side) or mitigate consequences (right side). |
Understanding these five elements is the key to building and interpreting a useful bowtie diagram.
The Anatomy of a Bowtie Diagram
To get the most out of a bowtie risk assessment, you need to understand its five core components. Each piece slots into the next, building a complete, visual story of a risk scenario. It’s a way to turn a complex problem into a diagram that’s clear and logical for everyone to follow.
Let's walk through it with an example from a manufacturing plant: a chemical spill from a large storage tank.
The Hazard and The Top Event
Every risk story starts with the Hazard. This is the thing or condition that has the potential to cause harm. In our case, the hazard is the volume of chemicals in the storage tank.
The knot in the middle of the bowtie is the Top Event. This is the moment you lose control and the hazard gets out. For our scenario, the top event is the "Loss of containment from the storage tank." It's that one specific, unwanted event we're trying to prevent.
Threats: The Left Side of the Bowtie
On the left-hand side of the bowtie, you’ll find the Threats. Think of these as the active causes or triggers that could directly lead to your top event. Sticking with our chemical spill, some very real threats might be:
- Corrosion that weakens the tank walls over time.
- Overfilling the tank because of a faulty level sensor.
- Impact damage from a reversing forklift.
Each one of these is a distinct pathway to failure. The bowtie method forces you to pinpoint these specific causes rather than just vaguely worrying about "the tank leaking."
A key strength of the bowtie risk assessment is its ability to map multiple, distinct causes and consequences to a single risk event. This visual clarity helps teams understand how different controls protect against different failure paths, which is often difficult to see in a standard risk register.
Consequences: The Right Side of the Bowtie
On the right side of the diagram, you map out the Consequences. What are the real-world, unwanted outcomes if that top event happens? A single event can lead to multiple problems. For our chemical spill, these could include:
- Worker injuries from direct chemical exposure.
- Environmental damage as chemicals pour into nearby drains.
- Production shutdown, leading to massive cleanup costs and business interruption.
These are the tangible impacts you’re working to avoid.
Barriers: The Controls in the Middle
Now for the most important part: the Barriers. These are your safety controls, and you place them along the lines of the bowtie. They sit between the threats and the top event, and between the top event and the consequences.
They fall into two distinct types:
Preventive Barriers: These are on the left side, designed to stop a threat from causing the top event. For the "corrosion" threat, a preventive barrier is a regular tank inspection and maintenance program.
Recovery Barriers: These are on the right side, ready to minimize the damage if the worst happens. If the tank does spill, a recovery barrier would be an emergency spill kit and a trained response team.
These barriers are the heart of your safety strategy. They’re a critical part of your overall safety management system, and visualizing them this way lets you instantly see where your defenses are solid and where you have gaps.
To see how these controls fit into the bigger picture, have a look at our guide on the key elements of a health and safety management system.
How to Conduct a Bowtie Risk Assessment
Running a bowtie risk assessment is a structured conversation. It's about getting the right people in a room to visually map out a risk and turn vague worries into a clear plan with specific controls. When you follow the steps, you end up with a diagram that everyone from the front line to the boardroom can understand.
This works best as a collaborative workshop. You need the people who do the work day-in and day-out, like operators and maintenance crews. Get them in the same room as your engineers and safety professionals. This mix of hands-on experience and technical knowledge uncovers the real-world threats and what works to stop them.
Step 1: Identify a Significant Hazard
First, you need to pick a hazard to focus on. Don't waste time on minor stuff. Start with a significant hazard, something with the potential for serious consequences. This could be a major piece of equipment, a high-risk process, or a hazardous chemical.
On a construction site, your hazard might be 'working at height on scaffolding'. In a factory, it could be the 'operation of a high-pressure hydraulic press'. The goal is to be specific.
Step 2: Define the Top Event
Next, you need to pinpoint the Top Event. This is the moment when you lose control over the hazard. Think of it as the knot in the center of your bowtie diagram. It's not the cause, and it's not the consequence, it's the incident itself.
- For the 'working at height' hazard, the top event is a 'person falling from the scaffold'.
- For the 'hydraulic press' hazard, it's an 'uncontrolled release of stored energy'.
Getting this right is crucial. If your top event is too broad ("an accident happens") or mixed up with a cause ("a person falls because a rail was missing"), the rest of your bowtie will be incorrect.
Step 3: Brainstorm Potential Threats
Now, look at the left-hand side of the bowtie. This is where you brainstorm all the credible Threats that could directly trigger your top event. Get your workshop team thinking: "What are all the things that could cause a person to fall from this scaffold?"
You'll likely come up with a list like this:
- An improperly secured plank dislodges.
- Sudden strong winds make the scaffold unstable.
- A worker trips over tools or materials on the platform.
- A guardrail gives way because it’s corroded.
Each of these is a distinct pathway to failure. The idea is to capture all the plausible scenarios.
This image gives a high-level view of how these steps all connect. 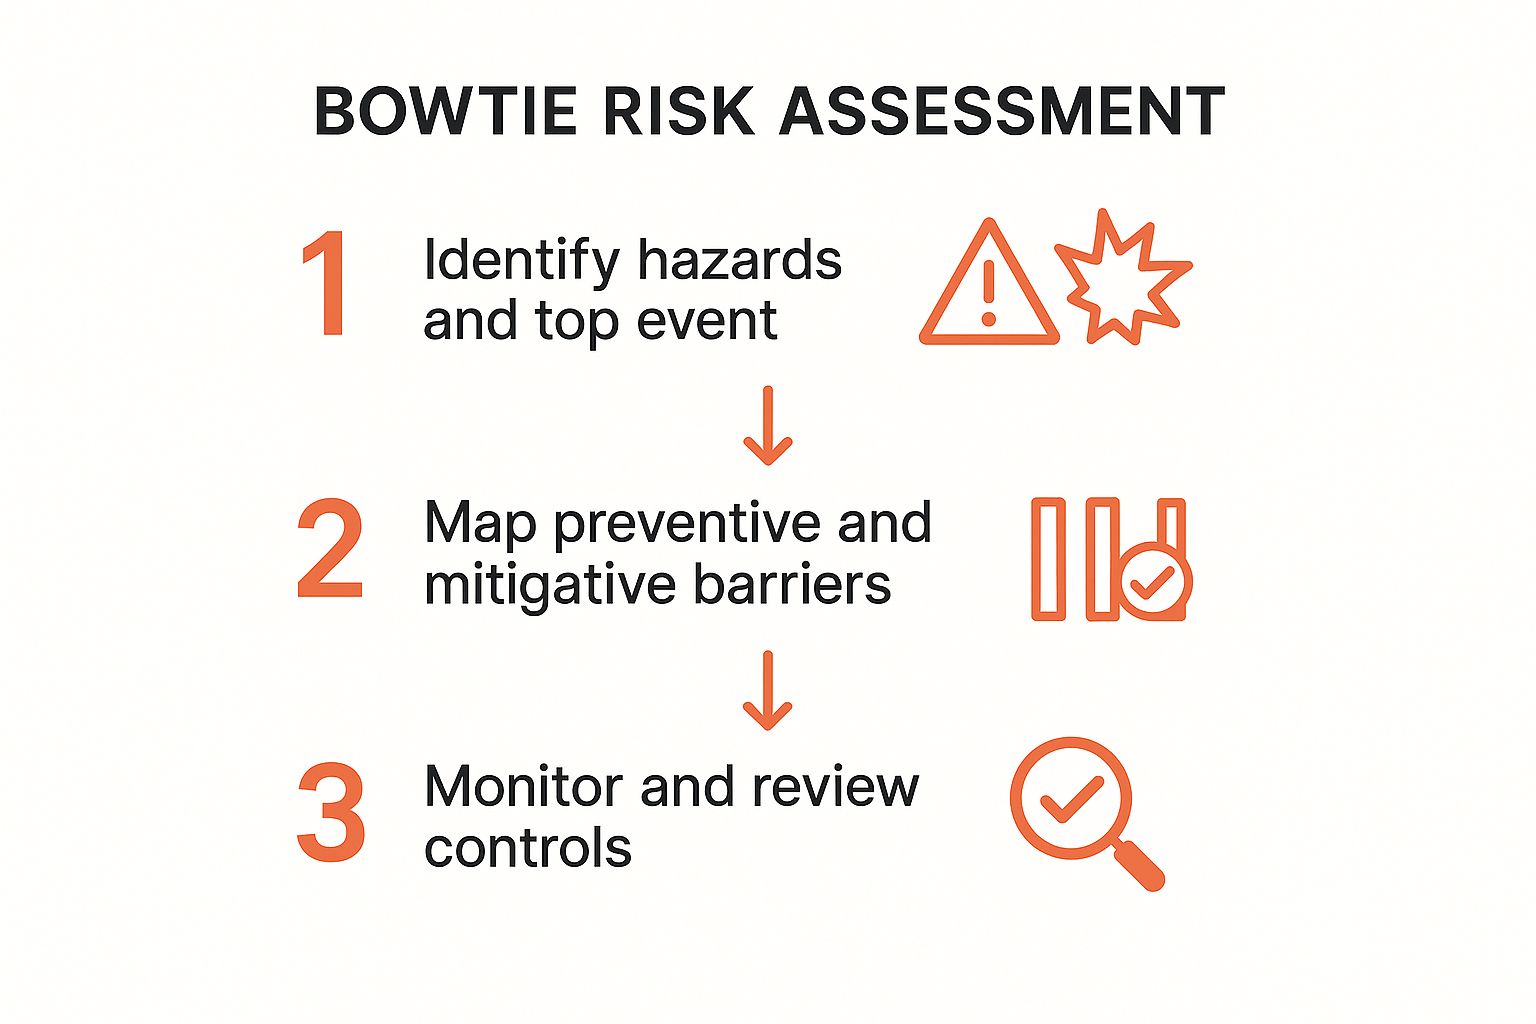 You can see how identifying that central risk leads to mapping out the controls needed to manage it from both sides.
Step 4: Identify and Place Preventive Barriers
For every threat you've listed, you now need to identify the Preventive Barriers. These are your first lines of defense, the controls you have in place to stop a threat from reaching the top event.
A barrier has to be a specific, active control. "Being careful" is a wish, not a barrier. A "certified pre-use scaffold inspection checklist" is a real barrier.
For the threat of an 'improperly secured plank', a solid preventive barrier is ensuring the 'scaffold is built and signed off by a competent scaffolder'. For 'tripping over tools', a barrier is 'strict housekeeping procedures and regular platform checks'. You draw these barriers on the lines connecting your threats to the top event.
Step 5: Brainstorm Potential Consequences
With the left side done, it’s time to move to the right side of the bowtie and think about the Consequences. If the top event does happen (the person falls), what are the possible outcomes?
You might list things like:
- Fatal or serious injury to the fallen worker.
- Injury to another person working below.
- Damage to equipment or materials on the ground.
- Major work stoppages and project delays.
Step 6: Identify and Place Recovery Barriers
Just like you did with threats, you now need to identify Recovery Barriers for each consequence. These controls don’t stop the fall, but they kick in immediately after to reduce the severity of the outcome.
For the consequence of a 'fatal or serious injury', your recovery barriers are critical:
- Use of a personal fall arrest system (like a harness and lanyard correctly anchored).
- Installation of safety nets below the work area.
- A well-rehearsed emergency rescue plan with trained first aiders on standby.
These barriers are your last chance to prevent a bad situation from becoming a catastrophic one.
Step 7: Analyse Barrier Weaknesses
Finally, it's time for a reality check. Look at every barrier you've put on the diagram and ask, "What could make this fail?" These weaknesses are called Escalation Factors.
For example, your 'scaffold inspection' barrier is great, but it can fail if the inspector is poorly trained or rushed. A 'fall arrest harness' is a great recovery barrier, but it’s useless if it's damaged, worn incorrectly, or attached to a weak anchor point. Identifying these escalation factors takes your bowtie from a simple diagram to a useful risk management tool. It shows you where you need to strengthen your defenses.
Practical Benefits of the Bowtie Method
How does the bowtie method actually help in managing workplace risks? Its biggest advantage is bringing clarity to complex situations. Operational risks are laid out in a simple, logical diagram that everyone gets, from the team on the tools to senior leaders.
This visual clarity is great for communication. Instead of making your team read dense reports or complex spreadsheets, you can use a bowtie diagram in a toolbox talk. It shows people exactly which threats their safety controls are designed to stop, answering the "why" behind the rules. It connects a specific procedure, like a daily pre-start check, directly to preventing a major event.
Prioritising Your Resources
One of the toughest challenges is figuring out where to spend limited time and money. The bowtie method helps you prioritize resources where they’ll have the most impact.
When you can see that a single preventive barrier is holding back multiple high-consequence threats, it becomes obvious that keeping it strong is a top priority. This approach pulls resource allocation away from guesswork and steers it toward targeted investment in the controls that matter.
The bowtie risk assessment method makes the invisible pathways of failure visible. It shows how different causes, controls, and consequences are interconnected, giving you a clear map of what you need to defend against and how.
This level of precision is valuable, especially in high-risk industries like mining, chemicals, and oil and gas. In Australia, case studies have shown how the bowtie method improves risk identification far beyond what a simple numeric risk management matrix can offer.
Improving Hazard Awareness and Compliance
The visual nature of a bowtie assessment improves hazard awareness across the workforce. It’s not just a paperwork exercise; it changes how people see risk.
For instance, one Australian mining company found that after rolling out bowtie analysis, their near-miss reporting went up by about 25%. This wasn’t because more things were going wrong. It was because their teams had a clear picture of the risk pathways and were better at spotting when a critical control wasn't performing as it should.
This awareness leads to better operational discipline and stronger compliance. Bowtie diagrams are perfect for demonstrating how you’re meeting standards like AS/NZS ISO 31000:2018. They clearly document how risks are managed and how control effectiveness is verified over time, which is what auditors want to see. You can dig into the specifics in this paper on bowtie methodology in practice.
Common Mistakes in Bowtie Analysis
Creating a bowtie diagram looks straightforward. But a few common mistakes can turn a useful risk management tool into just another confusing document.
Knowing these problems ahead of time is key. It helps you build a bowtie that’s clear, accurate, and genuinely useful for making decisions on the factory floor or a construction site.
Getting the Top Event Wrong
One of the most frequent mistakes is messing up the Top Event. Teams either make it too broad, like "workplace injury," or too specific, like "a worker slips on a patch of oil."
A good top event is the exact moment you lose control. For instance, instead of the vague "injury," a much better top event would be "uncontrolled release of high-pressure fluid." That’s the specific incident that could lead to an injury.
Confusing Threats and Consequences
Another common trap is mixing up your threats and consequences. A threat is what causes the top event, while a consequence is what happens after it.
Think of it like this:
- Incorrect: Listing "worker injury" as a threat. An injury is an outcome, not a cause.
- Correct: Identifying a "faulty pressure gauge" as a threat. This could lead to the top event of "over-pressurisation," which then results in the consequence of a "worker injury."
Keeping this distinction sharp is fundamental to building a logical bowtie.
Listing Controls That Aren’t Independent Barriers
This mistake can undermine the whole point of the exercise. A barrier has to be a specific, independent control that can stop a risk pathway by itself. Vague ideas like "worker awareness" or "being careful" don't count.
A true barrier is a concrete measure, not a general concept. For example, a "hard-wired pressure relief valve" is an effective, independent barrier. A "procedure to monitor pressure" is also a barrier, but it’s a separate one.
If you just list "good supervision" as a control, what does that actually mean? A real barrier would be a "documented supervisory check every two hours." Be specific.
Make sure every barrier you list is distinct. If two controls are just parts of the same system, you risk creating a false sense of security.
Forgetting About Escalation Factors
This is a critical oversight: failing to properly analyse your Escalation Factors. These are the hidden conditions that can make your planned barriers fail when you need them most.
Your bowtie might look solid, but if your barriers have weaknesses you haven't accounted for, you're still exposed.
For instance, a fire suppression system is an excellent recovery barrier. But what could cause it to fail?
- Poor maintenance leading to clogged sprinkler heads.
- Inadequate water pressure in the system.
- An employee accidentally shutting off the main valve.
These escalation factors are the "risks to your risks." Identifying them makes your analysis a robust, real-world safety plan. It forces you to ask if your controls will actually hold up under pressure.
Frequently Asked Questions About Bowtie Risk Assessment
Even with a grasp of the bowtie method, practical questions pop up when teams start using it. Here are some of the most common ones we hear from clients in manufacturing, construction, and other high-risk sectors.
How Is a Bowtie Different From a Risk Matrix?
A traditional risk matrix is a good starting point. It’s a quick way to rank risks by their likelihood and consequence, often using a color-coded system to show what needs attention first. It tells you how big a problem is.
But that’s where it stops. The simplicity of a matrix is also its biggest weakness, it doesn't tell you why something is a risk.
A bowtie diagram, on the other hand, tells the entire story. It gives you a visual map of the specific causes (the threats) that could lead to an incident, and the specific outcomes (the consequences) that might follow. It shows you exactly where your safety controls (barriers) fit into that story, linking them directly to the threats they prevent or the consequences they reduce.
Think of it like this: a risk matrix gives you a single score for a risk. A bowtie gives you a detailed roadmap showing every path leading to and from that risk, and exactly where all your roadblocks are placed.
How Often Should Bowtie Diagrams Be Reviewed?
A bowtie diagram is a living document, not a "set and forget" exercise. It needs to reflect reality on the ground. As a rule of thumb, you should formally review your bowties at least annually.
However, some events should trigger an immediate review. You'll want to get the team together right away if:
- You have a significant incident or a serious near-miss. This is your chance to see if a barrier failed, or if you missed a threat or cause.
- A major change happens on site. This could be new equipment, a change in process, or new people in key roles. Any change can introduce new threats or make old barriers less effective.
- An audit flags a problem. Findings from audits often point to weaknesses in your controls that need to be updated on the diagram.
Who Should Be Involved in a Bowtie Workshop?
The quality of your bowtie is only as good as the people in the room who build it. If a manager or safety advisor creates it alone in an office, it’s guaranteed to be inaccurate.
To get it right, you need a mix of hands-on experience and technical oversight. Your workshop team should always include:
- Frontline workers: The operators and maintenance crews who do the job every day. They know the real-world shortcuts and the challenges that never make it into a procedure manual.
- Supervisors: They’re the link between the plans made in the office and the work done on the floor. They see how procedures are actually followed.
- Technical experts: This could be an engineer or another specialist who understands the design, limits, and failure points of the equipment or process.
- A facilitator: You need someone who knows the bowtie method. Their job is to guide the conversation, challenge assumptions, and keep the team focused on building a useful diagram.
Can Bowties Be Used for Non-Safety Risks?
Yes. The bowtie method might have its roots in high-hazard industries, but its logic is universal. It’s a useful tool for understanding any kind of operational or business risk.
You could use a bowtie to analyse things like:
- Financial risks: Using a “major project budget overrun” as the top event.
- Environmental risks: With an “illegal discharge of contaminants” as the top event.
- Reputational risks: With “negative national media coverage” as the top event.
The structure of identifying threats, consequences, and the barriers between them works just as well. If you have more general questions about risk management, you can also check out some of the answers on our FAQ page.
Ready to move beyond spreadsheets and build a robust, visual safety system? Safety Space is an all-in-one platform that makes it easy to manage complex risks, track barrier effectiveness, and simplify compliance. See how it works with a free demo.
Ready to Transform Your Safety Management?
Discover how Safety Space can help you build a safer, more compliant workplace with our comprehensive safety management platform.
Book a Free DemoRelated Topics
Safety Space Features
Explore all the AI-powered features that make Safety Space the complete workplace safety solution.
Articles & Resources
Explore our complete collection of workplace safety articles, tools, and resources.