
A good risk management program template is a useful tool. It gives you a solid framework to build on, saving you from the headache of starting with a blank page. It's a structured document designed for the real-world pressures of busy construction sites and manufacturing floors, one that helps you move past confusing spreadsheets and lost paperwork.
Your Starting Point: A Practical Program Template
Trying to manage workplace health and safety without a clear system is a recipe for disaster. Important tasks get missed, hazards are overlooked, and accountability becomes impossible to track. A well-designed risk management program template is your first step toward bringing order to this chaos.
It provides a logical structure for identifying, assessing, and controlling the risks that are specific to your operations.
This isn't just about ticking a compliance box. A practical template acts as a guide, prompting you to think about parts of your work environment you might otherwise ignore. It’s built to be customised, whether you're overseeing a huge residential build or a multi-site manufacturing operation. The goal is to create a living document that your team actually uses, not a file that gathers digital dust on a server.
Why a Template Is a Necessary Tool
Starting with a template saves a massive amount of time and prevents critical oversights right from the start. Instead of trying to invent a process from scratch, you begin with a field-tested foundation that covers the essentials of any effective safety program. This frees you up to focus on what really matters: the unique risks present on your specific site.
The value of this structured approach is being recognized across the board. In Australia, the risk management market hit USD 270 million in 2024 and is tipped to climb to USD 782.48 million by 2033. This growth shows a clear shift towards more formalized risk programs, driven by everything from new technology to increasing cyber threats.
A risk management program is only effective if it's used. The best templates are simple, logical, and easy for supervisors and workers to understand and apply during their daily tasks.
Getting the Basics Right From the Start
A solid template gives you the essential sections you need to build out your program, ensuring you cover all your bases without making things overly complicated.
To give you an idea of how structured documents can be applied to specific operational tasks, take a look at a security patrol checklist template. It breaks a complex job down into simple, repeatable actions, and that's exactly what a good program template should do for your overall risk management.
Here's a breakdown of the key components you'll find in our downloadable template and why they matter.
Key Components in Your Risk Management Template
| Template Section | What It Covers | Your First Action |
|---|---|---|
| Scope and Objectives | Defines what the program covers: specific sites, processes, machinery, and personnel. | List all the operational areas this program will apply to. Be specific. |
| Roles and Responsibilities | Assigns clear ownership for risk management tasks to individuals, from management to site supervisors. | Name the key people responsible for safety and define their specific duties. |
| Risk Identification Methods | Outlines the processes you'll use to find hazards, such as site inspections, incident reports, and team consultations. | Schedule your first round of site walk-throughs and toolbox talks to gather input. |
| Assessment & Prioritisation | A framework for evaluating the likelihood and consequence of identified risks to see what needs attention first. | Use a simple risk matrix (like a 3x3 or 5x5 grid) to start rating your known hazards. |
By having these sections predefined, you create a consistent approach across your entire organization. This structure is the foundation of an effective risk management system, which moves you beyond just having documents to actively managing safety day in and day out.
Okay, that template you’ve downloaded? Think of it as a starting point, not the finished product. The real value is in how you adapt it to fit your specific site. This isn't just about ticking boxes; it's about creating a living document that actually reflects the reality of your operations.
Let’s be honest, the risks on a high-rise construction site in Perth are worlds away from those in a food processing plant in regional Victoria. One is dealing with working at heights and structural loads; the other is focused on contamination control and machinery hygiene. Your program has to capture those differences to be useful.
Nail Down Your Scope
First things first, you need to draw some clear lines. What exactly is this program covering? Being vague here is a classic mistake that makes everything that follows nearly impossible to implement.
Start with the physical boundaries. Is it for the entire manufacturing facility or just a single production line? For a construction project, are we talking just the main site, or does it also include the laydown yards and temporary access roads?
Then, think about the processes. Your scope needs to cover all the core activities, from receiving raw materials right through to final product dispatch or project handover. And don't forget supporting activities like maintenance, cleaning, and subcontractor operations.
For a construction site, your scope might look something like this:
- Physical Areas: The entire fenced-off project site, including multi-level structures, crane operation zones, and material storage areas.
- Core Processes: Excavation, concrete pouring, steel erection, electrical fit-out, and facade installation.
- Support Processes: Daily pre-start meetings, high-risk work permits, and managing delivery vehicles.
Identify What Makes Your Site's Risks Unique
With your scope locked in, it's time to get into the risks that exist within it. This is about moving beyond obvious things like slips and falls. You need to get specific and look at the unique conditions of your site that could lead to someone getting hurt.
Think about the interplay between your people, gear, materials, and the work environment. A food processing plant might pinpoint a serious risk of allergen cross-contamination, a hazard that wouldn't even be on the radar for a building site. Likewise, a construction project right next to a busy public road has traffic management risks that a secluded factory simply doesn't face.
The real goal here is to shift from a generic list of "construction risks" to a specific list of "risks on this project". For instance, instead of just "falls from height," a specific risk would be "fall of a worker during installation of roof trusses on Block B due to unsecured edge protection."
Don't forget to brainstorm some of these less obvious categories:
- Supply Chain Risks: What happens if a key supplier delivers faulty materials or just doesn't deliver at all? A recent study found that 61% of companies have experienced a data breach caused by a third-party vendor, which shows how connected these risks really are.
- Process Bottlenecks: Where do jobs pile up? Overcrowded work areas or rushed timelines can create new, unforeseen hazards.
- Adjacent Activities: How does the work one team is doing affect another? A classic construction example is welders working above painters, creating a fire and fume hazard.
- Environmental Factors: Think about noise, dust, lighting, and weather. A dusty manufacturing process could create long-term respiratory risks, while the extreme heat on a WA construction site introduces immediate risks of dehydration and heat stress.
Assign Clear Roles and Responsibilities
A risk management program with no clear owners is doomed to fail. Every single task, from doing an inspection to approving a high-risk permit, needs to have a name next to it. Any ambiguity just leads to inaction, because everyone assumes someone else is handling it.
Your template needs a dedicated section for roles and responsibilities. And don't just list job titles, get specific about the risk management duties for each one. This builds real accountability and makes sure nothing falls through the cracks.
Here’s a practical breakdown you can adapt for your site:
| Role | Key Risk Management Responsibilities |
|---|---|
| Project/Plant Manager | Provides resources for the program, signs off on major risk assessments, and leads investigations for serious incidents. |
| Site Supervisor | Conducts daily site inspections, leads toolbox talks on specific hazards, and ensures control measures are in place and working. |
| H&S Coordinator | Manages program documents, tracks the completion of corrective actions, and provides safety advice to teams on the ground. |
| Subcontractor Coordinator | Vets subcontractor safety paperwork, ensures their workers are inducted properly, and monitors their compliance on site. |
| Workers | Follows the agreed-upon procedures, reports hazards and incidents immediately, and actively participates in risk consultations. |
This kind of detailed assignment is what makes the risk management program template a functioning part of your day-to-day operations. It turns the document from a policy statement into a clear action plan everyone can understand. Once you’ve customized these three areas (scope, risks, and roles) you’ll have a program that genuinely fits your workplace and actively helps keep your people safe.
Assessing and Prioritising Your Onsite Risks
Once you've got a solid list of site-specific risks, the real work begins: figuring out which ones demand your immediate attention. Not all risks are created equal. Trying to tackle everything at once is a classic mistake and a sure way to get bogged down and achieve nothing.
The key is to have a simple, repeatable method for sorting the major threats from the minor annoyances.
This is where a risk assessment matrix really proves its worth. It’s a straightforward tool, included in your risk management program template, that helps you objectively score risks based on two simple factors: their likelihood and their potential consequence. This process turns a long, intimidating list into a clear, prioritized action plan.
Understanding Likelihood and Consequence
For the matrix to work, everyone on your team needs to be on the same page about what the scoring terms actually mean in the real world. Vague definitions will only lead to inconsistent and unreliable assessments.
Here’s a simple breakdown:
- Likelihood: This is just how probable it is that an incident will happen. You can use a simple scale like "Rare," "Possible," or "Likely."
- Consequence: This is the level of harm or damage that would result if the incident did occur. A common scale is "Minor," "Moderate," or "Major."
For example, on a manufacturing floor, a small chemical spill from a securely stored drum might be "Rare" and have a "Minor" consequence (requiring a simple clean-up). In contrast, a structural failure on a busy construction site is also "Rare," but its consequence would be "Major," involving serious injuries or even fatalities.
This flow chart shows the simple but critical process of defining the project scope, identifying key hazards, and assigning clear responsibility. These are the foundational steps you need to nail before you can even think about assessing and prioritising.
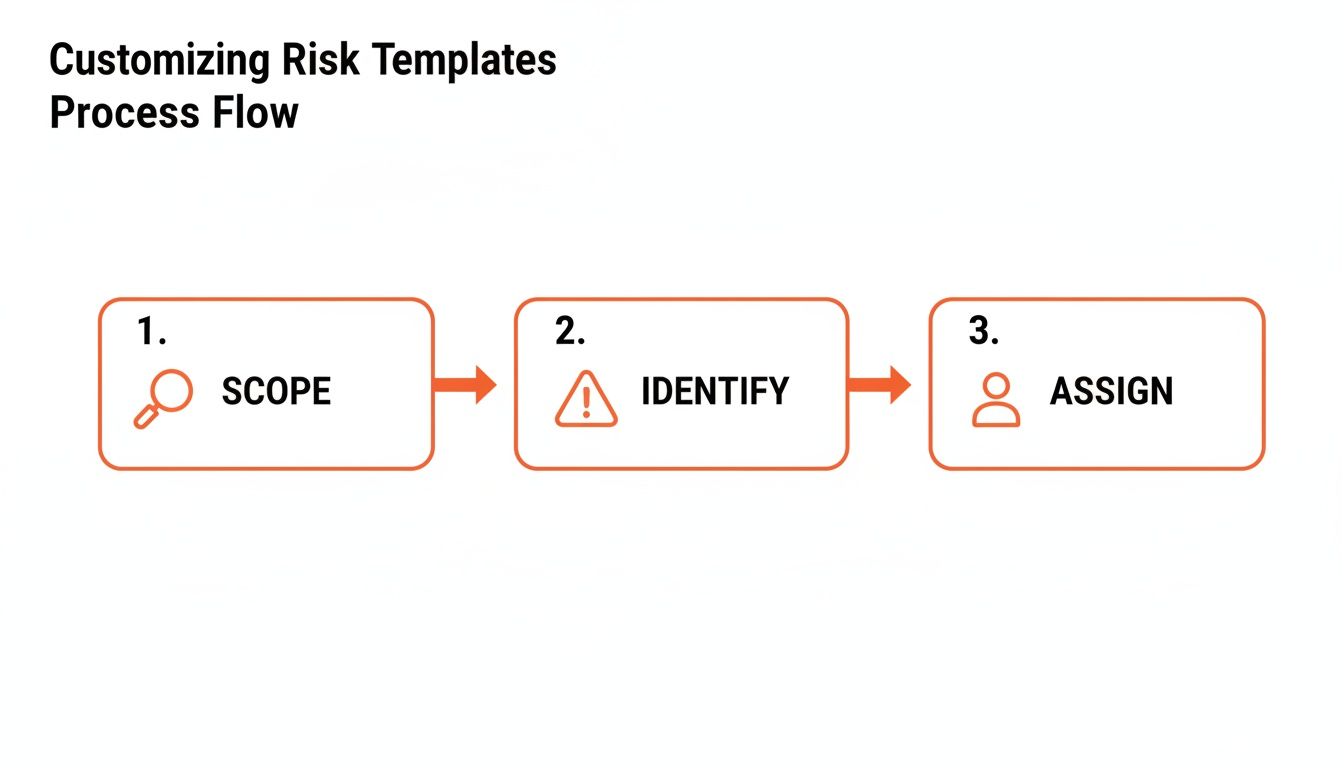
Getting this part right ensures that when you start prioritising, you're working with a clearly defined set of risks and owners. It makes the entire assessment far more accurate and, most importantly, actionable.
Using the Risk Matrix to Prioritise
Your template includes a simple grid where you can plot these risks. By combining the likelihood and consequence scores, you get a risk rating, which is often categorised as low, medium, or high.
This visual approach is incredibly powerful. It immediately shows you where your focus needs to be. Any risks that land in the "high" category (typically color-coded red) are your non-negotiables. These are the hazards that require immediate action and robust control measures, no questions asked.
For a deeper dive into building and using these grids, you can explore our detailed guide on the risk management matrix and see some more complex examples.
Here’s what a simplified version from your template might look like, populated with a few real-world examples from a construction site.
Simplified Risk Rating Matrix Example
This table helps you quickly map out your identified risks and see which ones need your immediate attention.
| Likelihood | Consequence (Minor) | Consequence (Moderate) | Consequence (Major) |
|---|---|---|---|
| Likely | Medium: Worker trips over loose cable | High: Unsecured materials fall from a lower level | High: Repeated exposure to loud noise without hearing protection |
| Possible | Low: Minor cut from handling rebar | Medium: Sprain from manual handling of cement bags | High: Vehicle collision in a congested laydown area |
| Rare | Low: Office paper cut | Medium: Allergic reaction to onsite dust | High: Crane failure during a critical lift |
As you can see, even a rare event like a crane failure shoots straight to the top of the priority list because its consequences are so severe.
From Assessment to Action Plan
Once you’ve rated your risks, the final and most crucial step is to document these findings and create a prioritized action plan right within your template. This isn't just about ticking boxes; it's the bridge between identifying a problem and actually fixing it.
For each high-priority risk, you need to clearly outline:
- The proposed control measures to reduce the risk.
- The person responsible for implementing those controls.
- A clear deadline for when the controls must be in place.
Your risk assessment is not complete until you have a documented plan to address the most significant findings. A matrix full of "high" risks with no corresponding actions is just a list of problems, not a management plan.
This documented plan becomes your roadmap for tangible safety improvements. It allows you to allocate your resources, time, money, and people, to the areas where they will have the greatest impact. It ensures the most critical hazards on your construction site or manufacturing floor get the attention they deserve, making your workplace demonstrably safer.
Developing and Implementing Control Measures
Once you've identified and prioritized your risks, it’s time to put your plan into action. This is where your risk management program template stops being a planning document and becomes an active tool for keeping people safe on site. It’s all about developing practical, real-world control measures for your high-priority risks and making sure they're actually put in place.
The goal here is to move past simply listing problems. Instead, you need to document specific, workable solutions that genuinely reduce the chance of an incident happening, or at least minimize its impact. This is the heart of any safety program that actually works.
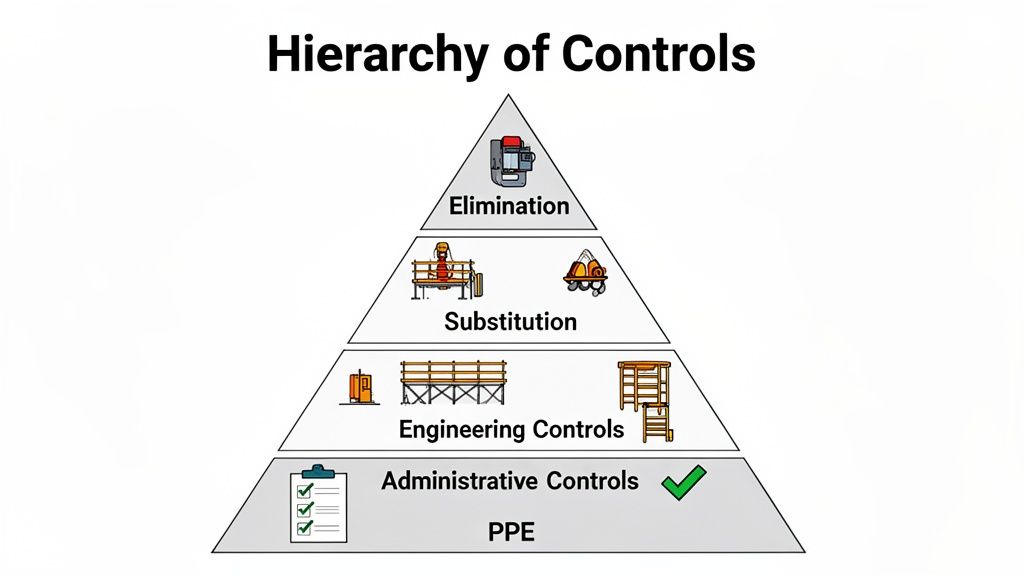
Using the Hierarchy of Controls in the Real World
We've all seen the pyramid. The hierarchy of controls is a framework that ranks risk treatments from most effective to least effective. But don't just memorize the levels, think of it as a practical guide for brainstorming solutions. Your template needs a dedicated spot to document the chosen control for each significant risk.
Let's break down the hierarchy with some concrete examples you’d actually see in construction and manufacturing.
- Elimination (Most Effective): Get rid of the hazard completely. Instead of workers climbing onto a roof to install anchor points, could the design be changed so all necessary equipment is pre-installed on the ground before the structure is lifted into place?
- Substitution: Swap the hazardous thing for a safer one. A classic manufacturing example is switching out a toxic, solvent-based adhesive for a much less hazardous water-based version. Simple, but effective.
- Engineering Controls: These are physical changes to the workplace itself. Rather than just telling workers to "be careful," you install fixed guarding on machinery to prevent access to moving parts. Or you use scaffolding that comes with pre-installed guardrails from the supplier.
- Administrative Controls: This is about changing how people work through procedures, training, or signage. It could be developing a specific Safe Work Method Statement (SWMS) for a high-risk task or implementing a solid lock-out, tag-out procedure for machine maintenance.
- Personal Protective Equipment (PPE) (Least Effective): This is your last line of defence, not your first. We're talking hard hats, safety glasses, and high-vis vests. PPE is essential, of course, but it should never be your only control measure for a serious risk.
For more information, our guide on control measures for risks unpacks this with more detailed strategies.
Managing Subcontractor Compliance
One of the biggest headaches on any busy construction site or large factory is getting subcontractors to follow your safety rules. It's not enough to just email them a copy of your program and hope for the best. You need to build your controls and compliance checks directly into how you manage them.
Start right from the contract. Make safety requirements a clear, non-negotiable part of the agreement. Specify that they must comply with your site's risk management program and any specific procedures for the high-risk work they'll be doing.
Then, during their site induction, don't just get a signature. Walk their supervisors through the key risks and control measures that are relevant to their work. Show them the physical controls you have in place, like designated walkways or exclusion zones, and explain the administrative controls, like your permit-to-work system.
Building Controls into Your Supply Chain
It's not just about the people on site; your entire supply chain can introduce risks. Recent data is revealing: while 82% of Australian business leaders now have a security risk management plan, an alarming 70% fail to properly vet their key suppliers. That gap is a massive liability in our industries, where a faulty component or unreliable service can lead to catastrophic failures.
To close this gap, you need to build checks into your procurement process:
- Ask for safety data sheets for any chemicals they plan to bring on site.
- Verify that any equipment they provide has a current maintenance record and is fit for purpose.
- For critical suppliers, don't be afraid to ask for a copy of their own risk management program.
This level of scrutiny means you're managing risks before they even arrive at your front gate. It's a practical step that makes your entire safety system more robust.
A control measure written down in a template is just an idea. A control measure that is physically in place, understood by workers, and regularly checked is what actually prevents people from getting hurt. Verification is non-negotiable.
Documenting and Communicating Your Controls
Once you've settled on the best control measures, they need to be documented clearly in your risk management program template. For every single high-priority risk, list the specific controls you're going to implement.
And be precise. Don't just write "use guarding." Write "Install fixed interlocked guarding on the main press to Australian Standard AS 4024." This leaves zero room for misinterpretation.
Communicating these controls is just as critical as developing them. Use toolbox talks, pre-start meetings, and visual aids around the site to make sure every single person, from the apprentice to the supervisor, knows the procedures for their tasks. A plan that's well-communicated is a plan that actually gets followed.
Keeping Your Risk Management Program Effective
A risk management program isn't a document you create once, tick a box, and file away. For it to be a useful tool that genuinely protects your team, it has to be a living document that reflects the reality of your worksite.
If your program is gathering dust in a folder somewhere, it's not working.
The key is building a simple, practical review cycle to keep it relevant. This isn't about creating more paperwork. It’s about ensuring the plan you rely on to keep people safe actually matches the risks they face every single day.
Setting a Practical Review Schedule
You don’t need a complicated schedule, just a consistent one. A good rule of thumb is to conduct a full, formal review of the entire program at least once a year. Book it in the calendar like any other critical operational meeting.
But an annual review is just the baseline. The real value comes from treating the program as something that needs to be checked more often, driven by what’s actually happening on the ground.
You need clear triggers that prompt an immediate review, no matter when the last one was. These events signal that your risk profile has changed, and your program has to adapt.
Look out for these key triggers:
- After any serious incident or near-miss: This is your most obvious and critical trigger. The review needs to find what failed and how the program must be updated to stop it from happening again.
- When introducing new machinery or substances: A new press on the factory floor or a different chemical used for site cleaning introduces new, unassessed risks. Time to update the plan.
- Significant changes to work processes or site layout: If you reconfigure a production line or change the traffic flow on a construction site, your existing risk assessments might be completely invalid.
- Following an update to WHS legislation: Compliance is non-negotiable. Legislative changes often require direct updates to your procedures and controls, so a review is essential.
Using Data to Measure Performance
So, how do you know if your program is actually effective? You need to look at the data your site generates every day. This information provides the hard evidence of what’s working and what isn’t.
Start by systematically collecting and analysing information from a few key sources:
- Site Inspection Reports: Are you seeing the same recurring issues? If the same hazards are being flagged week after week, it’s a clear sign that the control measures in your program are failing in practice.
- Incident and Near-Miss Reports: Look into these for trends. Are you seeing a cluster of similar incidents in one area or during a specific shift? This data points directly to weaknesses in your program.
- Worker Feedback: Your team on the ground often has the best insight. Use toolbox talks and team meetings to ask direct questions about what is and isn't working. They'll tell you what's really going on.
This data-driven approach is mirrored in national programs that assess risk management maturity. For instance, the Comcover Risk Management Benchmarking Program, which guides many Australian organizations, relies heavily on analysing internal and external data to spot trends and adapt. As you can learn more about their findings, this regular review of performance is essential for making real improvements.
A risk management program template filled with outdated information is worse than having no program at all. It creates a false sense of security while real risks on site go unmanaged.
By setting up a clear review cycle and using real-world data, your program becomes a dynamic and genuinely useful tool. It will adapt as your operations change, ensuring it accurately reflects the day-to-day challenges and helps you manage them effectively. This is where digital platforms like Safety Space make a huge difference, centralizing all this data to make your reviews faster, easier, and far more accurate.
Common Questions About Risk Program Templates
We get a lot of questions about creating and using risk management program templates. Let's tackle some of the most common ones that come up for professionals in construction and manufacturing.
How Often Should I Update My Program?
Think of your program as a living document, not a file you create once and forget about. A full review once a year is a good baseline, but you absolutely need to update it immediately after certain events.
These triggers are non-negotiable:
- After a serious incident or a near-miss that could have easily been a lot worse.
- Anytime you bring in new machinery, equipment, or hazardous substances.
- If you make a major change to a work process, like reconfiguring a whole production line.
- Following any updates to Work Health and Safety (WHS) legislation that impacts your operations.
This is where a digital platform really helps. Making these updates is so much faster when all your data is current and in one place, instead of digging through old paperwork.
What Is the Biggest Mistake People Make?
Hands down, the most common mistake is the "fill and forget" approach. This is when a manager downloads a template, plugs in some basic details, files it away on a server, and never looks at it again. That completely misses the point.
A risk management program template isn’t just about ticking a compliance box. It’s a practical tool meant for daily use on the ground.
To avoid this trap, weave the program into your everyday operations. Talk about it in your regular meetings, site inductions, and toolbox talks. Make sure your supervisors and team leaders know exactly where to find it and how to use it to guide their decisions.
How Do I Get My Team to Actually Follow the Program?
Getting buy-in from your crew and subcontractors really boils down to two things: involvement and clarity.
First, get your workers and supervisors in on the action when you’re identifying risks and deciding on controls. They’re the ones on the tools every day, so they often have the best insights into the real hazards. When people help build the plan, they take ownership and are far more likely to follow it.
Second, keep it simple. Don't bury the program in a 100-page manual no one will ever read.
Use visual aids, simple checklists, and straightforward instructions, especially for high-risk tasks. For your subcontractors, build compliance right into the contract. Make it a requirement for them to review the relevant sections of your program during their induction, and then do regular checks to see they’re sticking to the agreed safety procedures.
A well-managed program doesn't just keep your site safe, it keeps your whole operation running smoothly. At Safety Space, we built a digital platform that lets you build, manage, and track your entire risk program in real time, turning your template from a static document into a dynamic safety tool. See how it works by visiting https://safetyspace.co.
Ready to Transform Your Safety Management?
Discover how Safety Space can help you implement the strategies discussed in this article.
Explore Safety Space FeaturesRelated Topics
Safety Space Features
Explore all the AI-powered features that make Safety Space the complete workplace safety solution.
Articles & Resources
Explore our complete collection of workplace safety articles, tools, and resources.