
A Job Safety Analysis (JSA), often called a Job Safety Assessment, is a practical way to break down a job into its core steps. For each of those steps, you pinpoint what could go wrong, the potential hazards, and then decide on the control measures to stop an accident from happening. It’s practical safety planning, especially for those jobs that don't have a standard procedure.
The Role of a JSA on Your Work Site
On any Australian construction or manufacturing site, the JSA is a core document. Think of it like planning a road trip. Before you even start the car, you map out your route, check for road closures, and look for any potential delays. You do this to avoid getting stuck or ending up somewhere dangerous. A JSA applies that same forward-thinking logic to a work task.
It’s not just another piece of paperwork to be filed away. A good JSA is a hands-on planning tool used right before the work starts. It's particularly important for non-routine jobs where a standard operating procedure might not exist, forcing the team to stop and think about the task in front of them.
Who Creates a JSA?
Usually, the supervisor or team leader overseeing the work is responsible for getting the JSA done. But the best ones are always a team effort. The crew who will actually be on the tools should be involved.
This collaboration is important for a few simple reasons:
- Practical Insights: The workers doing the job have hands-on experience. They know the little quirks and hidden dangers that a supervisor might not see from the sidelines.
- Clear Communication: When the whole team is involved, everyone understands the risks and agrees on the safety controls before work begins. No confusion, no second-guessing.
- Shared Ownership: People are far more likely to follow a plan they helped create. It becomes their plan, not just a document handed down from above.
The goal is to create something that’s genuinely useful and relevant for that specific job, on that specific day.
Why a JSA Is More Than Just Compliance
While a JSA definitely helps you meet your legal duty of care, its real power is in stopping incidents before they happen. In Australia's high-risk industries, that proactive mindset is everything. The construction sector, for example, had a fatality rate of 3.4 per 100,000 workers in 2023, part of a national total of 200 work-related fatalities that year. A good JSA directly tackles the specific risks that contribute to these numbers, turning safety from a vague concept into a series of clear, actionable steps.
A JSA transforms safety from a reactive measure into a deliberate planning process. It’s about asking "what could go wrong here?" and answering that question with a solid plan before anyone picks up a tool.
For anyone looking to dive deeper into systematic frameworks for managing these kinds of risks, this practical guide to risk management offers some great insights into established methods. This is the kind of structured thinking that sits at the very heart of an effective JSA process.
The Three Core Parts of an Effective JSA
A Job Safety Analysis isn't a complex, bureaucratic document. At its heart, it’s a simple, logical process built on three core pillars. Think of it as a basic formula for thinking through a job safely, whether you're changing a tyre or operating a crane.
Get these three parts right, and you’ve got a JSA that’s genuinely useful on-site, not just another piece of paper to be filed away.
This flowchart maps out the simple, logical flow from figuring out the job to putting the right controls in place.
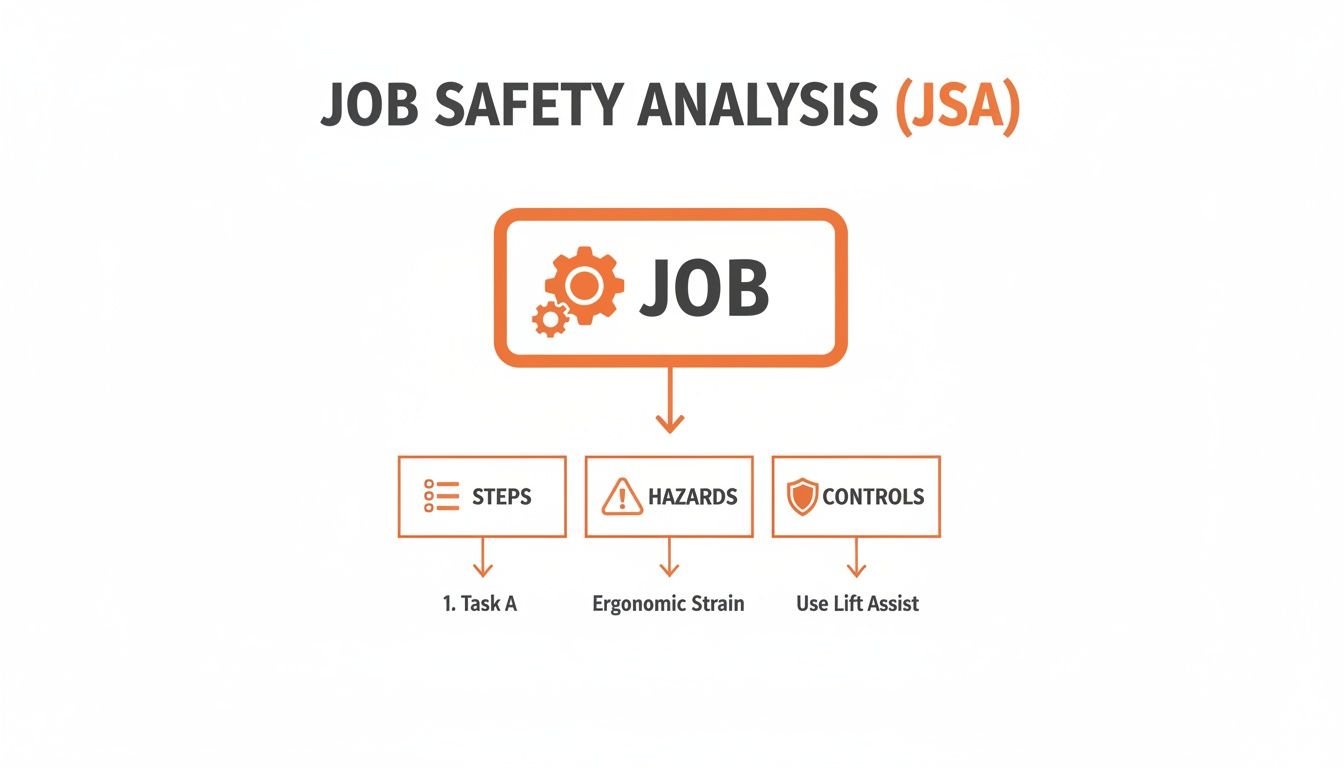
It really is that straightforward. Each part builds on the last, creating a complete and practical safety plan.
1. Task Steps
First things first, you need to break the job down into a sequence of steps. List every action in the order it happens, from start to finish. The key here is to be specific but not so detailed that you get lost.
For instance, if the job is "cutting timber with a circular saw," you don't need to list "pick up the pencil" and "draw a line." Keep the steps broad enough to be meaningful.
A good breakdown might look something like this:
- Step 1: Set up the work area and inspect the saw.
- Step 2: Position and secure the timber.
- Step 3: Make the cut using the circular saw.
- Step 4: Power down the saw and clean up the work area.
This sequence gives you a clear framework to work with. If you miss a step or get them out of order, you’ll end up with dangerous gaps in your safety plan.
2. Potential Hazards
Once you've mapped out the steps, it’s time to identify the potential hazards for each one. This isn't a theoretical exercise; it requires practical, on-the-ground thinking. For every single step, you need to ask, "What could realistically go wrong here?"
This is where the experience of your crew is gold. They’re the ones who know the little things that can trip you up.
Let's stick with our circular saw example:
- For "Set up the work area," a hazard could be tripping over an extension cord or discovering the saw's safety guard is busted.
- For "Position the timber," you might trap your fingers between the timber and the workbench.
- For "Make the cut," the obvious hazards are kickback, airborne sawdust, or blade contact.
Pinpointing these specific dangers at each stage is the absolute core of a JSA. It’s especially critical in industries like construction, where simple tasks can have devastating consequences. Safe Work Australia data shows falls, slips, and trips alone caused 29 worker deaths in 2023 and led to 30,300 serious compensation claims. That’s a stark reminder of why this matters. You can dig into more of these stats in a recent Safe Work Australia update.
3. Control Measures
The final piece of the puzzle is defining the control measures. These are the practical, concrete actions you’ll take to either eliminate a hazard or, at the very least, reduce its risk. For every single hazard you’ve listed, you must have a matching control.
Vague instructions like "be careful" are completely useless here. Controls need to be specific and actionable. A great way to approach this is by using the hierarchy of controls as your guide, always starting with the most effective options.
The best controls are the ones that get rid of the hazard completely (Elimination) or swap it for something safer (Substitution). If you can't do that, move down the list to engineering controls, then admin actions, and use Personal Protective Equipment (PPE) only as the last line of defence.
To wrap up our example, here’s how some practical controls would look:
- Hazard: Tripping over extension cords.
- Control: Run the cord overhead or, better yet, use a cordless saw (Elimination/Substitution).
- Hazard: Kickback from the saw.
- Control: Ensure the riving knife is in place and the timber is properly supported on both sides (Engineering).
- Hazard: Airborne sawdust.
- Control: Use a saw with a dust extraction port hooked up to a vacuum, and wear safety glasses and a P2 mask (Engineering/PPE).
By clearly defining these three parts—the steps, the hazards, and the controls—you create a logical and genuinely useful document that helps everyone work safely.
To show how this all comes together, here’s a simplified JSA for that same task.
Example JSA for Operating a Circular Saw
| Task Step | Potential Hazard | Control Measure |
|---|---|---|
| 1. Set up work area and inspect saw | • Tripping over extension cord • Damaged saw guard or blade | • Use a cordless saw or run cord overhead • Conduct pre-start check; remove faulty saw from service |
| 2. Position and secure timber | • Fingers trapped between timber and bench • Unstable timber moving during cut | • Keep hands clear when positioning • Secure timber firmly with clamps |
| 3. Make the cut | • Saw kickback • Blade contact with body • Airborne dust and debris | • Ensure riving knife is fitted; maintain firm grip • Keep both hands on the saw; never remove guards • Wear safety glasses and a P2 mask; use dust extraction |
| 4. Power down and clean up | • Saw left running unattended • Cuts from sharp offcuts | • Disconnect power before leaving the saw • Wear cut-resistant gloves when handling waste |
As you can see, it’s not about writing a novel. It's about clear, simple instructions that directly address the real-world risks of the job.
JSA vs SWMS vs JSEA: Understanding the Difference
In the world of workplace safety, acronyms get thrown around a lot. JSA, SWMS, and JSEA are three of the most common, and while they might sound interchangeable, they serve very different purposes.
Getting the distinction right isn't just about paperwork; it's about choosing the right tool for the job and staying on the right side of the law.
Think of it this way: a JSA (Job Safety Analysis) is like your daily pre-drive check. You walk around the car, check the tyres, and adjust your mirrors. It’s a practical, on-the-spot risk assessment for a specific, immediate task.
What Is a JSEA?
A JSEA (Job Safety and Environmental Analysis) is a straightforward extension of the JSA. It follows the exact same logic: break a job into steps, identify what can go wrong, and list the controls to stop it from happening.
The only real difference is it adds one more question to the mix: "What could harm the environment?"
So, on top of asking what could hurt a person, a JSEA forces you to consider things like:
- Could a chemical spill get into a stormwater drain?
- Will excessive dust affect nearby homes or ecosystems?
- Are our noise levels going to disturb local wildlife or residents?
You'd reach for a JSEA when your work has a clear potential to impact the surrounding area, not just the people with boots on the ground.
What Is a SWMS?
A SWMS (Safe Work Method Statement) is a completely different beast. It’s a non-negotiable legal requirement in Australia for a specific list of activities known as ‘high-risk construction work’ (HRCW).
Unlike a JSA which is a best-practice tool for any job, a SWMS is a legally mandated document for high-stakes work. It’s not optional, and it’s far more detailed. Using a JSA instead of a SWMS for HRCW is a serious compliance breach.
To go back to our driving analogy, a SWMS is the detailed operations manual for driving a truck carrying dangerous goods. It doesn't just cover the basics; it spells out who is qualified to drive, what specific training they need, the exact emergency procedures for a spill, and the PPE required.
It’s a comprehensive plan, not just a quick checklist. If you want to dig deeper into the legal side of things, you can learn more about the difference between a JSA and SWMS in our dedicated article.
JSA vs SWMS vs JSEA at a Glance
Sometimes, seeing it all laid out makes the choice clearer. This table breaks down the core differences so you can quickly see which document fits your needs.
| Document | Primary Purpose | When It's Used | Legal Status in Australia |
|---|---|---|---|
| JSA | To identify and control hazards for any general work task. | Daily for routine and non-routine jobs that are not classified as high-risk construction work. | Best practice for meeting general duty of care. Not a direct substitute for a SWMS. |
| JSEA | To identify and control both safety and environmental hazards. | For any job that could impact the surrounding environment (e.g., fuel handling, earthworks near waterways). | Best practice, used when environmental risks are a factor. |
| SWMS | To document the management of risks for legally defined 'high-risk construction work' (HRCW). | Mandatory before any HRCW begins, such as work at heights, demolition, or near powerlines. | A specific legal requirement under Australian WHS Regulations. |
In short, use a JSA for your day-to-day risk management. Expand it to a JSEA if environmental factors are a concern. But if the job falls into the HRCW category, you must use a SWMS. They are not interchangeable.
Common Construction Hazards and Controls
It’s one thing to talk about hazards in theory, but a Job Safety Analysis only proves its worth when it gets applied to real-world situations on site. Let's break down some of the most common hazards you’ll find on construction and industrial sites and, more importantly, the practical controls you can put in place.
This isn't about ticking boxes on a generic list. It’s about learning to spot specific, dangerous scenarios before they happen and knowing exactly what to do about them.
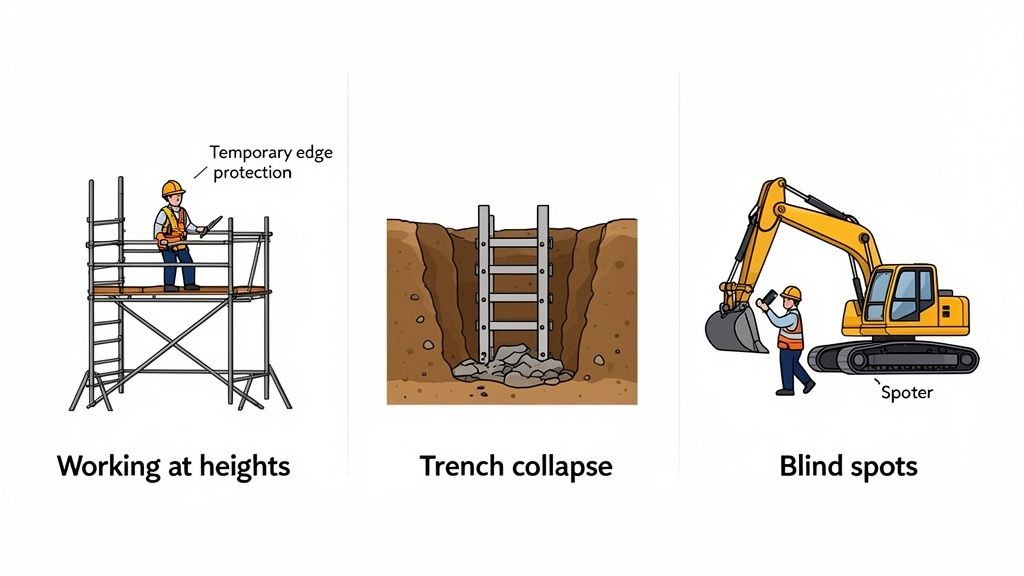
Working At Heights On Incomplete Structures
Working at height before permanent edge protection is installed is one of the most frequent and high-risk scenarios in construction. Think of an incomplete second storey, an open mezzanine, or the edge of an unprotected lift shaft.
The obvious hazard is a fall, which can happen in a split second from a simple slip, trip, or momentary lapse in concentration.
Actionable Control Measures:
- Install temporary edge protection: This is your first and best line of defence. Clamp-on guardrail systems or other rated temporary barriers create a physical separation between your crew and the fall hazard. It’s a classic engineering control.
- Use a fall restraint system: If guardrails aren't practical, a harness and lanyard fixed to a solid anchor point is the next best thing. The trick here is that the lanyard must be short enough to physically restrain the worker from ever reaching the unprotected edge.
- Establish "no-go" zones: Use high-visibility tape or barriers to clearly mark out areas within two metres of an unprotected edge. This simple administrative control keeps anyone who doesn’t absolutely need to be near the edge safely away from the danger zone.
Trench Collapse During Excavation
Excavation work is deceptively dangerous. A trench wall can collapse suddenly, without any warning, burying anyone inside under tonnes of soil. It happens fast, and survival is unlikely.
The hazards aren't just the collapse itself. Soil can become unstable from recent rain or even vibrations from nearby machinery. Workers can also be struck by tools or materials falling from the edge.
The risk of a fatality for workers in an unprotected trench is drastically higher than in almost any other construction task. Even a small collapse involves tonnes of soil, making this a critical hazard you have to get right.
Actionable Control Measures:
- Shoring or benching: Don't leave it to chance. Use hydraulic shoring, trench boxes, or other engineered support systems to brace the trench walls. In certain soil types, you might be able to use benching, which involves cutting the walls into a series of steps.
- Keep spoil piles back: That pile of excavated earth—the spoil—needs to be kept at least one metre back from the trench edge. The weight of the spoil itself can trigger a collapse.
- Provide safe access and egress: Always have a ladder or ramp positioned securely within the trench. When things go wrong, workers need a way to get out fast.
While our examples are construction-focused, the core principles of spotting and controlling major hazards apply everywhere. For a look at another high-risk industry, this guide to safety in forestry work shows how similar risk management challenges are tackled in a different environment.
Mobile Plant Blind Spots
Excavators, loaders, and dump trucks are the workhorses of any major site, but their massive blind spots create a huge risk for anyone on foot. Too many incidents happen when a machine reverses or turns and the operator simply doesn't see the person in their path.
The primary hazard is a collision, which almost always results in catastrophic crushing injuries.
Actionable Control Measures:
- Use a dedicated spotter: A trained spotter guiding the operator during reversing or tricky manoeuvres is a non-negotiable in busy areas. The spotter and operator must agree on clear hand signals and always maintain visual contact.
- Establish clear traffic management plans: Don’t let people and plant mix randomly. Designate separate walkways for pedestrians and roadways for machinery. Where they have to intersect, create clearly marked crossing points.
- Fit proximity sensors or cameras: Modern technology can be a lifesaver. Retrofit machinery with cameras and audible alarms that activate when a person or object is detected in a blind spot.
These examples show how a JSA moves you beyond just naming a hazard like "working at heights." It forces you to get specific about the situation and identify practical control measures for risks that will genuinely keep people safe on the job.
How to Avoid Common JSA Mistakes
Let’s be honest. Even with the best intentions, a Job Safety Analysis can end up as a useless piece of paper. The difference between a JSA that genuinely prevents injuries and one that just collects dust in the ute comes down to a few common pitfalls.
These mistakes turn a practical safety tool into a meaningless tick-and-flick exercise. The good news is they’re easy to fix. By focusing on clarity, collaboration, and what’s actually happening on the ground, you can make sure your JSAs are worth the paper they're written on.
Mistake 1: Being Too Vague
This is the number one killer of a useful JSA. Control measures like "be careful," "use common sense," or "wear PPE" are lazy, unhelpful, and dangerous. They offer zero specific direction and leave everything open to individual interpretation, the very thing a JSA is meant to prevent.
A control measure needs to be a clear, direct instruction that anyone on the crew can understand and follow, no matter their experience level. It’s about removing guesswork.
Do This Instead: Be specific and direct. Don't just write "Wear PPE." Spell out exactly what’s needed for the task. For example: "Wear cut-resistant gloves and safety glasses with side shields." Simple, clear, and non-negotiable.
Mistake 2: Not Involving the Right People
A JSA written by a supervisor in an office who hasn't been on the tools for years is guaranteed to miss the mark. The workers actually doing the job are the ones who know the real-world shortcuts, the tricky bits, and the hidden dangers that never show up on a standard checklist.
When you exclude them from the process, you don’t just get a weaker document; you get a top-down order that the crew has no ownership of. And if they don't buy into it, they're far less likely to follow it.
Do This Instead:
- Make it a team effort. Always fill out the JSA with the workers who will be performing the job.
- Ask real questions. Ask them, "What's the trickiest part of this?" or "Have you ever seen anything go sideways doing this before?"
- Listen to what they say. Their insights are gold. They're what make a JSA reflect reality, not just theory.
Mistake 3: The "Tick and Flick" Exercise
We’ve all seen it. A pre-filled, generic JSA gets passed around for signatures two minutes before the job starts. No one reads it, no one discusses it, and it's treated purely as a paperwork exercise to keep the safety manager happy.
This completely defeats the purpose. A JSA is meant to be a live planning tool, not a historical document to be filed away. When it becomes a rushed formality, it offers zero safety benefit and creates a dangerous false sense of security.
Do This Instead: Treat the JSA as the first step of the job, not a hurdle. Hold a quick pre-start or toolbox talk to walk through it. Make sure everyone understands the steps, hazards, and controls before a single tool is picked up.
Mistake 4: Forgetting to Update It
A JSA is a snapshot in time. It's written for a specific job, under specific conditions, with a specific team and set of tools. The moment any of those things change, the JSA can become irrelevant or, even worse, dangerously misleading.
A few common changes that demand an immediate review include:
- Weather conditions: A dry, sunny site is a world away from a wet, windy one.
- New gear: Swapping to a different model of excavator could introduce new blind spots or operating risks.
- The unexpected: Hitting unforeseen rock during an excavation completely changes the risk profile.
Do This Instead: Make reviewing and updating the JSA a standard part of your workflow. If conditions change, stop the job, get the team together, and update the document. A JSA has to be a living document that adapts to what's really happening on site.
Putting Your JSAs to Work with Digital Tools
Let's be honest. Managing Job Safety Analyses with stacks of paper or clunky spreadsheets is a recipe for disaster. Paperwork gets lost, you can't read the handwriting, and trying to track who’s done what across multiple sites becomes a full-time job in itself. This old-school approach means supervisors have zero real-time oversight, leaving huge gaps in your safety process.
When a JSA is just another piece of paper floating around, it's almost impossible to know if it was even completed, let alone followed. For any operations manager trying to keep a site safe and compliant, that lack of visibility is a massive risk. The good news? Moving to a digital system plugs these holes for good.
Making JSAs Faster and More Reliable
Digital platforms are built from the ground up to make the JSA process dependable. Instead of chasing signatures and wrestling with filing cabinets, teams can complete, sign, and share JSAs directly from a phone or tablet, right there on the job site. No more lost forms, no more delays.
Here’s a quick look at how a digital tool like Safety Space makes a real difference:
- Real-Time Monitoring: Supervisors get an instant view of when a JSA is completed and signed off, for any team, on any site.
- AI-Assisted Completion: Smart features can suggest common hazards and controls, which not only speeds things up but also drives consistency.
- Instant Sharing: The second a JSA is finalised, it can be shared with the entire crew, making sure everyone is working from the same page.
- Digital Audit Trail: Every JSA is automatically logged, dated, and stored, creating a perfect, unbreakable audit trail for any compliance checks.

Having an organised dashboard like this gives you immediate insight into what's actually happening across all your projects, right now.
Gaining Control Over Your Safety Process
Bringing your JSAs online isn’t just about making life easier. It’s about gaining genuine control over your safety procedures and making sure they're actually being followed. When your safety documentation is digital, you can easily spot patterns, identify recurring hazards, and confirm that every team is doing its part to stay safe.
By taking JSAs out of filing cabinets and putting them onto a live platform, you turn a reactive paperwork exercise into a proactive safety tool. It connects the office to the site in a way that paper never could.
This approach is really the core of any modern safety system. You can explore more about what makes a great system with specialised health and safety compliance software that ties everything together. At the end of the day, using digital tools for your JSAs helps you protect your people and your business far more effectively.
Your Top JSA Questions, Answered
Even with the best planning, questions pop up on site all the time. Let's tackle some of the most common queries about Job Safety Analyses to help you get them right, every single time.
How Often Should a JSA Be Reviewed?
A JSA is a living document, not a "set and forget" piece of paper. It absolutely must be reviewed whenever the job changes, a new hazard appears, or after any incident or near miss. Think of it as a live snapshot of the work being done right now.
For routine tasks that happen day in, day out, a quick review at the start of each shift or during a toolbox talk is a great habit. It’s a simple way to keep safety front of mind, confirm nothing has changed, and make sure everyone is on the same page before a single tool is picked up.
Who Needs to Sign a JSA?
Simple: everyone directly involved in the task needs to review and sign the JSA. This means the workers doing the job and the supervisor in charge. A signature isn’t just a tick-box exercise; it's a personal commitment. It confirms that each person has read, understood, and agreed to follow the safety controls.
A signature on a JSA means "I get it, and I'll do it." It creates a clear record that the plan for a safe job was communicated and accepted by the entire team before work kicked off.
This is where digital systems make life so much easier. Electronic sign-offs give you an instant, time-stamped record that’s simple to track and audit. No more chasing down lost or coffee-stained paperwork.
Can One JSA Be Used for Multiple Days?
Yes, but with a big 'if'. A single JSA can cover a task that stretches over a few days, but only if the conditions and hazards stay exactly the same. For instance, a JSA for installing roof trusses might hold up for a few days of clear, calm weather.
The crucial part is that the crew must review the JSA at the start of each day to confirm nothing is different. If the weather turns and the wind picks up, or if a different crane arrives on site, work stops. The JSA has to be reviewed and updated immediately to account for the new risks.
Is a JSA Legally Required in Australia?
This is a common point of confusion. The term "JSA" itself isn't always explicitly named in Australian WHS legislation. However, the process it represents—identifying hazards, assessing risks, and putting controls in place—is a non-negotiable legal duty for every employer.
Where the law gets specific is with ‘high-risk construction work’ (HRCW). For any of these tasks, a Safe Work Method Statement (SWMS) is the legally mandatory document. Many organisations use a JSA as the practical, on-the-ground tool to meet their general duty of care and as the first step in gathering the information needed to build a compliant SWMS.
Ready to stop chasing paperwork and get real-time control over your safety processes? Safety Space replaces outdated paper forms and spreadsheets with a single, easy-to-use platform. See how you can simplify compliance and protect your team by booking a free demo.
Ready to Transform Your Safety Management?
Discover how Safety Space can help you implement the strategies discussed in this article.
Explore Safety Space FeaturesRelated Topics
Safety Space Features
Explore all the AI-powered features that make Safety Space the complete workplace safety solution.
Articles & Resources
Explore our complete collection of workplace safety articles, tools, and resources.