
A good WHS risk assessment template is more than just a document you file away. It's a hands-on tool that forms the foundation of a safe worksite. In high-risk industries like construction and manufacturing, it's the critical link between planning and on-the-ground safety, helping you stop serious incidents before they happen.
Why a Solid WHS Risk Assessment Template Matters
Think of a risk assessment as the safety blueprint for a job. The goal isn't to create more paperwork; it’s to build a systematic way of thinking through a task, figuring out what could go wrong, and deciding on practical steps to prevent it. In environments packed with heavy machinery, moving vehicles, and work at heights, overlooking a single hazard can lead to devastating consequences.
A structured template is your guide through this process, making sure no critical steps are missed. It forces you to look beyond the obvious dangers and consider every angle. Without that consistent format, your assessments can become patchy and inconsistent, leaving dangerous gaps in your safety planning.
The Real-World Impact of Ineffective Assessments
When risk assessments are treated as just a box-ticking exercise, the results can be tragic. The latest statistics show just how high the stakes are.
In Australia, 188 work-related fatal injuries were recorded in a single year. Machinery operators and drivers faced the highest fatality rates at 6.7 deaths per 100,000 workers, a figure more than five times the national average. Vehicle incidents were the leading cause, accounting for a staggering 42% of fatalities, followed by falls from height at 13%. These numbers are a harsh reminder of why precise, targeted WHS risk assessments are essential.
A well-executed risk assessment isn't about compliance for compliance's sake. It's a direct intervention that saves lives. That simple, structured pause to evaluate hazards before work starts is one of the most powerful tools we have for preventing workplace tragedies.
It's More Than Just Spotting Hazards
A strong template does more than just help you list potential dangers. It actively connects those hazards to actionable controls and creates a clear line of accountability for getting it done. A complete template helps you:
- Standardise the Process: Everyone on every site uses the same method. This makes your safety practices consistent and easier to manage across different projects and teams.
- Create a Record: It provides documented proof that you’ve identified risks and taken reasonable steps to control them. This is critical for legal and compliance purposes.
- Improve Communication: The finished document becomes a vital communication tool. It clearly shows workers the risks involved and the specific control measures they must follow to stay safe.
Even looking at how other industries handle risk can highlight the value of a structured approach. For instance, exploring a guide on SaaS risk management shows how these core principles apply universally. At the end of the day, a robust WHS risk assessment process is a core part of any effective health and safety management system.
Breaking Down the WHS Risk Assessment Template
A good WHS risk assessment template is a practical tool, not just another bit of paperwork. It’s designed to walk you through a logical process, making sure you’ve systematically thought about what could go wrong and what you’re going to do about it.
Let's pull apart the key sections you'll find on most templates and explain what they actually mean on the ground. Without a decent template, it's far too easy to miss a crucial step, leaving your team exposed to a risk you simply overlooked. Each field is there for a reason, to help you build a complete picture of the task's safety needs.
Key Sections of a WHS Risk Assessment Template Explained
Here’s a quick rundown of the main parts of a standard risk assessment template. Think of this as the anatomy of a solid safety plan.
| Template Section | What It Is For | Practical Example |
|---|---|---|
| Hazard Identification | Spotting anything with the potential to cause harm. This is your starting point. | "Unguarded rotating parts on the main conveyor belt" (not just "machinery"). |
| Risk Analysis (Scoring) | Evaluating how likely the hazard is to cause harm and how severe the outcome could be. | Calculating a risk score for a trip hazard (Likelihood x Consequence) to prioritise it. |
| Control Measures | Documenting the specific actions you'll take to eliminate or reduce the risk. | "Install heavy-duty cable covers over trailing leads." (not just "be careful"). |
| Responsibility & Due Date | Assigning a specific person to implement the control and setting a deadline. | "Workshop Supervisor to action by end of shift today." |
| Review & Monitoring | Checking that the controls are working and updating the assessment if things change. | A 3-monthly review of the assessment for high-risk tasks. |
This structure ensures you move from simply identifying a problem to actively managing and reviewing your solution, which is the whole point of the exercise.
Hazard Identification: The Starting Point
This is the first and most critical part of your assessment. Your job here is to list everything that has the potential to cause harm. You need to be specific and ditch the vague descriptions.
Think about the actual tasks being performed. For instance, in a manufacturing plant, a hazard isn’t just "machinery." It’s the "unguarded rotating parts on the conveyor belt" or the "high-pressure hydraulic lines near the main walkway." See the difference?
Here are a few more real-world examples:
- Physical: Trailing electrical leads across a workshop floor.
- Chemical: Unlabelled drums of cleaning solvent stored without proper bunding.
- Ergonomic: Repetitive manual lifting of 20kg boxes from floor level.
- Psychosocial: High workload demands with tight, unrealistic deadlines.
The key to good hazard identification is detail. "Chemical spill" is okay, but "Risk of spill from damaged 200-litre drum of corrosive acid stored next to a forklift route" is much, much better. It gives you a clear problem to solve.
Being precise at this stage makes the rest of the assessment ten times easier and more effective. You can't control a risk if you haven't clearly identified the source of the danger first.
Risk Analysis: Evaluating the Danger
Once you've listed your hazards, you need to analyse the risk that comes with each one. This boils down to two simple questions: how likely is it to happen (likelihood), and how bad would it be if it did (consequence)?
Most templates use a scoring system for this, often a risk matrix where you rate both likelihood and consequence on a scale of 1 to 5.
Likelihood is just a structured way of guessing the probability:
- Rare (1): Unlikely to ever happen.
- Unlikely (2): Could happen, but probably won't.
- Possible (3): Might happen at some point.
- Likely (4): Will probably happen.
- Almost Certain (5): Expected to happen.
Consequence measures the severity of injury or illness:
- Insignificant (1): First aid injury, no time off.
- Minor (2): Needs a doctor, maybe a day off.
- Moderate (3): Serious injury, hospitalisation, significant lost time.
- Major (4): Permanent disability or a life-altering injury.
- Catastrophic (5): Fatality.
Let's go back to our "trailing electrical leads." You might decide the likelihood of someone tripping is 'Likely' (4) because it's in a busy walkway. The consequence could be 'Moderate' (3), as a bad fall could easily result in a fracture. You multiply them (4 x 3) to get a risk score of 12. On most risk matrices, that’s a high-priority risk that needs immediate action.
Control Measures: Taking Action
This section is where you write down your game plan. It’s not enough to spot a hazard; you have to do something about it. The best way to tackle this is by using the hierarchy of controls, a framework that prioritises the most effective solutions first.
- Elimination: The best option. Can you get rid of the hazard completely? For our trailing leads, could you use a cordless tool instead?
- Substitution: Can you replace the hazard with something safer? This is common for chemicals, like swapping a toxic solvent for a non-toxic one.
- Engineering Controls: Can you physically change the workplace to isolate people from the hazard? For the leads, this would mean installing permanent power outlets closer to the work area or running cables through the ceiling.
- Administrative Controls: Can you change the way people work? This includes creating safe work procedures (SWPs), putting up warning signs, or marking out exclusion zones. For the leads, this might involve using highly visible cable covers and telling workers to stick to marked walkways.
- Personal Protective Equipment (PPE): This is your last line of defence. It protects the worker but does nothing to remove the hazard itself. It’s also not a relevant control for a trip hazard.
Your template must have space to list the chosen controls and, crucially, who is responsible for implementing them and by when. For our example, the control might be: "Action: Install heavy-duty cable covers over all leads. Person Responsible: Workshop Supervisor. Due Date: End of shift today." This creates clear accountability and makes follow-up easy.
How to Properly Identify Workplace Hazards

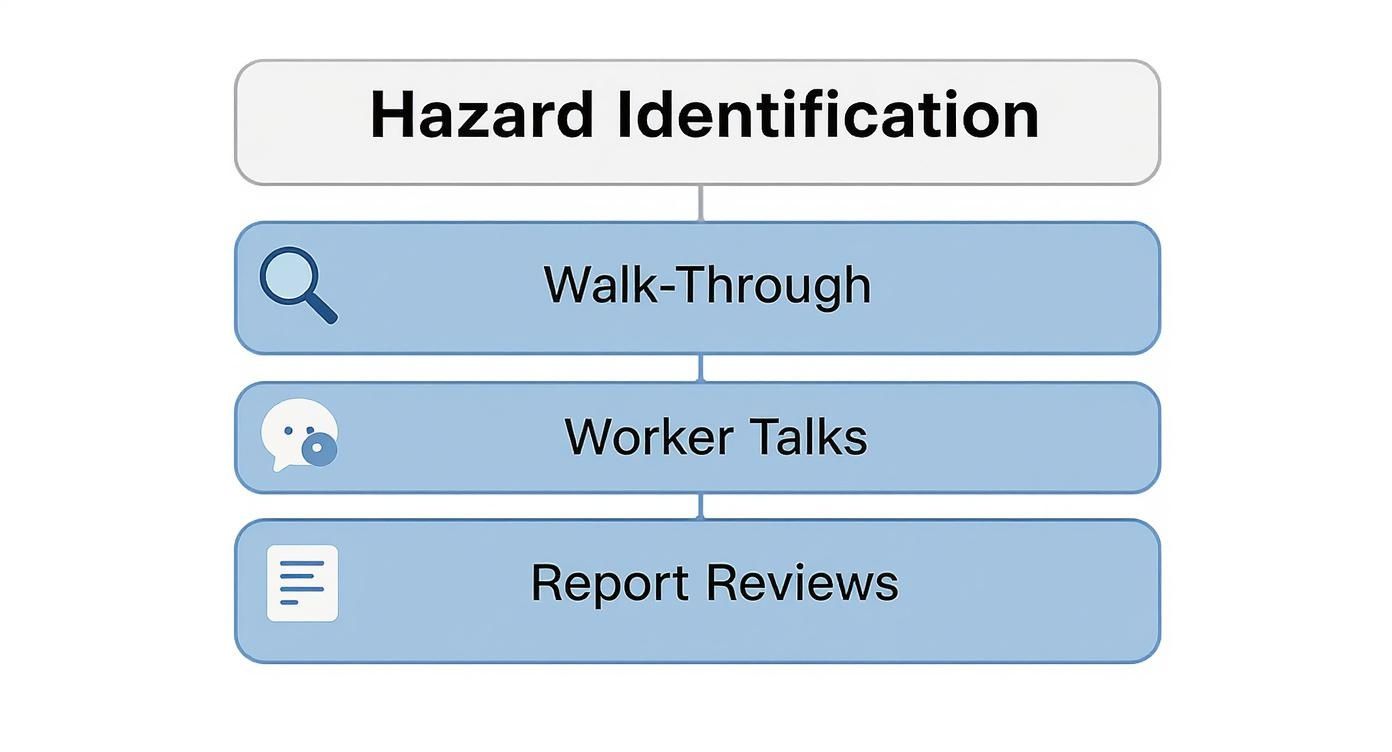
This is where the real work begins. Filling out your WHS risk assessment template is pointless if you don't get the first step right. Properly identifying hazards is more than just a quick glance around the workshop, it’s an active search for anything that could cause harm, especially the things people walk past every day.
To do this properly, you need to attack it from a few different angles. Relying on a single method is a sure way to miss something critical. A good assessment gathers information from the physical environment, the people actually doing the work, and your own incident history.
Conduct Work Area Walk-Throughs
A walk-through isn’t a casual stroll. It’s a systematic inspection where you are actively hunting for hazards. Get out to the specific area where the task is performed and, if you can, watch it in action.
You’re looking for the obvious and the not-so-obvious. A puddle of oil on the floor of a manufacturing plant is easy to spot. But what about the poor lighting above a stamping machine that could cause a worker to misjudge distances? That’s the kind of detail that matters.
To get the most out of your walk-throughs:
- Go at different times: The hazards present on a morning shift can be completely different from those on a night shift or during a maintenance shutdown.
- Bring a fresh pair of eyes: Ask someone who doesn't work in that area day-in, day-out to join you. They’ll notice things the regular team has become accustomed to.
- Look up, down, and all around: Hazards aren't always at eye level. Check for unstable racking above, trip hazards on the floor, and risks spilling over from adjacent work areas.
Talk to the Workers Doing the Job
The best source of information you have is the people who perform the task every single day. They know the shortcuts, the frustrations, and all the "near misses" that never make it into an official report. Trying to fill out a template from an office is a guaranteed way to miss the real risks.
Get out on the floor and have a real conversation. Ask open-ended questions that can’t be answered with a simple "yes" or "no."
Instead of, "Is this task safe?" try asking:
- "What's the most awkward or frustrating part of this job?"
- "Is there any part of this process that just feels unsafe, even if nothing has ever gone wrong?"
- "Have there been any close calls here that we should know about?"
- "What is it about this machine that worries you?"
This approach gets people talking. You might learn about an ergonomic risk for a welder who has to hold an awkward position for hours. Or you might discover a machine that only makes a deafening noise intermittently. These are the details that turn a generic assessment into a genuinely useful safety tool.
One of the biggest mistakes you can make is assuming you know a job better than the person who does it for 40 hours a week. Ask, listen, and take their concerns seriously. Their insights are invaluable.
Review Past Incident and Injury Reports
Your own records are a goldmine. Dig into any past incident reports, first aid logs, and workers' compensation claims related to the task or area you're assessing. You're looking for patterns.
Is the same minor injury popping up over and over? That’s a clear signal of an uncontrolled hazard. Near-miss reports are especially useful because they show you where a serious incident almost happened, giving you a chance to fix the problem before it causes real harm.
This data is also crucial for understanding broader trends. For instance, Australian work-related injury data shows huge differences based on location and age. Workers in very remote areas have 56% more serious injury claims, and older workers (65+) face a fatality rate of 4.3 per 100,000 workers, significantly higher than the national average. When you’re working through your WHS risk assessment template, this kind of data should prompt you to pay extra attention to those higher-risk situations.
By combining these three methods, walking the site, talking to your team, and reviewing your history, you build a complete and accurate picture of the hazards you face. This comprehensive approach is foundational to what is hazard identification and ensures the rest of your risk assessment is built on solid ground.
Putting Controls in Place That Actually Work
Spotting hazards and scoring risks is only half the job. A perfectly filled-out WHS risk assessment template is just a piece of paper if the controls you choose don't genuinely make the work safer. This is where you shift from thinking to doing, and it's the most critical part of stopping people from getting hurt.
The trick is to be systematic when choosing your controls, not just grabbing the easiest or cheapest fix. For this, we rely on the hierarchy of controls. It's the industry-standard playbook for a reason. It pushes you to pick the most effective and reliable solutions first.
Before you can control a hazard, you have to find it. Good information is everything.
This is a great reminder that you find the real risks by walking the floor, talking to your crew, and actually learning from what’s happened before.
Start at the Top: Elimination and Substitution
The best controls, without a doubt, are elimination and substitution. Why? Because they get rid of the hazard for good. It’s not always practical, but you have to ask the question first. Could we just stop doing this dangerous thing?
Elimination means you completely remove the hazard. A classic example is designing a process so you no longer need to manually lift heavy items, maybe you get materials delivered directly to the point of use on a pallet, cutting out the manual handling risk entirely.
Substitution is about swapping something dangerous for a safer alternative. Think about a workshop switching out a toxic, solvent-based cleaner for a non-toxic, water-based one. The job still gets done, but the chemical exposure risk is gone. Simple.
These top-tier controls are the gold standard because they don't rely on someone remembering to follow a rule or wear their gear. Once you've done it, the hazard is permanently out of the picture.
Using Engineering Controls to Isolate People from Harm
When you can't get rid of the hazard, the next best thing is to physically separate people from it. That's what engineering controls are all about. These are physical changes you make to the workplace, a machine, or the process itself.
Good engineering controls are the ones that work away in the background, protecting people without them even having to think about it. They are built-in safety.
A few real-world examples I see all the time:
- Installing fixed machine guarding around the moving parts of a conveyor belt or a press.
- Fitting a local exhaust ventilation (LEV) system right over a welding station to suck away the toxic fumes at the source.
- Bringing in mechanical lifting aids like a small crane or a hoist to handle heavy engine parts, taking the strain off your workers' backs.
- Building sound-dampening enclosures around noisy generators on a site to bring the noise level down for everyone else.
These fixes are incredibly effective because they're physically there, offering a constant buffer between the worker and the hazard. For some great insights into putting these ideas into practice, this guide on preventing electrical fires shows how engineering and administrative controls work together.
When You Can't Engineer It Out, Use Administrative Controls
Moving down the list, we get to administrative controls. These aren’t physical changes, but changes to the way people work. We're talking about the procedures, training, and systems you put in place to guide safer work.
The catch is that admin controls are less reliable because they depend entirely on people doing the right thing, every single time. Still, they are a crucial part of any solid safety system.
Administrative controls are your safe work procedures, your training sessions, and your warning signs. They are essential support players but should never be your only line of defence against a serious risk.
Common admin controls you'll see in any workplace include:
- Developing a Safe Work Procedure (SWP) for something like operating a forklift, which spells out the rules for speed, no-go zones, and load limits.
- Implementing lockout-tagout procedures to make sure a machine is de-energised before a mechanic puts their hands in it.
- Providing proper training on how to read a Safety Data Sheet (SDS) and handle hazardous chemicals correctly.
- Using signs and bright yellow line markings to create clear pedestrian walkways in a busy workshop.
It is absolutely essential that you document these controls in your WHS risk assessment template and make sure every single person involved knows them inside and out.
Your Last Line of Defence: Personal Protective Equipment (PPE)
Right at the bottom of the hierarchy, and for good reason, is Personal Protective Equipment (PPE). This is your gear, the hard hats, safety glasses, gloves, and respirators.
PPE is your last resort. It does nothing to change the hazard itself; it just puts a barrier between it and the worker. You should only rely on it when all the other, better controls aren't feasible, or as an extra layer of protection.
The big problem with PPE is that its effectiveness hinges on so many things going right. It has to be the right type for the job, fitted correctly, worn 100% of the time, and kept in good nick. If any one of those fails, the protection is zero. Our guide on control measures for risks explains how to layer all these controls properly so you're not just relying on PPE.
Of course, mandating safety glasses in a grinding bay or steel-toed boots on a construction site is non-negotiable. Just never forget that PPE is the final, fragile barrier, not the first tool you should reach for.
Common Mistakes When Using a Risk Assessment Template
Even with the best WHS risk assessment template on hand, it’s surprisingly easy to fall into traps that make the whole process pointless. A risk assessment isn't just about ticking boxes; it's a practical tool designed to stop people from getting hurt. When it's done poorly, it becomes a meaningless paper-pushing exercise that gives a false sense of security.
Knowing the common pitfalls is the first step toward dodging them. Most of these mistakes are simple to fix, but they’re the difference between an assessment that genuinely protects your team and one that’s not worth the paper it’s printed on.
Mistake 1: Being Too Generic
One of the most frequent errors I see is people writing vague, unhelpful controls. Statements like "use caution" or "be careful" are completely useless because they don’t tell anyone what to do. An effective assessment gives clear, specific instructions that leave no room for guesswork.
Let's look at an example.
- What Not to Do: "Be careful when using the ladder."
- What to Do Instead: "For any work above 2 metres, a mobile scaffold must be used. All workers must complete the 'Mobile Scaffold Competency' training before use."
See the difference? The second one is actionable. It sets a clear rule (use a scaffold), defines when it applies (above 2 metres), and includes a training requirement. Nobody has to guess what "being careful" looks like.
Mistake 2: Not Involving the Right People
A risk assessment completed by a manager in an office, without ever talking to the people who actually do the job, is almost guaranteed to miss critical hazards. It's the workers on the tools who know the real-world risks, the shortcuts people take, and the near misses that often go unreported.
Cutting them out of the process is a huge missed opportunity. Unfortunately, it's a common story. Studies show a widespread failure to include key people in assessment teams, which severely limits how accurate the hazard identification can be. You can get more insights on common WHS slip-ups from the team at excitesafety.com.au.
The fix is simple: make it a team effort.
- Who to Involve:
- The workers performing the task: They have the most valuable, on-the-ground insights. Period.
- A supervisor or team leader: They understand the workflow and are responsible for ensuring controls are actually put in place.
- A safety representative (if you have one): They can help guide the process and offer technical advice.
Your team on the tools will always know more about the real risks of a job than anyone else. Go to where the work is done, have a proper conversation, and actually listen to what they have to say.
Mistake 3: Treating It as a One-Time Task
Another classic blunder is treating the risk assessment as a "set and forget" document. Workplaces aren't static, things change constantly. A risk assessment that was perfectly fine six months ago might be dangerously out of date today.
This document is a living tool that needs to be pulled out and updated regularly. You can't just do it once, file it away, and hope for the best.
So, when should you review your risk assessment?
- Annually: At an absolute minimum, even if you think nothing has changed.
- After any incident or near miss: This is a massive red flag that something in your assessment isn't working.
- When a new process is introduced: New machinery, tools, or chemicals always bring new hazards.
- When a job changes significantly: If the steps involved in a task are altered, the risks will be, too.
Mistake 4: Failing to Follow Up on Controls
Coming up with a brilliant control measure is completely useless if nobody actually implements it. A completed WHS risk assessment template is a plan of action, not the action itself. The document has to clearly state who is responsible for putting each control in place and the deadline for getting it done.
Without clear accountability, things get forgotten. The supervisor needs to follow up and physically check that the agreed-upon controls are in place and working as intended. A simple check-in is all it takes to make sure the safety plan moves from paper into practice.
Got Questions About WHS Templates? We've Got Answers.
Let's cut through the noise. Here are some straight-up answers to the most common questions we hear about using a WHS risk assessment template. The idea is to give you quick, practical advice to clear up any confusion and help you get the job done right.
How Often Should We Review Our WHS Risk Assessments?
Officially, you should be reviewing your assessments at least once a year. But the real answer? You review them whenever something changes.
That means pulling it out when you bring in new machinery, change up a work process, or after any kind of incident or near miss. Think of your risk assessment as a living document, not a "set and forget" piece of paper you file away.
For high-risk jobs, like working in confined spaces or at heights, you'll want to review it far more often. Maybe quarterly, or even before each and every shift. The annual check-in is just the bare minimum if nothing else has changed.
Who Should Be Involved in Completing the Template?
This is non-negotiable: filling out a risk assessment has to be a team effort. You absolutely must include the people who actually do the work. They’re the ones who know the real, on-the-ground risks that a manager sitting in an office might never see. Their firsthand experience is gold.
Of course, a supervisor or manager needs to be involved to sign off on the control measures and make sure resources like time or new equipment are actually allocated. A safety officer can help guide things, but the assessment should never, ever be done by one person alone. Get out to the work area and fill it out with the team.
A risk assessment written without the input of the workers doing the job is a work of fiction. The best insights come from the people on the tools, not from behind a desk.
What Is the Difference Between a Hazard and a Risk?
This trips people up all the time, but the difference is actually pretty simple, and crucial.
- A hazard is anything with the potential to cause harm. Think of a wet floor, an unguarded machine, or a toxic chemical. They're all hazards.
- The risk is the likelihood of that hazard actually hurting someone, combined with how severe that harm could be.
Our template is structured to walk you through this exact process. It helps you move from just spotting the hazard (the wet floor) to properly managing the risk to people (the high chance of someone slipping and copping a moderate injury, like a fracture).
Stop wrestling with spreadsheets and paperwork. Safety Space is a simple, all-in-one platform that makes managing your health and safety straightforward. From real-time monitoring to completing a WHS risk assessment template on the go, we give you the tools to protect your people and your business. See how it works with a free demo and H&S consultation.
Ready to Transform Your Safety Management?
Discover how Safety Space can help you build a safer, more compliant workplace with our comprehensive safety management platform.
Book a Free DemoRelated Topics
Safety Space Features
Explore all the AI-powered features that make Safety Space the complete workplace safety solution.
Articles & Resources
Explore our complete collection of workplace safety articles, tools, and resources.