
An emergency response plan template is your starting point for building a clear, direct guide for when things go wrong on site. For a busy construction project or manufacturing floor, this isn't just about paperwork; it's a practical playbook that helps your team react quickly and correctly during a crisis.
What an Emergency Response Plan Actually Does
Picture a chemical spill in a factory or a structural issue on a building site. Without a plan, you get confusion and wasted time. With a solid plan, your team knows exactly who is in charge, how to communicate, and what steps to take immediately. This moves beyond simple compliance to focus on real-world readiness.
An emergency response plan (ERP) is a documented set of procedures to follow during and after a crisis. Its main goal is to reduce or prevent injury and property damage. It removes the guesswork by clearly defining roles, responsibilities, and actions for specific events.
The Practical Value of a Plan
A well-structured ERP template is one of the most useful tools for protecting your people, equipment, and operations. It provides a foundation you can build on, ensuring you cover all critical bases from the start.
So, what does an effective ERP actually do?
- It Defines Clear Roles: The plan specifies who becomes the incident commander, who handles communications, and who manages the scene. This prevents confusion when every second counts.
- It Establishes Communication Protocols: It outlines how to alert employees, contact emergency services, and keep everyone informed. A reliable system is crucial, especially on large or noisy sites.
- It Maps Out Actions: The template details procedures for specific scenarios, like evacuations for fires, shelter-in-place orders for severe weather, or lockdown protocols for security threats.
The core purpose of an emergency response plan is to provide straightforward instructions that can be followed under pressure. It turns chaos into a coordinated response, guided by pre-determined logic rather than on-the-spot guesswork.
More Than Just a Document
Let's be clear: an ERP is not a static file that sits on a shelf. It’s a key part of your overall safety management system, designed to be used, tested, and improved. A good emergency response plan template gives you a head start on creating this active system. It provides the framework, but it's your job to fill it with site-specific details, train your people, and practice the procedures.
Ultimately, the plan is about organising a predictable and effective response. It ensures that when an emergency happens, your team isn't figuring things out for the first time; they're following a script they already know.
This preparation is fundamental to managing workplace incidents. You can learn more by exploring the 9 key elements of a health and safety management system and how an ERP fits within that bigger picture.
Building Your Core Response Plan Template
An effective emergency response plan isn't a complicated, fifty-page beast. It’s a practical document that strips away confusion, giving your team clear, simple instructions to follow when the pressure is on. At its heart, a strong plan is built on a core template that answers the non-negotiables: who does what, how they talk to each other, and where they go.
Think of it like building the frame of a house. You need a solid structure before you can even think about walls or a roof. Let's walk through building that essential framework for your own emergency response plan template.
Defining Key Roles and Responsibilities
When an incident kicks off, hesitation is the enemy. The single most powerful thing you can do to prevent chaos is to assign key roles before anything happens. Everyone on site needs to know, without a shadow of a doubt, who is leading the response and what their specific job is.
You don't need a huge command structure, just a clear chain of command. Start by plugging these fundamental roles into your template:
- Incident Commander: This is your shot-caller, the person in charge of the entire response. They make the big decisions, direct resources, and are the central point of command until emergency services arrive and take the reins.
- Communications Lead: This person manages the flow of information, both inside and out. They're responsible for alerting employees, contacting emergency services, and keeping stakeholders in the loop.
- Scene Supervisor: Their job is to control the immediate area of the incident. Think of them as on-the-ground security, securing the scene, preventing unauthorised access, and making sure people stay clear of danger.
- Evacuation Wardens: For larger sites, these folks are absolutely critical. They guide people along evacuation routes, do a final sweep of their designated areas, and help anyone who needs assistance getting to the assembly point.
Make sure these roles are assigned to specific individuals, with backups clearly named in case someone is unavailable. The names and contact numbers for this entire team should be right at the front of your plan for instant access. No fumbling through pages in a crisis.
Establishing Clear Communication Protocols
How you communicate during a crisis can make or break your entire response. A plan that hinges on a single method, like email, is doomed to fail the second the power goes out. Your communication protocol has to be simple, reliable, and have multiple layers.
This visual breaks down the basic flow of a solid emergency communication strategy. It’s a loop: identify who needs to know, send the message, and then confirm it was actually received.
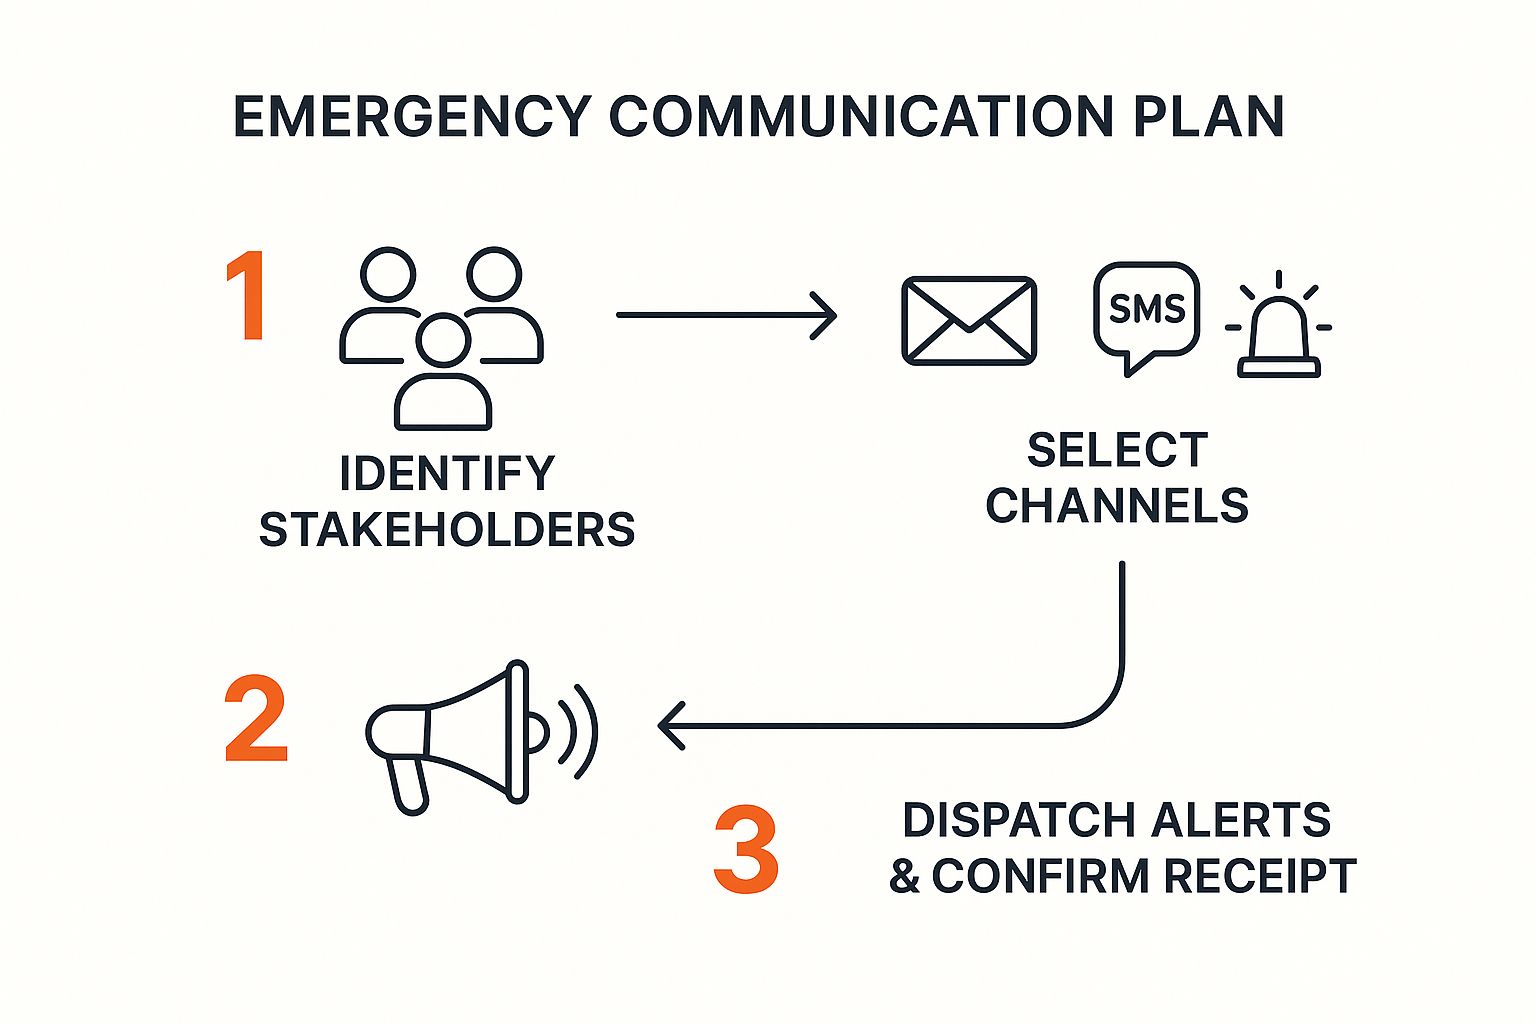
The key takeaway here is that a real plan isn't just about blasting out alerts. It's about getting the right information to the right people through channels that you know will work.
Your template needs to document several different alert methods.
- Primary Alert System: This is your big red button. It could be a site-wide alarm, a siren, or a mass notification system that pings every employee's phone with an SMS. It's your first move for immediate, widespread warnings.
- Secondary Methods: What’s plan B? You need backups. This could be two-way radios for your key response team, a simple phone tree for supervisors, or even designated runners to deliver messages in extremely noisy environments.
- External Communication: List the direct contact numbers for local emergency services like fire, police, and ambulance. Don't just write "Call 000." Have the direct line for the local station if possible, plus the numbers for your utility companies (gas, electricity, water).
A communication plan that hasn’t been tested is just a theory. When you run drills, make sure you actually practice using both your primary and backup systems. That’s the only way to find out what really works on your site.
Key Components for Your Response Plan
Here’s a quick look at the non-negotiable sections that must be in your emergency response plan template. These form the backbone of a document that’s actually useful when things go wrong.
| Component | What It Does | Information to Include |
|---|---|---|
| Response Team | Identifies the key people in charge during an emergency. | Names, roles (e.g., Incident Commander), contact numbers, and designated backups for each role. |
| Communication Plan | Outlines how information will be shared quickly and reliably. | Primary and secondary alert systems, contact list for emergency services, and media contact person. |
| Evacuation Routes | Provides clear, visual instructions for getting to safety. | Site maps with marked exits, primary and secondary evacuation routes, and location of emergency gear. |
| Assembly Points | Designates safe gathering locations for headcounts. | A primary and a backup assembly point, clearly marked on the site map and located away from danger. |
| Emergency Procedures | Gives simple, step-by-step actions for specific incidents. | Checklists for fire, medical emergencies, chemical spills, etc. Focus on immediate actions first. |
Getting these core components documented clearly is the first and most important step to building a response plan that your team can rely on.
Mapping Evacuation Routes and Assembly Points
Yelling "evacuate the building!" isn't a plan; it's an order that needs a plan to work. On a complex manufacturing floor or a sprawling construction site, clear routes and designated assembly points are the difference between chaos and an orderly evacuation.
Your emergency response plan template absolutely must include visuals.
- Site Maps: Use simple, easy-to-read maps of your facility. These should clearly mark all exits, primary and secondary evacuation routes, and the location of crucial gear like fire extinguishers and first aid stations.
- Assembly Points: Designate at least two assembly points: a primary one and a backup. Your main spot should be a safe distance from the building, in an open area clear of traffic. The backup is for when the primary point is unsafe or blocked.
- Headcount Procedures: Once people are gathered, you need a bulletproof way to account for everyone. The plan has to specify who is responsible for the headcount (usually supervisors or wardens) and how they report missing persons straight to the Incident Commander.
For example, a multi-level plant might have color-coded routes for different floors, all leading to one spot in the employee car park. A long construction site might have multiple assembly points along its length to stop workers from having to travel through hazardous zones. The goal is always to make the path to safety as short and simple as possible.
Documenting Core Emergency Procedures
Finally, your template needs specific, step-by-step procedures for the emergencies you're most likely to face. Keep the language direct and simple. Use checklists or bullet points, not long paragraphs, because they're far easier to follow under stress.
Start with the basics that apply almost anywhere.
- Fire: Procedures for hitting the alarm, using a fire extinguisher (for trained staff only), and getting everyone out.
- Medical Emergency: Steps for calling for help, providing immediate first aid, and guiding paramedics to the injured person.
- Hazardous Material Spill: Actions for containing the spill (if safe!), evacuating the area, and notifying specialized teams.
- Major Equipment Failure: Protocols for shutting down machinery, securing the area to prevent injuries, and notifying maintenance and management.
Each procedure should have an "Immediate Actions" list right at the top. For a chemical spill, it might be: 1) Alert nearby workers, 2) Move to a safe, upwind location, 3) Activate the spill alarm, 4) Notify the Incident Commander. These simple, numbered steps can be executed in seconds without anyone needing to read a detailed manual. This core set of procedures gives you a strong foundation you can build on later with more site-specific risks.
Tailoring Your Template to Your Actual Site Risks

A generic emergency response plan is a decent starting point, but that's all it is. It's like having a map of a city you've never been to. It shows the main roads but tells you nothing about the local traffic, random roadworks, or which neighborhoods to avoid. To be effective, your plan must match the real, tangible risks found at your specific workplace.
The only way to make that happen is with a thorough, site-specific risk assessment. This process is all about uncovering the unique hazards you face every day, from the specific machinery you operate to the chemicals you have stored out back. Only then can you build practical, effective response actions directly into your plan.
Moving From Generic to Specific
The first step is to walk your site with a critical eye. Sure, a generic template might have a section for "Fire," but a fire in your welding bay demands a completely different response than one in the chemical storage area. One might involve Class D fire extinguishers for combustible metals, while the other needs foam suppressants and a huge focus on containing toxic fumes.
You have to get that granular. Documenting every potential hazard is the foundation for turning a basic document into a life-saving tool that reflects the reality of your day-to-day operations.
Identifying Your Unique Site Hazards
Every worksite has its own risk profile. Start by listing the obvious things, then dig deeper. Don't just think about what could happen; focus on what is most likely to happen based on the work you do.
Here are a few key areas to analyze:
- Machinery and Equipment: What are the specific risks tied to your gear? Think about crush points on a press, entanglement hazards on a conveyor belt, or the potential for catastrophic failure in a high-pressure hydraulic system.
- Hazardous Materials: Make a list of every single chemical, solvent, fuel, and compressed gas on site. Go beyond a simple inventory. Note their specific dangers (flammable, corrosive, toxic) and exactly where they are stored.
- Work Processes: Analyze the tasks your team actually performs. Welding creates fire and fume hazards. Working at height introduces fall risks. Confined space entry brings its own set of dangers, like oxygen deficiency.
- Site Layout and Location: Look at external factors, too. Is your site prone to flooding? Are you located near other industrial facilities that could pose a threat? Could your main access route be easily blocked in an emergency?
A thorough risk assessment isn't a one-off task you tick a box for. It's an active, ongoing process of observation and analysis. The goal is to build a list of credible scenarios that your emergency plan must address head-on.
Analyzing Risks and Building Response Actions
Once you have your list of hazards, it’s time to analyze each one. For every risk you've identified, you need to develop a specific and actionable response procedure. This is where your generic template starts to become your plan.
For instance, your risk assessment flags a potential ammonia leak from a refrigeration unit. A generic plan just says, "evacuate." A properly tailored plan specifies the exact response:
- Immediate Action: Activate the ammonia leak alarm.
- Evacuation: Evacuate to the assembly point located upwind of the leak.
- Isolation: The trained response team will shut off specific valves (Valve A-3 and B-7) if it's safe to do so.
- Communication: The Communications Lead immediately notifies the local fire department's HAZMAT unit, giving the exact location and nature of the leak.
This level of detail is critical. It removes guesswork and gives your team clear, sequential instructions they can follow under immense stress. For a deeper dive into mapping out these cause-and-effect scenarios, understanding a Bowtie risk assessment provides a structured way to think about preventative controls and response actions.
Customizing Your Template With Specific Scenarios
Your goal should be to have a dedicated section or checklist in your ERP for each high-probability, high-consequence risk. Don't just link out to a separate document; build the core actions directly into the main plan so they're easy to find in a crisis.
Here’s a simple way to structure this information in your template:
| Scenario | Immediate Actions | Key Personnel Involved | External Contacts |
|---|---|---|---|
| Welding Fire (Bay 3) | 1. Activate manual pull station. 2. Use Class D extinguisher. 3. Evacuate immediate area. | Incident Commander, Scene Supervisor | Fire Department |
| Forklift Collision | 1. Secure the scene. 2. Provide immediate first aid. 3. Shut down involved equipment. | First Aiders, Scene Supervisor | Ambulance, Police |
| Chemical Spill (Acid) | 1. Alert workers in the zone. 2. Use spill kit to contain. 3. Evacuate to upwind location. | HAZMAT Team, Evacuation Wardens | HAZMAT Unit, EPA |
This table format makes the information scannable and easy to digest during an actual emergency. It connects a specific risk to a specific set of actions, roles, and contacts. By customising your template this way, you create a tool that is not just compliant, but genuinely useful for protecting your team when it really matters.
Making Your Plan Work with Training and Drills
An emergency response plan sitting in a folder is just paper. Its real value comes alive when your team knows it, trusts it, and can execute it without a second thought. This is where practical training and regular drills come into play. They’re how you turn a document into your crew's muscle memory.
Let's be honest, a plan is only a theory until it's tested. Regular practice is the only way to find out what actually works on your site, under pressure, when communication is patchy and every second counts. The goal is simple: make the response so familiar it becomes second nature.
Moving Beyond Toolbox Talks
Effective training isn't just another meeting or a quick toolbox talk. It has to be active, engaging, and directly tied to the specific roles people will play when things go wrong. A first aider needs a totally different skillset than an evacuation warden, and your training has to reflect that reality.
Start by breaking down the training based on the roles you've already defined in your plan.
- For Everyone: All employees need to know the absolute basics. This means recognizing different alarm signals, knowing the primary and secondary evacuation routes, and understanding where the assembly points are. This is non-negotiable, foundational knowledge.
- For the Response Team: Your incident commander, communications lead, and area wardens need more focused, scenario-based training. They should be practising decision-making, using equipment like two-way radios, and coordinating with external emergency services.
- For Specialized Roles: Your designated first aiders need regular refreshers on CPR and treating common workplace injuries. Fire wardens need hands-on practice with different types of extinguishers. Anyone on a spill response team needs to be completely comfortable suiting up and using containment kits.
This role-specific approach ensures that people aren't just aware of the plan; they're competent and confident in performing their specific duties.
Running Drills That Feel Real
The whole point of a drill is to simulate the pressure and chaos of a real event, but in a controlled way. You want to make it feel real enough to be a genuine test, without bringing daily operations to a complete standstill.
There are a few different types of drills you can run, each with its own purpose.
- Tabletop Exercises: These are low-impact, discussion-based sessions. Get your key response team in a room, give them a scenario (e.g., "A chemical spill has occurred in warehouse B"), and have them talk through the plan step-by-step. It’s a fantastic way to find gaps in your procedures without shutting down the entire site.
- Functional Drills: These are a bit more hands-on. A functional drill tests one specific part of your plan, like your communication system. You could, for instance, test your ability to send a mass SMS alert to all staff and see how long it takes for everyone to acknowledge it.
- Full-Scale Drills: This is the big one, simulating a real emergency as closely as possible. It might involve a full site evacuation, coordinating with local fire services, and properly testing your headcount procedures at the assembly point. While they can be disruptive, running one of these annually is the ultimate test of your plan's effectiveness.
The most valuable information comes from the things that go wrong during a drill. A missed step, a communication failure, or a blocked evacuation route aren't failures of the drill; they are golden opportunities to fix a weakness before it can cause real harm.
Gathering Feedback and Improving the Plan
A drill isn't over when the "all clear" sounds. The most critical phase comes next: collecting feedback to figure out what worked and what didn't. This is how your emergency response plan becomes a living document that gets stronger over time.
Immediately after any drill, get the key participants together for a debrief. Don't be shy. Ask direct questions to get practical feedback:
- Could you hear the alarm clearly in your work area?
- Were the evacuation routes easy to follow and well-signed?
- Did you know who your evacuation warden was?
- Were the instructions from the Incident Commander clear and concise?
- Did the communication equipment work as expected?
This feedback is gold. It gives you immediate, actionable insights into weak spots you'd never spot on paper. Use this info to make instant updates to your emergency response plan. If a route was confusing, update the map. If a radio had a dead spot, note it in the plan. This continuous loop of practice, feedback, and improvement is what makes your plan a reliable tool that will actually work when you need it most.
Using Data to Improve Your Emergency Plan
A good plan isn't created once and then forgotten. Let's be honest, the most reliable emergency response plans are living documents, built on good information and fine-tuned over time. Using data from your own site, from real incidents, close calls, and even drills, is the only way to shift from guesswork to a fact-based approach for your emergency response plan template.
This whole process boils down to keeping clear, honest records of what actually happens at your workplace. Every single incident, near miss, and drill provides valuable intel that shows you where your real problems are hiding. This data-driven method helps you fix procedures based on what is happening, not what you think might happen.
Learning from Incidents and Near Misses
Every time something goes wrong, it's a chance to learn. The key is having a simple, consistent system for recording what happened. You don't need a complicated setup; a basic log is all you need to get started.
For every event, no matter how small it seems, you should document:
- What happened: A straightforward, factual description of the event.
- What was the response: Which parts of the emergency plan were actually activated?
- What worked well: Did the team follow procedures? Did the equipment function correctly?
- What didn’t work: Where were the breakdowns in communication or action?
This information becomes your single source of truth. After just a few months, you'll start to see patterns emerging. Maybe you notice frequent small spills in one particular area, or communication always lags during second-shift drills. These patterns point you directly to the parts of your plan that need attention.
Your near-miss log is one of your most valuable safety tools. These events are free lessons. They show you where a serious incident is likely to happen next, giving you a chance to fix the problem before anyone gets hurt.
Effective emergency response planning relies on consistent data collection to guide risk reduction. A data-gathering exercise for the Africa Biennial Report on Disaster Risk Reduction found that inconsistent reporting can seriously block efficient early warning systems. This just goes to show how crucial organised data collection and timely reporting are for building a solid emergency plan. You can read more about these disaster response planning findings to understand the bigger picture.
The Role of Local Emergency Services
Your plan shouldn't exist in a vacuum. One of the most practical steps you can take is to coordinate with your local emergency services, like the fire department or paramedics. They are your most important partners during a real crisis, so getting them involved beforehand is critical.
Don't wait for an emergency to introduce yourself. Reach out and invite them for a site walkthrough.
Share key information with them, including:
- A copy of your emergency response plan.
- Detailed site maps showing access points, hydrants, and utility shut-offs.
- A list of hazardous materials on site and exactly where they are stored.
This simple act of coordination makes a massive difference. When emergency responders arrive on a scene they're already familiar with, they can act faster and more effectively. They won't waste precious minutes figuring out the layout or trying to locate a specific hazard.
By combining the internal data from your own incidents with the external expertise of local services, you create a robust, reliable emergency response plan. It’s a practical approach that turns a standard template into a genuinely dependable tool for your specific workplace.
Common Questions About Emergency Response Plans
Even with a solid emergency response plan template, questions always pop up. Here are some straightforward answers to the most common queries we hear from teams on construction sites and manufacturing floors.
How Often Should We Update Our Plan?
At a minimum, you should be dusting off your plan for a review once a year.
But the real answer is: you update it the moment anything significant changes on site. This isn't just about ticking a compliance box; it's a practical necessity to keep your team safe.
Immediate updates are non-negotiable for triggers like:
- New Machinery: That new press or conveyor system just changed your entire risk profile.
- Different Hazardous Materials: Bringing in new chemicals means you need new response procedures, full stop.
- Site Layout Changes: A new wall or storage area could be blocking a critical evacuation route nobody has thought about yet.
- New Key Personnel: If your incident commander or a key warden leaves, that contact list needs to be updated immediately.
Honestly, the most crucial time to update the plan is right after a real incident or even just a drill. Use the lessons you just learned, the good and the bad, to patch up weaknesses while they're still fresh in everyone's mind.
What Is the Biggest Mistake Companies Make?
The single biggest mistake we see, time and time again, is writing a brilliant emergency response plan and then letting it collect dust on a shelf. An ERP isn't a "set and forget" document you create for a safety audit. It's completely useless if your team hasn't been trained on it and run through the drills.
An untested plan is just a theory. If your people don't know the procedures and haven't physically walked the evacuation routes, the plan will fall apart during a real emergency. It has to be a living, breathing document that your team actually uses.
Where Should We Keep Copies of the Plan?
Accessibility is everything, especially when things go sideways. What happens if the power goes out, or a fire blocks off the main office? You have to make the plan available from multiple locations so your team can get their hands on it no matter what.
The best practice is to keep both digital and physical copies:
- Digital Copies: Store them on a shared drive or a cloud service that key people can access from their phones or an off-site computer.
- Printed Copies: Have binders in critical, easy-to-access locations like the site manager’s office, control rooms, and with each emergency coordinator.
This kind of redundancy ensures that even in the middle of a chaotic event, the instructions your team needs are always within reach. And once the dust settles, clear documentation is vital. As a follow-up, it’s worth learning the best practices for filling out a workplace incident report, which is a crucial next step.
At Safety Space, we provide a fully customisable Health and Safety management platform to help you manage everything from risk assessments to incident reporting. Replace your paperwork and spreadsheets with a single system that gives you real-time oversight. Find out how Safety Space can simplify your compliance and protect your team.
Ready to Transform Your Safety Management?
Discover how Safety Space can help you build a safer, more compliant workplace with our comprehensive safety management platform.
Book a Free DemoRelated Topics
Safety Space Features
Explore all the AI-powered features that make Safety Space the complete workplace safety solution.
Articles & Resources
Explore our complete collection of workplace safety articles, tools, and resources.