
When you're faced with a small fire on a construction site or factory floor, your first few seconds of action are everything. Knowing how to use a fire extinguisher isn't just theory; it's a critical skill that can turn a potential disaster into a minor incident. The key is remembering one simple acronym: P.A.S.S.
This stands for Pull, Aim, Squeeze, and Sweep. It's a straightforward method, designed to be recalled easily even when the pressure is on. Let's break down exactly what that looks like in a real-world situation.
Your first 30 seconds
Match the extinguisher to the fuel, warn people nearby, keep a clear exit behind you, use a manual call point if it is close, and size the fire. If it is bigger than a small bin fire or smoke is dropping visibility, get out and dial triple zero—PASS only applies once you have decided the fight is safe.
The PASS Technique for Fire Extinguishers
Think of the P.A.S.S. method as building muscle memory for an emergency. Each step is a deliberate action that gets the most out of the extinguisher's contents while keeping you as safe as possible. It’s the standard procedure for a reason: it works.
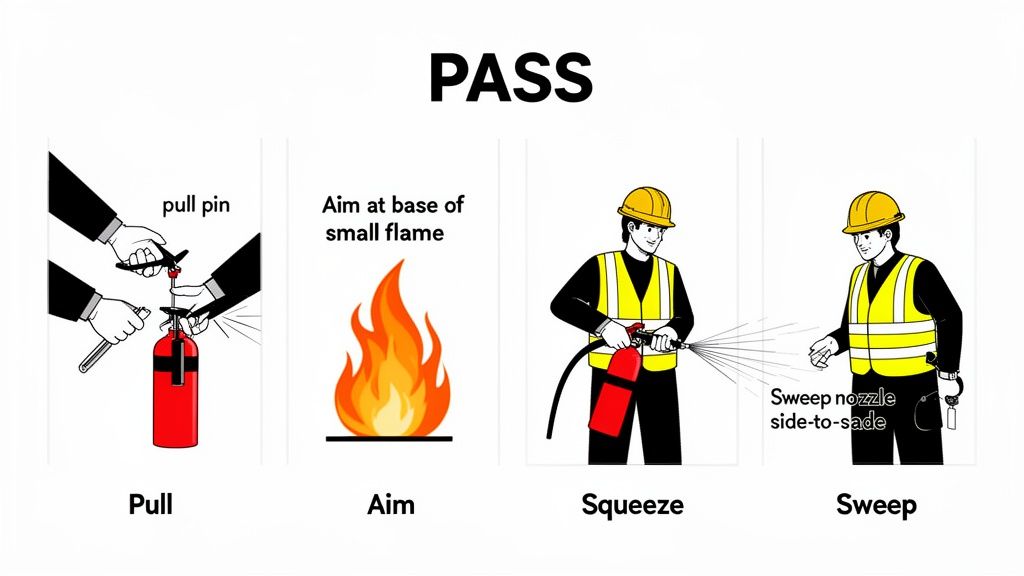
Pull the Pin
First things first: you need to arm the extinguisher. At the top, you'll see a pin, often held in place by a plastic tamper seal. This pin stops the handle from being accidentally squeezed.
Grab the extinguisher firmly, break that seal, and pull the pin straight out. If it’s a bit stiff, a slight twisting motion usually does the trick. Don't worry, the extinguisher won't go off yet. Once that pin is out, you're ready for the next step.
Aim at the Base of the Fire
This is where most people get it wrong, and it’s the most important part of the process. Your instinct might be to aim for the big flames, but that’s a waste of your limited extinguishing agent.
You need to aim the nozzle or hose directly at the base of the fire, where the fuel is actually burning. Get yourself a safe distance away, usually around 2 to 3 metres, before you start. By targeting the fuel source, you're cutting the fire off at its legs.
A common mistake is aiming too high. Always remember you're not fighting the flames; you are fighting what is fuelling them. Targeting the base of the fire is the only way to effectively put it out.
Squeeze the Handle
With the pin pulled and your aim true, it's time to release the agent. Squeeze the top and bottom handles (or levers) together with firm, steady pressure. This will discharge the contents in a controlled spray.
Avoid short, jerky bursts unless the fire is tiny. A continuous spray is far more effective for blanketing the fuel and smothering the blaze. If you need to stop and reposition, just release the handles.
Sweep from Side to Side
While you're squeezing the handles, start sweeping the nozzle back and forth across the base of the fire. Use a slow, methodical sweeping motion to cover the entire area where the fuel is burning.
This ensures you don't miss any spots and prevents the fire from reigniting. Keep sweeping until the fire appears to be completely out.
Even when the flames are gone, don't turn your back. Watch the area carefully for a few moments to make sure it doesn’t flare up again. Once you’re confident it's out, back away slowly while still keeping an eye on it.
To help your team remember these critical steps under pressure, here’s a quick-reference table.
The PASS Method at a Glance
This table breaks down the four steps for quick recall, making it a perfect addition to toolbox talks or safety noticeboards.
| Step | Action | Why It's Important |
|---|---|---|
| Pull | Pull the pin at the top of the extinguisher to break the tamper seal. | This unlocks the operating lever and allows the extinguisher to discharge. It won't work if the pin is still in place. |
| Aim | Aim the nozzle low, pointing it directly at the base of the fire. | The fuel source is at the bottom. Hitting the flames higher up is ineffective and wastes the extinguishing agent. |
| Squeeze | Squeeze the handles together with firm, even pressure to release the agent. | This releases the pressurised agent in a controlled manner. Releasing the handles will stop the discharge. |
| Sweep | Sweep the nozzle from side to side across the base of the fire until it is out. | A side-to-side motion ensures you cover the entire fuel source, smothering the fire and preventing reignition. |
By memorising and, more importantly, practising P.A.S.S., your team members can approach a fire situation with a clear plan instead of panic. This simple technique provides a clear plan of action when every second counts.
Alright, you know the P.A.S.S. technique, but grabbing an extinguisher is just one move. The few seconds before you even think about approaching a fire are arguably the most important. What you do next can be the difference between knocking down a small blaze and becoming a victim yourself.
This isn't about playing the hero. It's about being a smart, effective first responder who knows exactly when to act and, more crucially, when to get out. These checks are your final go/no-go decision.
Confirm You Have a Clear Escape Route
Before you take a single step towards that fire, stop. Turn around. Look at the path behind you. Is it completely clear? Can you get to an exit door without tripping over something or finding your way blocked?
Picture this: a small fire sparks up near a piece of equipment on a busy factory floor. You grab the nearest extinguisher, ready to go. But behind you are pallets, stray tools, or a temporarily blocked walkway. If you advance and that fire suddenly flares up, you're trapped. Always have a clean getaway before you commit.
Your number one job is your own safety. A fire extinguisher is just a tool, not a magic wand. If your escape path isn't 100% clear, your only move is to evacuate and raise the alarm.
Judge the Size and Spread of the Fire
Fire extinguishers are designed for one thing: small, “incipient stage” fires. We're talking about a fire that's just started and is still contained. Think of something no bigger than a small rubbish bin.
Take a hard look at where the fire is. Is it still confined to whatever it started in, like a single machine, a container, or a small pile of rags? Or has it already started climbing a wall, spreading across the floor, or reaching for the ceiling? If the flames are growing fast or moving vertically, it’s already too big for a portable extinguisher.
- Contained Fire: A fire in a wastebasket or on a small bit of equipment. You can probably handle this.
- Spreading Fire: Flames are licking up a wall or racing toward other flammable materials. Do not attempt to fight this.
If the fire is bigger than you are comfortable with, your job is to get out, shut the door behind you if you can, and call 000. Trying to tackle an out-of-control fire is a dangerous, losing battle. This quick size-up is a fundamental part of any pre-start check, just like the principles found in a Take 5 Safety Checklist.
Assess the Smoke Conditions
Don't ever underestimate the smoke; it can be far more dangerous than the flames. If the room is filling with thick, dark smoke, you're in immediate danger. The toxic gases from burning materials can knock you out in just a few breaths.
Is visibility getting poor? Do you have to crouch down just to breathe cleaner air? If so, the fire has gone beyond the point of no return for a first responder. You can't safely fight what you can't see, and you risk getting completely disoriented.
- Light Smoke: You can see clearly across the room and breathe without any trouble.
- Heavy Smoke: Visibility is poor and the air is thick and stings your throat or eyes.
When faced with heavy smoke, your only option is to get low to the floor where the air is clearer and get out immediately. Using an extinguisher in these conditions is a high-risk gamble that almost never pays off. These simple checks are what ensure you only use that extinguisher when it's genuinely safe and effective to do so.
Choosing the Right Fire Extinguisher for the Job
In the heat of the moment, grabbing the closest fire extinguisher feels like the right move. But using the wrong one can turn a small, containable fire into a full-blown disaster. Imagine throwing water on an electrical fire; it's a recipe for making things dangerously worse.
Different fires are fuelled by different materials, and each one needs a specific type of extinguishing agent to be put out safely and effectively. This is why understanding fire classes isn't just textbook theory; it's about making a quick, correct decision when every second counts.
Understanding the Different Classes of Fire
On construction and manufacturing sites across Australia, you’re most likely to run into fires from Class A, B, E, and sometimes F. Knowing what's actually burning is the first critical step to knowing how to fight it.
Here’s a practical breakdown of what you'll encounter on site:
- Class A Fires: These involve everyday combustible materials. Think burning timber offcuts, cardboard packaging, pallets, or discarded fabrics.
- Class B Fires: Fuelled by flammable liquids. This covers everything from petrol and oil to paints and solvents commonly found in workshops or around machinery.
- Class E Fires: These involve live electrical gear. It could be anything from a faulty power tool to an overloaded switchboard.
- Class F Fires: Specifically for fires involving cooking oils and fats. While you might think of commercial kitchens, they're a real risk in site canteens. Incidents like these can easily lead to significant fire damage from cooking.
Matching the fire class to the right extinguisher is a non-negotiable skill. Getting it wrong isn't just ineffective; it can escalate the danger dramatically.
Before you even think about tackling a fire, you need to run through a quick mental checklist. Is the fire small and contained? Do you have a clear and safe escape route? This decision tree lays out that thought process perfectly.
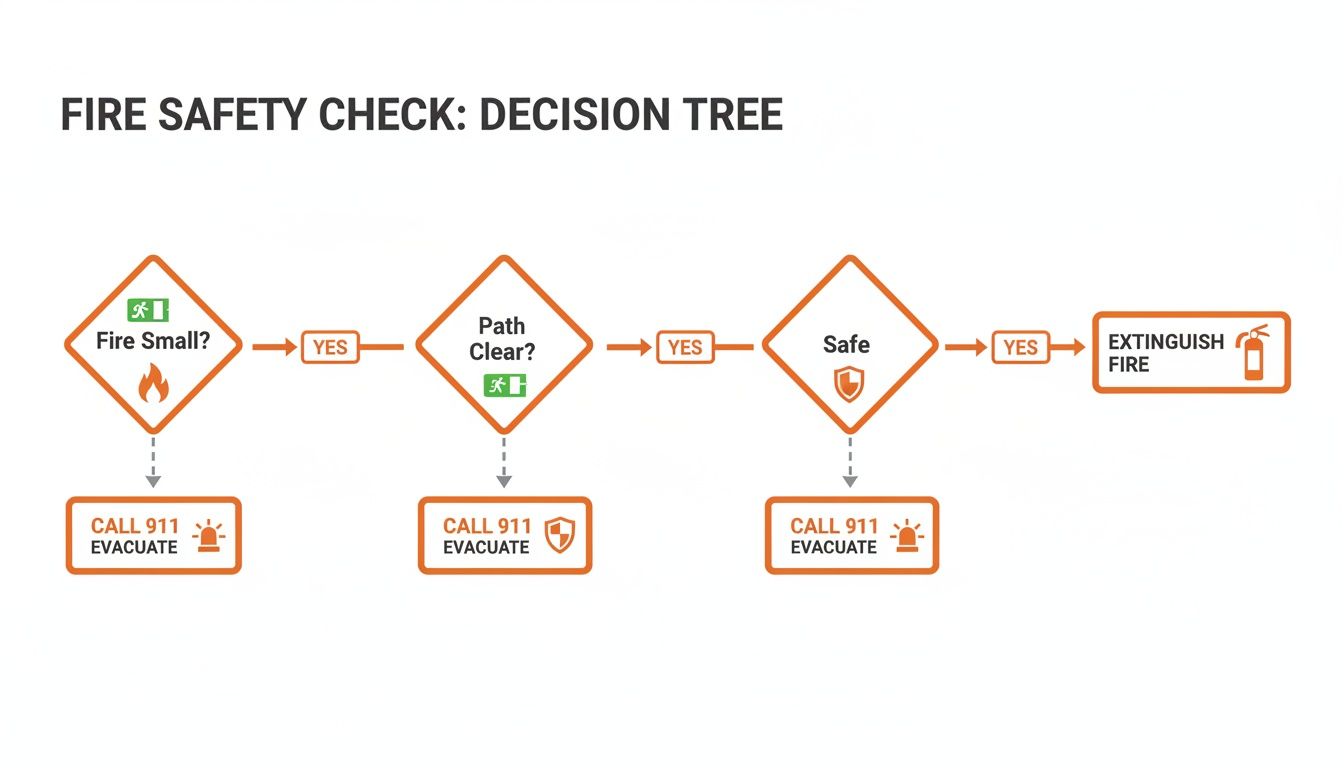
As the flowchart shows, your first priority is always your safety. If you can't tick those boxes, the only correct action is to evacuate.
Selecting the Correct Extinguisher Type
Once you’ve identified the class of fire, you can pick the right tool for the job. In Australia, extinguishers are colour-coded for quick and easy identification. The most common one you’ll see is the Dry Chemical Powder (ABE) extinguisher, marked with a white band. It’s a versatile workhorse that’s effective on Class A, B, and E fires.
But versatile doesn't always mean it's the absolute best choice for every single situation. A simple mistake can escalate fast, especially in high-risk industries.
For a clearer picture, here’s a quick-reference table that maps common fire sources on industrial sites to the correct extinguisher.
Matching the Extinguisher to the Fire Class
| Fire Class | Fuel Source (Examples) | Correct Extinguisher Type | DO NOT USE |
|---|---|---|---|
| A | Wood, paper, cardboard, plastics | Water (Red), Foam (Blue Band), Dry Powder ABE (White Band) | CO2 |
| B | Petrol, diesel, paint, solvents | Foam (Blue Band), Dry Powder ABE (White Band), CO2 (Black Band) | Water |
| E | Energised electrical equipment, power tools, switchboards | Dry Powder ABE (White Band), CO2 (Black Band) | Water, Foam |
| F | Cooking oils, fats | Wet Chemical (Oatmeal Band) | Water, CO2, Dry Powder |
Making the right choice in seconds can be the difference between a minor incident and a major catastrophe. That's why taking the time to familiarise your team with the types of extinguishers on your site and the specific hazards they cover is a fundamental part of being prepared for a fire.
Performing Regular Fire Extinguisher Inspections
Knowing how to use a fire extinguisher is a vital skill, but that knowledge means nothing if the extinguisher itself doesn't work. A unit that sits on a wall for months can lose pressure, develop a blocked nozzle, or suffer other faults that only reveal themselves in the middle of an emergency.
That’s why regular, documented inspections aren't just a box-ticking exercise. They're a fundamental part of keeping your site genuinely prepared.
The good news is, the process doesn't need to be complicated. A simple, consistent check can spot problems early, making sure every extinguisher is ready to go when you need it most. It's all about building a routine that protects your people and your property.
Your Monthly Inspection Checklist
The Australian Standard AS 1851 outlines the rules for maintaining fire protection equipment. While a professional service technician will handle the in-depth annual servicing, it's up to your team to perform quick monthly checks to catch any obvious issues. Think of this as your first line of defence against equipment failure.
Here’s what to look for every month:
- Accessibility: Is the extinguisher easy to see and get to? It can't be blocked by pallets, equipment, or other stored items. In an emergency, nobody has time to clear a path.
- Signage: Is the location sign visible and in good shape? Clear signage helps people find the extinguisher fast, especially when they're panicking.
- Physical Damage: Give the cylinder a quick once-over. Are there any dents, rust spots, or signs of corrosion? A compromised cylinder is a serious hazard.
- Pressure Gauge: This is a big one. The needle must be pointing inside the green zone. If it's in the red, the extinguisher doesn't have enough pressure to work correctly.
These checks are quick and simple, but they’re non-negotiable for both compliance and real-world safety.
A fire extinguisher with a low-pressure reading is effectively useless. The monthly gauge check is arguably the most important step in your routine inspection; it confirms the unit has the power to do its job.
More Than Just a Quick Glance
Going a little deeper during your monthly check can reveal less obvious but equally serious problems. A few extra seconds of attention can prevent a catastrophic failure.
Look closely at the operating components:
- The Tamper Seal: Check that the plastic tamper seal around the pin is intact. If it’s broken or missing, the extinguisher might have been used, tampered with, or accidentally discharged. It needs to be professionally inspected.
- Nozzle and Hose: Make sure the nozzle and hose are clear of any obstructions. It's not uncommon to find dirt, debris, or even insect nests blocking the flow of the extinguishing agent.
- Service Tag: Confirm the service tag is attached and shows the date of the last professional inspection. This is how you know you’re on track with your scheduled maintenance.
The Australian Standards AS 1851:2012 also require annual maintenance and visible placement, with site assessments often recommended for businesses with multiple locations. These monthly walk-arounds ensure everything stays compliant between professional services. For more on the risks, Fire & Safety Australia provides some eye-opening statistics.
Documenting Your Checks for Compliance
Simply doing the checks isn't enough; you need to prove it. Keeping a clear, consistent record of your inspections is crucial for compliance and accountability. Thankfully, this doesn't have to be a headache.
A basic log, whether it's a tag on the extinguisher or a digital record, should capture a few key details:
- Date of Inspection: When the check happened.
- Extinguisher ID/Location: Which specific unit was inspected.
- Inspector's Name/Initials: Who did the check.
- Status: A simple pass/fail or a note on any issues found.
- Actions Taken: What was done to fix a problem (e.g., "Reported low pressure to H&S Manager").
Proper documentation doesn't just keep the regulators happy; it also creates a history for each unit, helping you spot recurring issues over time. You can find more practical tips on setting up these processes in our guide on fire extinguisher inspection requirements. Regular checks, paired with solid documentation, are the backbone of any reliable fire safety plan.
Managing Fire Safety with Digital Tools
Let's be honest, trying to keep track of dozens of fire extinguishers across multiple sites with paper checklists is a nightmare. Paperwork vanishes, inspections get missed, and you often don't hear about a problem until it's far too late. It’s a logistical mess that leaves you exposed. Ditching the clipboard and spreadsheets isn't just about convenience; it’s about shoring up your site's fire readiness and making compliance straightforward.
A digital platform like Safety Space pulls your entire fire safety management into one place. It swaps out those cumbersome paper trails for a clear, accountable process that everyone from the head office to the factory floor can actually use.
This shift is fundamental. It’s about building a reliable system where nothing falls through the cracks, giving managers a real-time view of what's happening and helping your team to flag issues the moment they spot them.
Making Inspections Consistent Across All Your Sites
Imagine being able to schedule and assign every monthly extinguisher check for all your job sites right from your desk. With a digital system, Health and Safety managers can set up recurring inspections, push them out to specific people or teams, and see the completion rates from a single dashboard.
This completely removes the guesswork and the endless manual follow-ups that drain a safety manager's time. The system just sends out automatic reminders, making sure checks get done on time, every time.
For the person on the ground, the process is dead simple. They pull out their phone or tablet and follow a clear, step-by-step digital checklist. But instead of just ticking a box, they can instantly document what they see.
- Low Pressure Gauge: If a gauge is in the red, they can snap a photo and attach it directly to the report.
- Physical Damage: A dented cylinder or a busted handle? A quick picture flags it for immediate attention.
- Blocked Access: If an extinguisher is buried behind a pile of boxes, a photo provides undeniable proof of the hazard.
This creates a transparent, time-stamped record of every single check. There’s zero ambiguity about what was found or when it was reported.
From Incident to Action in Minutes
What happens after a fire extinguisher is used is just as critical as the inspections beforehand. A used extinguisher is an empty one, leaving a dangerous gap in your site's fire protection until it's sorted. In a paper-based world, you're relying on someone remembering to file a report, which often leads to unacceptable delays.
With a digital platform, incident reporting becomes immediate and actionable. The moment an extinguisher is used, a worker can log the entire event right from their phone.
That single action can set off a chain of automated workflows:
- Instant Notifications: The system immediately pings the H&S manager, site supervisor, and the maintenance crew.
- Replacement Request: A task is automatically created to get the used unit replaced or recharged.
- Formal Investigation: The report can kick off a formal investigation to figure out the root cause of the fire in the first place.
This creates a seamless flow of information that actually drives action, ensuring a used extinguisher is replaced as fast as possible and the incident is properly investigated. If you're looking for ways to structure these processes, you can learn more about building a smarter system with a workplace safety app.
By logging every use, you create an invaluable data trail. This record helps managers spot recurring safety issues, whether it's a specific piece of equipment causing trouble or a work area that needs better hazard controls.
Ultimately, using digital tools for fire extinguisher safety is about closing the loop between inspection, reporting, and resolution. It turns a reactive, often chaotic process into a proactive system that improves accountability and makes your entire operation safer.
Why Hands-On Training Is So Important
Reading about the PASS method is one thing. Pull, Aim, Squeeze, Sweep. Simple enough on paper, right? But when a real fire kicks off on the factory floor or a busy construction site, all that theory can vanish in a cloud of smoke. The shock, the noise, the sheer panic of the moment is enough to make anyone freeze up or forget what they’ve learned.
This is exactly where hands-on training proves its worth. Watching a video or flicking through a guide just doesn't cut it when it comes to preparing someone for the physical reality of tackling a fire. You need practical, real-world experience to build the muscle memory and confidence to act decisively when it counts.
It's all about turning knowledge into an instinct. When someone has actually felt the heft of an extinguisher, yanked a real pin, and braced against the force of the discharge, their response in an emergency is worlds apart. They push past that critical moment of hesitation because they’ve been through the motions before in a safe, controlled environment.
Bridging the Gap Between Knowing and Doing
The need for practical training isn’t just a gut feeling; the numbers tell a pretty clear story. A surprising number of people who grab an extinguisher for the first time in a real fire make critical errors. They might aim at the flames instead of the base of the fire, forget to pull the pin entirely, or fail to sweep correctly, wasting precious seconds and extinguishing agent.
In fact, research from Fire & Safety Australia highlights a massive gap: over 50% of untrained people use fire extinguishers incorrectly. These aren't just small mistakes; they can make the fire worse or even cause serious injury. But here’s the kicker: training flips those numbers completely. After a hands-on course, over 90% of people used the extinguishers correctly, and they were 33% more effective at actually putting out fires. You can dig into more of these workplace fire statistics yourself.
The real goal of training isn't just to memorise steps. It’s to build the confidence to execute those steps when adrenaline is pumping and every second matters. Hands-on practice is the only way to get there.
Building Real-World Competence
A solid training session is about more than just letting someone spray an extinguisher at a controlled fire. It needs to simulate the entire emergency response, building a foundation of practical skills your team can actually fall back on.
A good hands-on training program should always include:
- Choosing the Right Extinguisher: Trainees should be physically identifying different types of extinguishers (like ABE or CO2) and matching them to specific fire scenarios, whether it's a flammable liquid spill or an electrical panel fire.
- Handling the Equipment: People need to get a feel for the weight and balance of different units. They should practice lifting them properly and getting into a safe position before even thinking about discharging.
- Experiencing the Discharge: The kickback and sheer noise of an extinguisher can be startling. A live-fire drill lets people experience this firsthand, so it doesn’t catch them off guard in a real emergency.
- Assessing the Situation: Trainers should walk participants through making that crucial go/no-go decision, reinforcing when to fight a fire and when the only smart move is to get out.
Comprehensive safety training doesn't stop there. It should also cover other critical protocols like Lock Out/Tag Out (LOTO) safety training to prevent accidents when machinery is being serviced. This helps build a broader safety mindset where using an extinguisher is just one piece of a much larger hazard control system. For any safety manager in a high-risk industry, this kind of practical education isn't an expense; it's a fundamental investment in protecting your people and your property.
Tired of juggling spreadsheets and chasing up missed inspections? With Safety Space, you can ditch the paperwork and manage your entire fire safety program digitally. Schedule checks, report incidents in real-time, and get a clear, accountable system that ensures every extinguisher is ready to go. It’s the simplest way to maintain compliance and keep your people safe. Book a free demo today and see how easy H&S management can be.
Ready to Transform Your Safety Management?
Discover how Safety Space can help you implement the strategies discussed in this article.
Explore Safety Space FeaturesRelated Topics
Safety Space Features
Explore all the AI-powered features that make Safety Space the complete workplace safety solution.
Articles & Resources
Explore our complete collection of workplace safety articles, tools, and resources.