
When we talk about proper manual handling techniques, we're not just repeating the old advice of "lift with your knees". It's a much bigger picture. It’s about a complete, thought-out approach to moving things safely – whether you're lifting, carrying, pushing, or pulling. You need to consider the load itself, how your body moves, and the environment you're in.
Why Manual Handling Techniques Are Critical
Every physical job involves manual handling, and if you get it wrong, the risks are huge. Think of your body like a crane. A crane has limits. If you overload it, try to lift from a strange angle, or operate it on soft ground, something is going to give. Correct techniques are the operator's manual for your body, helping you avoid those costly breakdowns.
In fields like construction or manufacturing, it's the repetitive movements that really get you. A single bad lift might not send you to the physio, but making that same mistake dozens of times a day, week after week, places a massive, accumulating strain on your muscles, discs, and joints. This is exactly why getting the technique right every single time is so important.
The Real Cost of Poor Technique
The fallout from poor manual handling isn't just a theoretical risk. It's a very real problem on Australian worksites. Muscular stress from body stressing activities is the single biggest cause of workplace injury claims in Australia, accounting for a staggering 37% of all serious claims.
That translates to about 44,420 claims every single year from everyday actions like lifting, carrying, and putting things down. Find out more about how lifting technique impacts workplace injuries in Australia.
What this statistic tells us is that these aren't freak accidents. They are common, predictable, and most importantly, preventable injuries. The culprits are usually simple, day-to-day tasks done without thinking about the right technique.
Good manual handling isn’t about being the strongest person on site; it's about being the smartest. It’s about using your body's strengths, like your powerful leg muscles, to protect its vulnerable parts, like your lower back.
What Counts as Manual Handling?
A lot of workers are performing manual handling tasks all day without even labelling them as such. It’s a broad term that covers far more than just heaving a heavy box off the floor. When you understand the full scope, you start to see all the moments where you need to switch on your safety brain.
To give you a clearer picture, here’s a quick look at some common tasks and the risks they carry if you’re not careful.
Common Manual Handling Tasks and Associated Risks
| Manual Handling Task | Common Risk/Injury |
|---|---|
| Lifting a tool bag from the ground to a ute tray | Lower back strain, disc injuries, shoulder strain |
| Carrying a bag of cement across a worksite | Muscle fatigue, trips and falls, spinal compression |
| Pushing a heavily loaded trolley or wheelbarrow | Wrist and shoulder injuries, hernias |
| Pulling a pallet jack or dragging a heavy hose | Back strain (often worse than pushing), rotator cuff tears |
| Holding and Restraining a pipe while a colleague works | Muscle fatigue in arms and back, repetitive strain injuries |
Each of these actions places a different kind of demand on your body. For instance, pushing a load is generally easier on your back than pulling it because you can lean into it and use your body weight to your advantage.
Recognising these little details is the first step. By consciously applying specific manual handling techniques for each type of task, you can slash the risk of sprains, strains, and the kind of long-term musculoskeletal damage that can cut a career short. It’s all about staying safe, productive, and able to keep doing the work you do.
Right, let's get one thing straight. In Australia, the rules around manual handling aren't just well-meaning suggestions on a poster. They're hard and fast legal duties.
But don't worry, you don't need a law degree to get your head around it. The core principle is simple: employers have a duty to provide a safe workplace, and employees have a duty to work safely in it. It's a shared responsibility, and getting this partnership right is the only way to genuinely prevent manual handling injuries.
For employers, this means you are legally on the hook to do everything that is reasonably practicable to get rid of, or at least minimise, manual handling risks. This isn't about pointing fingers after an accident; it's about being proactive. You can't just wait for someone to injure their back before you decide to act.
What Employer Responsibilities Look Like on the Ground
Thinking about your legal duties in practical terms makes them much clearer. This isn't about ticking boxes on a form; it's about real actions you need to take on the worksite, day in and day out.
As the person running the business (what the law calls a PCBU), your main duties boil down to this:
- Provide a safe work environment: This is all about spotting hazardous tasks and redesigning them. For instance, if your team is constantly bending down to lift heavy bags of cement off the floor, you need to find a better way. That could mean storing them on raised pallets or bringing in mechanical aids.
- Supply safe and suitable equipment: You have to provide, maintain, and pay for the right gear for the job. If a trolley, hoist, or forklift is what's needed to move a heavy load safely, it must be available, in good nick, and ready to go.
- Deliver proper training and supervision: It’s not enough to just buy a new lifter and park it in the corner. You must train your workers on the correct manual handling techniques for the specific tasks they do. Just as importantly, you need to supervise them to make sure those safe procedures are actually being followed.
A core legal principle is that risk must be actively managed. This involves a constant cycle of identifying hazards, figuring out how serious the risk is, and then putting solid controls in place to protect your people.
Employee Responsibilities on Site
Safety is absolutely a two-way street. While the employer carries the primary responsibility, every single employee also has a legal duty to take reasonable care for their own health and safety, as well as for the safety of others around them.
In simple terms, you must:
- Follow the safe work procedures: Use the equipment and manual handling techniques you've been trained on. If you've been shown how to use a pallet jack, don't be tempted to manually shove the pallet just to save 30 seconds. It's not worth it.
- Report hazards straight away: If you spot a problem – a dodgy piece of equipment, a recurring risky process, a spill on the floor – you have a duty to report it. Tell your supervisor. This is how things get fixed before someone gets hurt.
- Not put others at risk: Your actions have a ripple effect. Rushing a job, taking shortcuts, or ignoring the safety rules doesn't just endanger you; it creates a dangerous situation for your entire crew.
Picture a busy factory floor. The employer’s duty is to make sure walkways are clear and that heavy parts are moved with a small gantry crane. The employee's duty is to use that crane correctly, report it if it starts making a funny noise, and never, ever try to lift the component by hand because it seems quicker.
When both sides of the equation meet their obligations, the system works. And most importantly, people go home safe.
How to Conduct a Manual Handling Risk Assessment

A manual handling risk assessment can't be a tick-and-flick exercise you rush through just to say it's done. To actually work, it needs to be a practical tool that helps you spot genuine dangers on the job site before they cause an injury.
A simple but incredibly effective way to do this is with the T.I.L.E. framework.
This isn't just another safety acronym. It stands for Task, Individual, Load, and Environment. By looking at each of these four elements, you build a complete picture of the risks involved in any manual handling activity. It forces you to think beyond just the weight of an object and consider all the other pieces of the puzzle.
Let’s break down how this works in the real world.
T is for Task
First up, look at the task itself. What does the job actually require the worker to do? Think about the specific movements, how often they're repeated, and the postures involved.
Take a busy manufacturing floor, for example. An assembly line worker might handle hundreds of small, light components every day. Each part is easy to lift, but the repetitive twisting, reaching, and constant gripping creates a massive risk of strain over a full shift.
When you're assessing the task, ask yourself:
- Does it involve repetitive movements?
- Is the worker forced to twist, stoop, or reach overhead?
- Is the work paced so quickly that there's no time for a quick recovery break?
- Does it involve excessive pushing, pulling, or carrying something over a long distance?
Getting answers to these questions helps you see when the work design itself is the real hazard.
I is for Individual
Next, you have to consider the person doing the job. People aren't machines. Everyone has different physical capabilities, levels of experience, and training. A task that’s perfectly fine for one person could be a serious risk for another.
A new worker, for instance, might not have the conditioning or the knowledge of proper manual handling techniques to tackle a specific job safely. In the same way, someone returning from an injury might have temporary physical limits.
It’s not about judging a person's strength. It's about matching the physical demands of the job to the capabilities of the person doing it. A mismatch is a recipe for injury.
The statistics from around Australia show just how serious this is. In New South Wales alone, manual handling is a leading cause of workplace injuries, with over 145,000 workers injured in just one three-year period. You can dig into the data on Safe Work Australia's guidance on lifting, pushing and pulling.
L is for Load
The load is often the first thing people think about, but its risk profile goes way beyond just its weight in kilograms. The shape, size, and stability of what's being moved are just as critical.
A large, awkward-to-hold box can easily be riskier than a smaller, heavier item with good handles. Consider these factors:
- Is the load bulky or difficult to see around?
- Does it have sharp edges or hot surfaces?
- Is the weight unstable or likely to shift, like a half-full container of liquid?
- Is it hard to get a firm grip?
Answering these helps you figure out if the load itself needs to be changed—maybe by breaking it into smaller parts or securing it properly before it's moved.
E is for Environment
Finally, look at the environment where the work is happening. A perfect lift can turn dangerous in a heartbeat if the surroundings are hazardous. This step is crucial, but it's the one people most often forget.
Imagine someone carrying a load through a cluttered workshop with uneven floors, poor lighting, and other people weaving around them. Each of these environmental factors adds another layer of risk. For a deeper look at assessing workplace risks, our guide on the BowTie risk assessment method offers some really useful strategies.
Check for things like:
- Space constraints: Is there enough room to lift without twisting or bending into an awkward position?
- Flooring: Are there slip or trip hazards like spills, cables, or uneven surfaces?
- Lighting: Is it bright enough to see the path clearly?
- Obstructions: Are walkways clear of clutter and equipment?
By systematically working through Task, Individual, Load, and Environment, you build a complete and practical risk assessment. This moves you beyond guesswork and gives you a clear roadmap to control the real manual handling hazards on your site.
Core Techniques for Safe Lifting and Carrying
Knowing the risks is one thing, but preventing injuries really comes down to what you do in the moment. Good manual handling isn't about learning some complex, secret technique. It's about deliberately replacing bad habits with a consistent, safe method for every single lift.
The most effective method, and the one most widely taught, is often called the 'powerlift'. Think of it as your body's most efficient way to move something, using its strongest muscles to protect its most vulnerable parts. It’s a simple sequence of steps that, when done correctly, dramatically reduces the strain on your back.
This image gives a great visual of the correct posture.
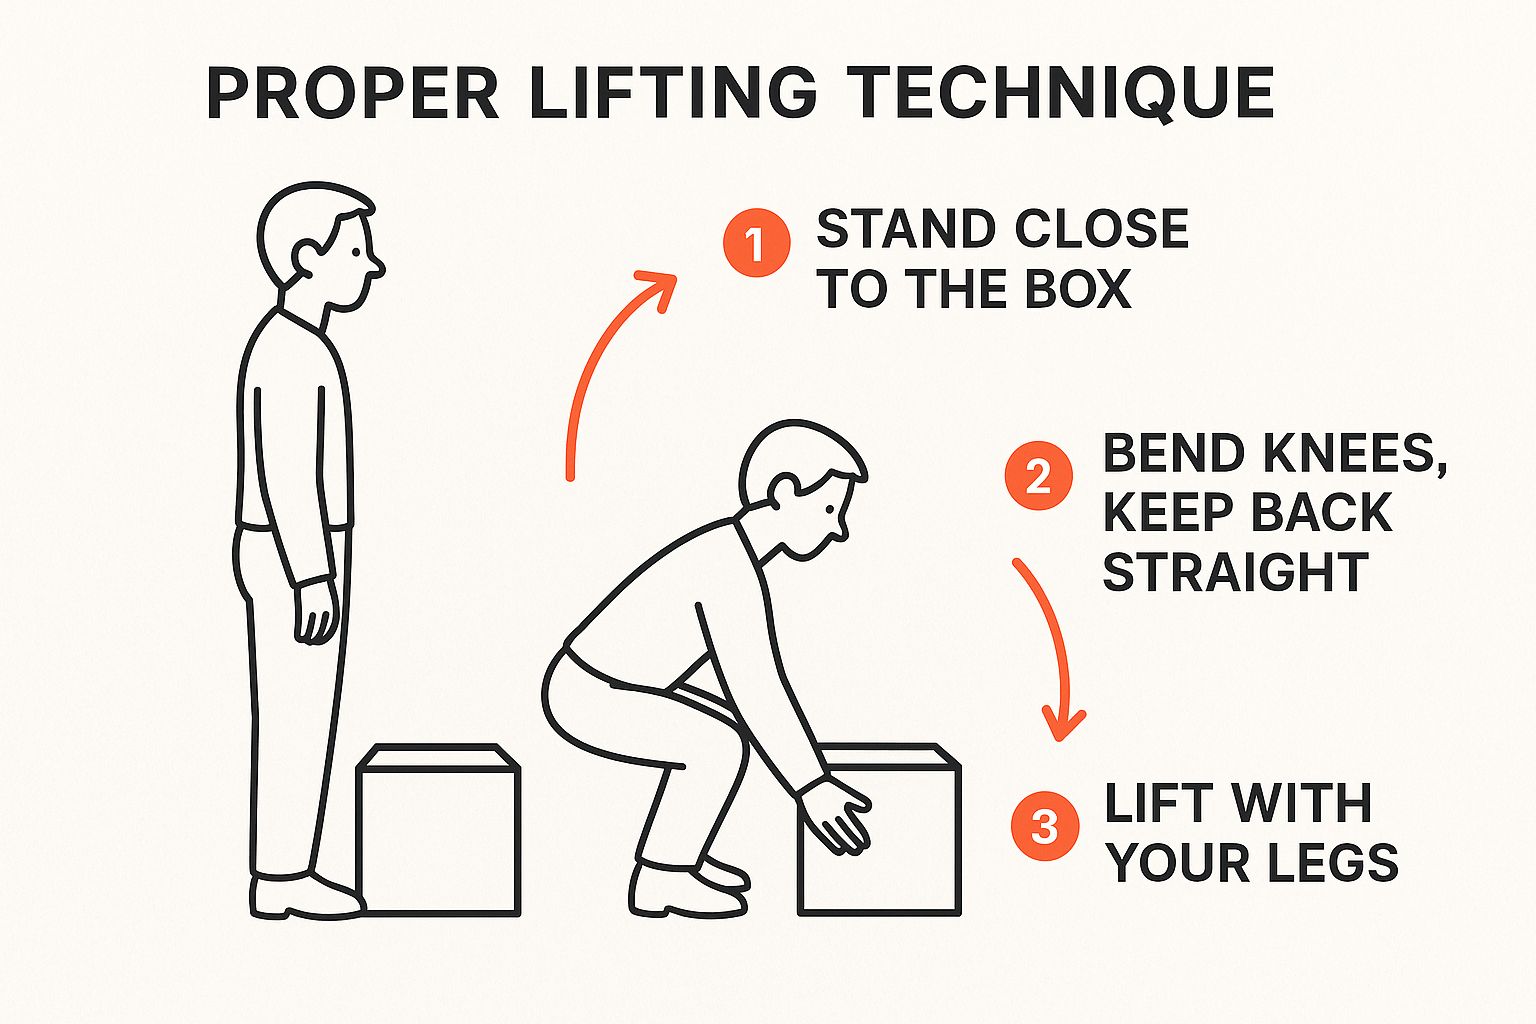
The key takeaway is that the real power comes from your legs. Your back should stay straight, acting like a stable support column, not a flimsy hinge.
Breaking Down the Powerlift Step by Step
Let’s walk through the exact steps to follow every time you lift something from a low position. This isn't just for heavy items; applying these techniques to all lifts is what builds the right muscle memory.
Plan Your Move: Before you even touch the load, stop and think. Where is it going? Is the path clear of clutter, spills, or trip hazards? Know your destination and make sure it’s ready for the item. Rushing this step is a classic mistake that leads to completely avoidable accidents.
Position Your Feet: Get in close to the load. Place your feet about shoulder-width apart, with one foot slightly ahead of the other. This creates a wide, stable base of support—the foundation for a safe lift.
Bend Your Knees, Keep Your Back Straight: This is the most critical part. Lower yourself down to the load by bending at your knees and hips, not your waist. Keep your back as straight as possible, your chin up, and your shoulders back. You want your spine in a neutral, strong position.
Bending at the back turns your spine into a weak crane, putting immense pressure on your discs. Bending your knees uses your powerful leg muscles—like your quads and glutes—as the engine for the lift.
Get a Firm Grip: Grasp the load firmly with both hands. Use your whole hand, not just your fingertips. If it's a box, give it a quick check to make sure it won’t fall apart mid-lift.
Lift With Your Leg Muscles: Start the lift by pushing up with your legs. As you straighten them, the load will come up with you. Your back should stay straight throughout this whole movement. You should feel the effort in your legs, not your lower back.
Hold the Load Close: Keep the item as close to your body as you can, near your centre of gravity (around your belly button). The further an object is from your body, the more leverage it has, and the more strain it puts on your back.
Techniques for Carrying, Pushing, and Pulling
Lifting is only half the battle. Once the load is up, you still need to move it safely. The same core principles apply: maintain good posture and use your body’s strength, not its weak points.
Carrying a Load
- Keep the load hugged close to your body.
- Make sure you can see over or around the item to spot any hazards ahead.
- Move your feet to turn; never twist your torso while carrying something.
- Take smooth, steady steps. Don't rush.
Pushing vs. Pulling
When you have a choice, always try to push rather than pull. Pushing lets you use your body weight to your advantage and keeps your back in a much more stable position. Pulling often forces you to twist and lean backwards, which is a weaker and more dangerous posture.
When you're using equipment like pallet jacks or trolleys, always follow the established safe work procedures to make sure you're operating them correctly.
To put it all together, here is a quick summary of the key do's and don'ts to remember.
Do's and Don'ts of Manual Lifting
This table gives a clear comparison between the right way to lift and the common mistakes people make every day.
| What to Do (Correct Technique) | What to Avoid (Common Mistake) |
|---|---|
| Assess the load and plan your path first. | Rushing into a lift without thinking. |
| Get a wide, stable stance with your feet. | Standing with your feet close together. |
| Bend your knees and keep your back straight. | Bending at the waist and arching your back. |
| Get a full, firm grip on the object. | Grabbing the load with just your fingertips. |
| Lift smoothly using your powerful leg muscles. | Jerking or snatching the load off the ground. |
| Hold the load close to your body. | Holding the load at arm's length. |
| Turn by moving your feet. | Twisting your back while holding the load. |
Mastering these manual handling techniques is a skill. It takes conscious effort at first, but with a bit of practice, it becomes second nature—protecting you from the kinds of preventable injuries that are far too common on worksites.
Using Mechanical Aids and Team Lifts Correctly
Often, the smartest manual handling technique is to avoid handling the load manually at all. Let's be honest, when a task involves something too heavy, awkward, or repetitive for one person, the safest path forward is using a mechanical aid or organising a team lift.
These aren’t just last-resort options. They should be your first thought when managing any significant manual handling risk.
Using equipment like trolleys, pallet jacks, and hoists is all about working smarter, not harder. These tools are designed to take the strain right off your body—especially your back—and dramatically reduce the chance of injury. But just having the gear on site isn't a silver bullet; you have to know how to use it properly.
Selecting and Using Mechanical Aids
The first step is always choosing the right tool for the job. It sounds simple, but it’s a critical decision. A pallet jack might be perfect for shifting pallets across a flat warehouse floor, but it’s completely useless on a gravel-covered worksite. Likewise, a trolley is great for moving a stack of small boxes, but it’s the wrong choice for a single, heavy engine block.
Before you even think about moving a load, you need to give the equipment a quick pre-start check. This isn't some complex, time-consuming inspection. It’s a common-sense once-over that could prevent a serious incident.
- Check the wheels: Are they free of debris? Do they turn and swivel smoothly?
- Inspect the frame: Look for any obvious cracks, bends, or signs of serious wear and tear.
- Test the mechanism: If it’s a hydraulic jack or a hoist, does it lift and lower without jerking?
- Look for a load rating: Every piece of lifting equipment has a maximum capacity. Never exceed it.
When you use a mechanical aid, you’re transferring the load from your body to the equipment. This is a massive safety win, but it only works if the equipment is safe, right for the environment, and used the way it was designed.
Once you get moving, the same principles of good situational awareness kick in. A golden rule is to always push, not pull, whenever you can. Pushing allows you to see where you're going and use your body weight to your advantage. Pulling often forces you into an awkward, backwards-walking posture, which is a recipe for trips and falls. Keep your eyes peeled for uneven ground, ramps, blind corners, and other people.
How to Perform a Team Lift
What if a mechanical aid isn't available or just isn't practical for the load and the location? This is where a team lift comes in. But let's be clear: a team lift is not just two people grabbing either end of an object and hoping for the best. It's a coordinated, planned effort that relies on crystal-clear communication.
In fact, a poorly executed team lift can be even more dangerous than a bad solo lift.
Follow these practical steps to make sure your team lifts are done safely.
Assign a Leader
One person, and only one person, needs to be in charge. This leader directs the entire operation, from calling out "prepare to lift" to giving the final command to "lower". This simple step eliminates confusion and ensures everyone moves as one.Match Your Partners
If you have the choice, try to pair up people of a similar height and build. This helps distribute the load far more evenly between the lifters. An uneven pairing can cause the object to tilt, unexpectedly shifting the entire weight onto one person.Plan the Lift Together
Before anyone touches the load, the entire team must walk the route. You need to spot any trip hazards, figure out how you'll navigate tight corners, and check which doors need to be propped open. Everyone has to agree on the plan before the lift begins.Use Simple, Clear Commands
The leader must use direct, loud commands that everyone can hear and understand.- "Ready to lift?" (Wait for everyone to confirm they are ready).
- "Lifting on three. One, two, three, LIFT."
- "Ready to lower?"
- "Lowering on three. One, two, three, LOWER."
Lift in Unison
This is non-negotiable. Everyone must lift and lower the object at the exact same time. All team members should be using the correct powerlift technique we discussed earlier: feet apart, back straight, and bending at the knees. Moving together keeps the load stable, predictable, and safe.
Team lifts are a vital manual handling skill, but their success hinges entirely on communication and coordination. By following this straightforward framework, you can turn a potentially dangerous task into a controlled and safe part of the job.
Effective Training and Injury Prevention
Let's be honest: ticking a box for training once a year isn't going to stop anyone from getting hurt. Effective manual handling training isn't a one-off classroom session. It's an ongoing process that has to happen on the job, where the real risks actually are. The goal here is to build practical skills and muscle memory, not just pass a test.
Good training has to be hands-on and tailored to the actual work being done. It should involve live demonstrations of the correct manual handling techniques using the real loads and in the real environments your team faces every day. Your workers absolutely must have the chance to practise these techniques under supervision and get direct, immediate feedback.
This kind of practical, site-specific coaching is far more valuable than any generic video or PowerPoint presentation. It bridges the gap between theory and the physical realities of the job site, which is the only way to make the lessons stick.
Making Training Stick
For training to truly have an impact, it needs to be reinforced regularly. This is where short, sharp "toolbox talks" before a shift or quick refresher demonstrations really shine. This approach keeps safety at the top of everyone's mind and helps turn correct procedures into second nature.
It’s also a legal requirement, and for good reason. Manual handling-related incidents account for over 40% of all workplace injuries nationally in Australia. Tasks like lifting, carrying, and pushing are common culprits behind musculoskeletal disorders. Proper risk management demands that employers constantly review their controls and update training to keep people safe. You can learn more about the top causes of workplace injuries in Australia and how to mitigate them.
Training is most effective when it is active, not passive. Workers should be doing, not just watching. This hands-on approach builds the confidence and competence needed to use safe manual handling techniques correctly, every single time.
To see how your current processes are tracking, you might find it useful to run a health and safety self-assessment to spot any gaps in your training approach.
Proactive Injury Prevention Exercises
Beyond formal training, preparing the body for physical work is a critical piece of the injury prevention puzzle. Encouraging workers to perform simple stretches and strengthening exercises can make a huge difference in their resilience to strain.
These don't need to be long or complicated. Just a few minutes before a shift can prepare muscles for the demands ahead, helping to slash the risk of strains and sprains.
Simple Stretches and Strengthening Exercises:
- Cat-Cow Stretch: On your hands and knees, gently alternate between arching your back up (like a cat) and letting it sag down (like a cow). This is great for improving spine flexibility.
- Knee-to-Chest Stretch: Lie on your back and gently pull one knee towards your chest, holding for 20-30 seconds. This helps release tension in the lower back and hamstrings.
- Bodyweight Squats: Stand with your feet shoulder-width apart and lower yourself as if sitting in a chair, keeping your back straight. This strengthens the leg and glute muscles—your powerhouse for safe lifting.
- Plank: Hold a push-up position, keeping your body in a straight line from head to heels. This is fantastic for building core strength, which is vital for supporting your spine during any manual task.
By combining practical, ongoing training with simple physical preparation, you create a robust system for preventing manual handling injuries. It’s a shift from just ticking compliance boxes to building a genuinely safer work environment.
Ready to stop juggling spreadsheets and paper forms? Safety Space is an all-in-one platform that makes managing health and safety simple. From real-time monitoring to AI-powered form completion, it gives you the tools to spot problems before they happen and keep your people safe. Get your free demo of Safety Space today.
Ready to Transform Your Safety Management?
Discover how Safety Space can help you build a safer, more compliant workplace with our comprehensive safety management platform.
Book a Free DemoRelated Topics
Safety Space Features
Explore all the AI-powered features that make Safety Space the complete workplace safety solution.
Articles & Resources
Explore our complete collection of workplace safety articles, tools, and resources.