
A Safe Operating Procedure, or SOP, is more than just a document you tick off for compliance. Think of it as a practical, step-by-step playbook for getting a high-risk job done safely. A good SOP takes the guesswork out of complex tasks, giving your team clear directions to follow every single time. This is critical for preventing injuries in high-stakes industries like construction and manufacturing.
What Is a Safe Operating Procedure?
At its core, an SOP breaks a task down into a clear, logical sequence of steps. The goal is simple: standardize your processes, cut down on errors, and keep hazards under control.
Instead of your crew relying on memory or inconsistent habits picked up over the years, they have a reliable guide to follow. This is especially vital when dealing with complex machinery, hazardous materials, or any kind of high-risk environment.
The main aim of an SOP is to build safety and consistency into your daily operations. This principle is just as crucial in other sectors, like healthcare, where clear procedures are important. You can see a great example of this in how QR codes enhance patient safety in healthcare.
SOP vs SWMS in Australia
Here in Australia, you’ll often hear the terms SOP and Safe Work Method Statement (SWMS) thrown around. While they sound similar, they serve very different purposes under our Work Health and Safety (WHS) regulations, and it's important to know which is which.
- An SOP is all about the how-to for a specific task or piece of equipment. It's a detailed, step-by-step guide for routine, day-to-day operations.
- A SWMS is a legal requirement for specific high-risk construction work. Its primary focus is on identifying potential hazards for those high-risk activities and spelling out the control measures to manage them.
If you’re looking to build out your full suite of safety documentation, our guide on WHS policies and procedures is a great place to start.
The easiest way to think about it is this: a SWMS is a legal must-have for certain high-risk jobs, while an SOP is a practical tool you can use to standardize any task. In fact, a detailed SOP often makes for a brilliant supporting document to a SWMS, giving you the granular detail needed for proper training.
Australia’s construction industry has become one of the safest in the world, thanks to these kinds of rigorous safety procedures. In 2018, Australia recorded just 24 deaths in construction, or 2 per 100,000 full-time workers. This is partly because principal contractors must prepare health and safety plans for projects over $350,000, and SWMS are mandatory for all high-risk work.
The Building Blocks of a Useful SOP

Before you start writing, let's talk about what separates an SOP that gathers dust on a shelf from one that genuinely keeps your team safe. A useful Safe Operating Procedure is built from clear, practical components that all work together. Each part has a specific job, from identifying the task right through to outlining emergency actions.
Getting these building blocks right is the real difference between a simple compliance checkbox and a tool your team actually trusts and uses on the workshop floor. Let’s break down the essential pieces of a solid SOP.
To make things crystal clear, here’s a quick rundown of the key sections you'll want to include in any robust SOP.
Key Sections of a Safe Operating Procedure
| Component | Purpose and What to Include |
|---|---|
| Document Control | The basics: A clear title, unique document ID, version number, and key dates (creation, last review, next review). This prevents confusion. |
| Task Description | A concise summary of the job the SOP covers. Be clear about what's in scope and what isn't (e.g., "routine operation only, not maintenance"). |
| Hazard Identification | A practical list of potential risks. Think moving parts, electrical hazards, sharp edges, or hazardous substances. No jargon. |
| Required PPE | Be specific! Don't just say "gloves." Specify "cut-resistant gloves (Level 5)" or "chemical-resistant nitrile gloves." Remove all guesswork. |
| Step-by-Step Instructions | The core of the SOP. A numbered list of actions covering pre-start checks, operation, and shutdown/cleanup procedures. Use simple language. |
| Emergency Procedures | Crucial information for when things go wrong. Detail emergency shutdown steps, first aid response, and who to contact immediately. |
| Authorisation & Review | Names and signatures of who wrote, reviewed, and approved the SOP. This adds accountability and a point of contact for questions. |
Each of these components plays a vital role in creating a document that is both compliant and genuinely useful for the person doing the work.
Core Document Information
Every SOP needs a clear identity. This isn’t just about being organized; it’s a critical part of document control that stops people from using an outdated version. I’ve seen it happen, and the consequences can be serious.
Start with these key identifiers at the top of the page:
- A Specific Title: "SOP for Operating the Haas VF-3 CNC Machine" is infinitely better than a generic "CNC Machine SOP." Vague titles cause mix-ups, especially when you have several similar machines on site.
- Document ID and Version Number: Assign a unique code (e.g., MANU-CNC-001) and a version number (e.g., v1.2). This simple step makes it easy to track updates and ensure everyone is working from the latest approved procedure.
- Key Dates: Always include the date it was created, the date it was last reviewed, and the date for the next scheduled review. This forces you to keep the document alive and relevant.
Task, Hazards, and PPE
This section sets the scene. It defines the job, flags the risks, and lists the gear needed to do it safely. It should be the very first thing an operator reads to get their head in the game.
First, you need a precise description of the task. Explain what the procedure covers and, just as importantly, what it doesn't. For example, specify if the SOP is for routine operation only, explicitly excluding maintenance or repairs.
Next up is the risk assessment. This isn’t a dense, multi-page analysis but a straightforward list of the real-world hazards someone will face. Think about things like moving parts, electrical risks, sharp edges, or hazardous substances, and list them clearly so operators know exactly what to look out for.
Finally, detail the required Personal Protective Equipment (PPE). Be painfully specific. Instead of "gloves," write "cut-resistant gloves (Level 5)." Instead of "safety glasses," specify if they need to be "splash-proof chemical goggles." This removes any doubt.
A well-written SOP doesn't assume knowledge. It clearly states every hazard and every piece of required PPE, ensuring that even a new team member understands the risks and protections from the start.
The Step-by-Step Instructions
This is the heart of your SOP. The instructions have to be clear, direct, and written in the exact order they need to be performed. Keep your language simple and use active verbs, it’s a guide, not a novel.
Break the entire task down into a logical sequence. I always recommend using a numbered list, as it’s the easiest format to follow under pressure. Keep each step focused on a single action. If a step gets too complex, break it down further into sub-steps.
Think in three phases:
- Pre-operational checks: What needs to be inspected before starting? (e.g., Are guards in place? Is the emergency stop functional?).
- Operating steps: The core sequence for actually running the equipment or doing the task.
- Post-operational steps: The shutdown, cleanup, and handover procedures. What does "finished" look like?
Try to avoid jargon, but if you have to use technical terms, make sure they are commonly understood by your team. From my experience, adding photos or simple diagrams for complicated steps can make a massive difference in clarity.
Emergency and Review Details
Even with the best procedures in the world, things can still go wrong. Your SOP must tell people exactly what to do in an emergency. This section should be impossible to misinterpret.
Be direct and include clear instructions for:
- Emergency Shutdown: The precise steps to stop the machine or process safely.
- First Aid: What to do immediately in case of injury.
- Spill Response: How to handle any chemical or material spills correctly.
- Contact Information: Who to call in an emergency (e.g., Supervisor, First Aid Officer), with phone numbers.
Lastly, every SOP needs to show who wrote it, who approved it, and when. This establishes accountability and provides a clear point of contact for questions or suggested improvements. This information is the final stamp that confirms the document has been properly vetted and is authorized for use on the floor.
Grab This Ready-to-Use SOP Template
Alright, theory is one thing, but having a solid starting point is another. Here’s a practical, no-fuss safe operating procedure sample you can copy and paste directly into your own documents.
I've built this template to include all the essential pieces we've just talked about. It's designed to be simple, with clear placeholders like [Task Name] that you can quickly swap out with your specific details. Think of it less as a blank form and more as a guided worksheet. I’ve included italicized notes to explain what goes where and, more importantly, why.
The goal here is to give you something you can actually use today.
Safe Operating Procedure
Document Title: SOP for [Task Name, e.g., Operating the Bench Grinder]
Document ID: [e.g., MANU-GRIND-001]
Version: 1.0
Date Created: [DD/MM/YYYY]
Last Reviewed: [DD/MM/YYYY]
Next Review Date: [DD/MM/YYYY]
1.0 Task Description
This procedure covers the routine setup, operation, and shutdown of the [Name and Model of Equipment] located in the [Specific Location, e.g., Workshop Bay 3].
A quick note: Be specific. It's often just as important to state what the SOP doesn't cover, like maintenance, repairs, or non-standard use.
2.0 Potential Hazards
Before starting, everyone needs to be aware of the real-world risks involved with this task:
- Mechanical Hazards: [e.g., Entanglement in rotating wheels, contact with abrasive surfaces]
- Electrical Hazards: [e.g., Faulty wiring, improper grounding]
- Airborne Particles: [e.g., Metal dust, sparks, wheel fragments]
- Ergonomic Hazards: [e.g., Awkward posture during prolonged use]
My tip: List the stuff that actually happens. This isn’t for a textbook; it’s for the person doing the job day in, day out.
3.0 Required Personal Protective Equipment (PPE)
The following PPE must be worn at all times while performing this task. No exceptions.
- [e.g., AS/NZS 1337.1 compliant safety glasses with side shields]
- [e.g., Hearing protection (Class 5 earplugs or earmuffs)]
- [e.g., Steel-toed safety boots]
- Do NOT wear loose clothing, jewellery, or gloves that could get caught.
It's crucial to remove all ambiguity here. Specify the exact type and standard of PPE required so there’s no guesswork.
4.0 Step-by-Step Operating Instructions
Follow these steps in sequence. Don't jump ahead.
4.1 Pre-Operational Checks
- Inspect the work area. Make sure it’s clean, dry, and free from trip hazards or other obstructions.
- Check the grinding wheels. Have a good look for any cracks, chips, or signs of damage. If in doubt, get it checked.
- Verify safety guards. Confirm the tongue guards and tool rests are in place and correctly adjusted (they should be within 3mm of the wheel).
- Test the emergency stop button. Give it a push to ensure it’s working before you even think about powering on the machine.
4.2 Operating Procedure
- Start the machine. Let it get up to full speed before you start working.
- Hold the workpiece firmly. Use both hands and keep it resting securely on the tool rest.
- Apply gentle, steady pressure. Feed the workpiece into the grinding wheel smoothly, never force it.
- Keep the workpiece moving. This prevents hotspots on the job and avoids creating grooves in the wheel.
- Cool the workpiece as needed. Use the quench pot to stop things from getting too hot.
4.3 Post-Operational Shutdown
- Turn off the machine using the standard stop button.
- Wait for the wheel to stop completely. Never walk away from a machine while it's still spinning down.
- Clean up. Brush down the machine and sweep the area, getting rid of all dust and debris.
- Put everything away. Return all tools and materials to where they belong.
Key Takeaway: The instructions need to be crystal clear. So clear that a newly trained operator can follow them from start to finish without having to stop and ask for help. Stick to simple, direct language and active verbs.
5.0 Emergency Procedures
If things go wrong, this is what you do immediately:
- Machine Malfunction or Wheel Breakage:
- Hit the Emergency Stop button straight away.
- Do not try to clear any jams or broken pieces.
- Find your supervisor and let them know what happened.
- Injury:
- Stop work immediately and hit the Emergency Stop.
- Yell for the nearest First Aid Officer.
- For any serious injuries, call 000 first, then notify your supervisor.
When it comes to emergencies, there's no room for confusion. Actions must be direct and easy to follow under pressure. It’s a good idea to list key contact names and numbers right here.
6.0 Authorisation and Review
Prepared by: [Name/Position] Signature: _______________________
Reviewed by: [Name/Position] Signature: _______________________
Approved by: [Name/Position] Signature: _______________________
A Completed SOP for Operating a Forklift
The template we just went through gives you the skeleton. But to really get it, you need to see how it comes to life with some real-world details.
Let's fill out that blank framework and build a practical safe operating procedure sample for a task we see every day in warehouses across the country: operating a forklift. This isn't just theory; this is how a solid SOP looks on the ground.
You'll see how we move from vague placeholders to direct, actionable instructions. The end goal is a document a new operator can pick up and follow without any guesswork, making sure they do the job safely, the same way, every single time.
Safe Operating Procedure
Document Title: SOP for Operating the Crown C-5 Series Forklift
Document ID: WH-FORK-003
Version: 1.1
Date Created: 15/01/2024
Last Reviewed: 20/06/2024
Next Review Date: 20/06/2025
1.0 Task Description
This procedure outlines the pre-start checks, safe operation, and shutdown protocol for the Crown C-5 Series LPG forklift. Its purpose is for moving palletised goods within the main warehouse (Bays 1-12) and the designated loading dock area.
This SOP does not apply to battery-electric forklifts, maintenance work, or operating on graded outdoor surfaces.
2.0 Potential Hazards
Anyone operating this machine must be fully aware of the key hazards involved:
- Impact and Collision: High risk of colliding with fixed objects like racking and doorways, as well as pedestrians or other moving vehicles.
- Load Instability: Dropped loads caused by poor handling, overloading the machine, or travelling with an elevated mast.
- Tip-Over: A serious risk from turning too sharply, hitting uneven surfaces, or trying to move an unstable or oversized load.
- Pedestrian Interaction: Operating in areas with foot traffic, particularly around blind corners, exits, and noisy production zones.
- Refuelling Hazards: Exposure to highly flammable LPG during cylinder changes.
3.0 Required Personal Protective Equipment (PPE)
The following PPE is mandatory and must be worn correctly at all times when operating the forklift:
- High-visibility vest (must be AS/NZS 4602.1 compliant)
- Steel-toed safety boots
- Safety glasses (especially when moving liquids or dusty goods)
- A critical note: Do not wear loose clothing, hoodies, or lanyards that could easily get tangled in the controls.
Why The Details Matter
See how being specific instantly makes the document more powerful? It's not just any "forklift"; it's the Crown C-5 Series. The work area isn't just "the warehouse"; it's Bays 1-12 and the loading dock. This kind of clarity removes all ambiguity and makes the procedure directly relevant to the person doing the job.
Good SOPs aren't just paperwork, they are a core part of reducing workplace incidents. Across Australia, we've seen proof that clear, standardized procedures get results. The traumatic injury fatality rate for workers has already dropped by 19 percent since 2013.
However, the work is far from over. Body stressing (37%) and falls, trips and slips (23%) still make up the vast majority of serious claims, which shows exactly why we need robust procedures that tackle these specific risks head-on. You can dig deeper into these figures in the key work health and safety statistics for 2024.
Now, let's get into the most important section: the step-by-step instructions.
4.0 Step-by-Step Operating Instructions
4.1 Pre-Operational Checks
- Do a full circle check. Walk around the machine. Look for any fluid leaks, obvious damage, or defects before you even think about getting on.
- Check your fluids. Make sure the engine oil, hydraulic fluid, and coolant levels are where they need to be.
- Inspect the business end. Look closely at the forks and mast. Are there any cracks, bends, or serious wear and tear on the forks, chains, or rollers?
- Test all functions. Before you move an inch, test the horn, all lights, and both the service and emergency park brakes. Cycle the lift, tilt, and side-shift controls to ensure they're working smoothly.
- Log the check. Grab the daily pre-start log and fill it out. If you find any faults, the machine gets tagged "Out of Service" and you must tell your supervisor immediately. A dedicated forklift inspection checklist is a great tool to make sure nothing gets missed.
4.2 Operating Procedure
- Get on correctly. Always use three points of contact (two hands, one foot). No jumping up.
- Check your path. Look in the direction of travel. Always know what’s around you: pedestrians, other vehicles, obstacles.
- Handle the load properly. Approach the load squarely with the forks level. Drive in until the load is flush against the backrest. Lift just high enough to clear the ground (150mm max) and tilt the mast back slightly for stability.
- Travel smart. Keep the load low and tilted back. Stick to the site speed limit (8 km/h). You must slow right down and sound the horn at all intersections and blind corners.
- Keep your distance. Stay at least three forklift lengths away from any other moving vehicle. And never, ever allow anyone to walk or stand under a raised load.
4.3 Post-Operational Shutdown
- Park in the right place. Head to the designated parking area. It must be level ground and can't obstruct any walkways, fire exits, or emergency equipment.
- Forks down. Lower the forks completely until the tips are flat on the ground.
- Engage the park brake.
- Engine off, key out. Turn the machine off and take the key with you.
- Complete the post-op log. Note down any issues or faults you noticed during your shift. Don’t leave it for the next person to discover.
This level of detail isn't optional for high-risk work. Vague advice like "be careful" is totally useless. Specific instructions like "slow down and sound the horn at all intersections" are what build safe, repeatable habits that actually prevent incidents.
5.0 Emergency Procedures
- In Case of a Tip-Over:
- DO NOT JUMP. Your instinct is wrong. Stay in the cab.
- Brace your feet firmly on the floor.
- Grip the steering wheel tight and lean away from the direction of the fall.
- If a Load Becomes Unstable:
- Stop the forklift immediately.
- If it's safe, lower the load slowly to the ground.
- Cordon off the area to create an exclusion zone and go get your supervisor. Don't try to be a hero.
6.0 Authorisation and Review
Prepared by: J. Smith (Warehouse Supervisor)
Reviewed by: A. Chen (WHS Manager)
Approved by: R. Davis (Operations Director)
How to Implement and Train Your Team on New SOPs
Drafting a solid SOP is just the start. Let's be honest, a perfect procedure is useless if it just gathers dust in a folder or sits unread on a server. A document only starts protecting your team when they understand it, believe in it, and use it every single day. The rollout and training process is what turns that piece of paper into a practical, life-saving tool.
Simply handing someone a document and asking for a signature isn’t training. That’s just a box-ticking exercise. Proper implementation is an active process built on clear communication and hands-on demonstration. It’s about putting the procedure into the daily routine so it becomes second nature, not just another compliance hurdle.
Start With the Why
Before you get into the nuts and bolts of the new procedure, take the time to explain the "why" behind it. People are far more likely to follow a rule when they understand its purpose.
Talk about the specific hazards the SOP is designed to control. You could say something like, "We’re putting this new lockout procedure in place because we've had a few near misses on this machine during maintenance, and we can't risk that happening again." This kind of context helps your team see the SOP as a tool for their own protection, not just another top-down directive.
Practical Training Methods That Actually Work
Reading a document is passive. Real, lasting learning happens when people get actively involved. Get your team out onto the floor and walk them through the process in the environment where they'll actually be doing the work.
Here are a few methods that get real results:
- Toolbox Talks: These short, informal meetings are perfect for introducing a new SOP. Focus on one key procedure at a time to keep it brief and impactful. It's a great forum to announce the change and tackle any immediate questions.
- Hands-On Demonstrations: The person who wrote the SOP, or a senior operator who has it down pat, should physically walk the team through every step. They can point out specific controls, demonstrate the correct technique, and highlight the most critical safety checks.
- Peer-to-Peer Coaching: Pair up an experienced worker who has mastered the procedure with newer team members. This kind of on-the-job guidance is often far more effective and less intimidating than a formal classroom session.
A non-negotiable part of this process involves equipment-specific safety protocols. For instance, making sure your team has critical Lock Out/Tag Out safety training for machinery like overhead doors is an absolute must during implementation.
The goal of training isn't just to show someone what to do; it's to confirm they can do it correctly and safely on their own. This is where competency checks come in.
After the initial run-through, have each team member perform the task while a supervisor observes. This isn't about catching people out, it's about verifying their understanding and ironing out any small mistakes before they become ingrained habits. For more structured ideas, our guide on workplace safety training offers some great frameworks.
This flowchart, for example, shows the key operational steps for a forklift, a common high-risk task that is always covered by an SOP.
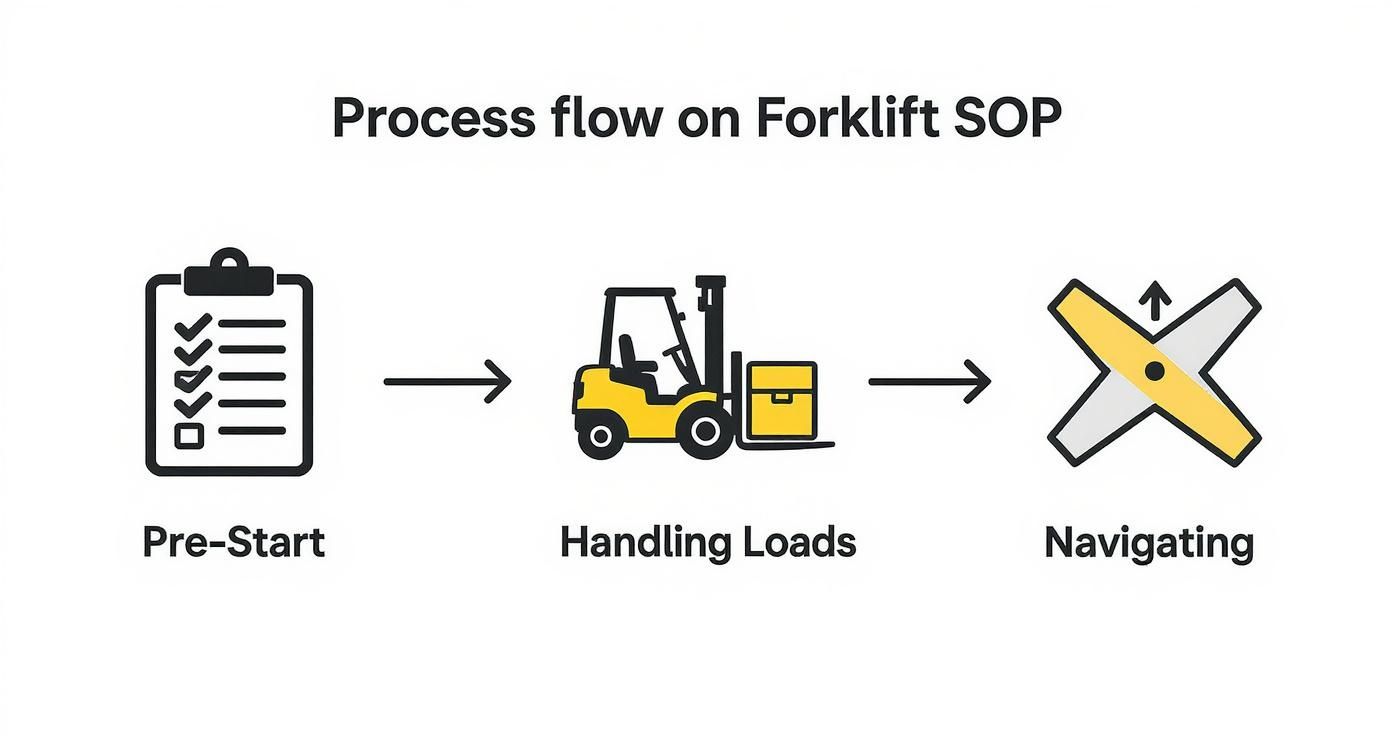
Visualizing the process like this breaks a complex job into clear, manageable phases, which is exactly what good training should aim to do.
Managing Updates and Version Control
Procedures aren't set in stone. New equipment gets installed, processes are improved, or a near-miss highlights a gap in the original SOP. Your implementation plan has to include a rock-solid system for managing these updates.
When an SOP is updated, you need a clear plan to communicate the changes. Don’t just save the new version over the old one and hope people notice.
- Use a Version Number: A simple change from v1.1 to v1.2 makes it immediately obvious that something is different.
- Highlight the Changes: Use colored text, a revision history section, or a summary to show exactly what was updated so people don't have to re-read the entire document.
- Retrain on the Changes: A quick toolbox talk is all it takes to explain the update and, crucially, the reason it was made.
Making sure everyone is working from the correct and most current document is absolutely vital for safety.
Common Questions About Safe Operating Procedures
Even with a great template and a solid example to follow, a few questions always seem to pop up once you get down to the nitty-gritty of creating and using Safe Operating Procedures. Honestly, getting these final details right is what separates a document that just sits on a shelf from one that actually keeps people safe.
So, let's tackle some of the most common questions I hear. We’ll clear up any lingering confusion so you can get on with it, confidently.
What's the Real Difference Between an SOP and a SWMS?
I know we touched on this earlier, but it's such a common mix-up in Australia that it’s worth a second look. People throw these terms around interchangeably all the time, but under WHS law, they are two very different beasts with distinct legal jobs.
Here's the simplest way I've found to explain it:
- A SWMS is a legal must-have for high-risk construction work. Its sole purpose is to pinpoint hazards and spell out the controls for those specific high-risk tasks. Think of it as a risk-focused legal document.
- An SOP is a how-to guide for pretty much any task. It gives you the detailed, step-by-step playbook for running a piece of equipment or carrying out a process safely and consistently, every single time. It’s a practical tool for the workshop floor, not just a compliance document for a narrow set of activities.
For instance, you might use an SOP to detail the routine, day-to-day operation of a CNC machine. But you would need a SWMS for the high-risk task of installing or decommissioning that same machine. A good SOP is often the perfect supporting act for a SWMS, providing that granular detail you need for proper training.
How Often Should We Review Our SOPs?
There isn't a single, legally-mandated countdown timer for every SOP, but industry best practice is pretty clear: you should be reviewing your procedures at least annually.
But let's be realistic, waiting a full year is often way too long. Things change.
A much smarter approach is to treat an SOP as a living document. It needs an immediate review whenever one of these things happens:
- After an incident or a near-miss. This is the big, flashing red light. The review has to dig into what went wrong and how the procedure can be tightened up to stop it from happening again.
- When new gear is brought in. You've just upgraded a forklift. Even if it seems similar to the old one, the SOP needs a full overhaul to reflect any changes in its operation, controls, or safety features.
- If the task or process itself changes. Even a small tweak to the workflow, the materials used, or the environment can quietly introduce brand-new hazards.
- When the rules get updated. WHS laws and Australian Standards don't stand still. Your procedures have to evolve to meet current legal requirements.
Don't just treat reviews as a calendar reminder you can hit snooze on. An outdated SOP can be more dangerous than having no SOP at all because it creates a false sense of security.
Who Is Actually Responsible for Writing SOPs?
This has to be a team effort. While a Health and Safety Manager or a supervisor might quarterback the process, the best, most effective SOPs are never written by one person in a quiet office.
The responsibility really needs to be shared:
- The Person Doing the Work: This is your most valuable player. The experienced operators who do the job day in, day out know the practical steps, the machine's little quirks, and the real-world hazards the manual never mentions. Their input is gold.
- The Supervisor or Team Leader: They have the bird's-eye view. They make sure the steps are logical, cover all the safety angles, and line up with the site's wider operational goals. They're also brilliant at translating the operator's hands-on knowledge into clear, written instructions.
- The WHS Manager: They bring the compliance framework. Their job is to ensure the SOP ticks all the boxes for WHS regulations, Australian Standards, and your own company policies. They also steer the formal risk assessment part of the process.
Get all three of those perspectives in the room, and you're onto a winner. Without the operator, the SOP won't be practical. Without the supervisor, it might miss the big picture. And without the WHS manager, it might not be compliant.
What Should Happen if a Worker Doesn't Follow an SOP?
This is a serious issue, and it calls for a measured and consistent response. The absolute first step is to stop the work immediately. Safety first, no exceptions.
From there, the focus has to be on understanding why the procedure wasn't followed. Was it someone deliberately cutting corners, or was there a genuine flaw in the SOP itself?
Your investigation needs to ask some hard questions:
- Was the worker properly trained on this SOP? Can you pull out the records that show their training and competency assessment?
- Is the SOP actually clear and correct? Is it possible the procedure is confusing, out of date, or just plain wrong? Sometimes, workers find a better or safer way to do things, and the paperwork just hasn't caught up yet.
- Are there barriers making it hard to follow? For example, is the specified PPE unavailable? Is a key tool broken, forcing them to improvise?
- Is there unspoken pressure to take shortcuts? Are production targets making people feel they have to skip safety steps just to keep up?
Once you get to the root cause, you can take the right action. Sure, that might involve disciplinary steps if it was a wilful breach. But more often than not, it leads to retraining, coaching, or most importantly, revising the SOP to make it more practical and effective for everyone.
Stop wrestling with paper, spreadsheets, and clunky software. Safety Space is the all-in-one platform designed to make managing your Health and Safety simple and effective. From real-time monitoring to AI-powered form completion, we give you the tools to spot problems before they escalate and protect your people and your profits. Book a free demo and H&S consultation to see how you can build a safer, more efficient workplace.
Find out more at https://safetyspace.co
Ready to Transform Your Safety Management?
Discover how Safety Space can help you build a safer, more compliant workplace with our comprehensive safety management platform.
Book a Free DemoRelated Topics
Safety Space Features
Explore all the AI-powered features that make Safety Space the complete workplace safety solution.
Articles & Resources
Explore our complete collection of workplace safety articles, tools, and resources.