
A net can look fine from the ground and still fail when it matters. The weak point is often a missing label, slack lacing, a damaged anchor, or a gap at an edge that nobody has walked to. A field-ready safety net inspection checklist needs a pass or remove decision every time, not a vague “looks okay”. On Australian sites, the duty sits under the WHS Act and WHS Regulations. In New Zealand, the same work sits under the Health and Safety at Work Act 2015 and WorkSafe NZ guidance, with different terms but the same expectation, prove the control works before people rely on it.
Walk the site in the same order every time. Start with the net's markings and records. Then check the mesh, stitching, rope and connections, anchorage, position and clearance, coverage and edges, and finally debris, impact history and removal from service. Each stop should end with a pass or remove call, a record field completed, and an escalation if the net fails. A visual check alone can't prove strength, traceability, or post-impact fitness, so the form has to capture what was inspected, what was measured, and who released the net back to use.
Table of Contents
- 1. Net Certification, Markings and Records
- 2. Mesh, Net Body and Stitching Condition
- 3. Perimeter Ropes, Lacing and Connection Points
- 4. Anchorage, Brackets and Supporting Structure
- 5. Position, Deflection and Clearance Below the Net
- 6. Coverage, Gaps and Edges
- 7. Debris, Post-Impact Checks and Removal From Service
- 7-Point Safety Net Inspection Comparison
- Turn the Checks Into a Standing Inspection Routine
1. Net Certification, Markings and Records
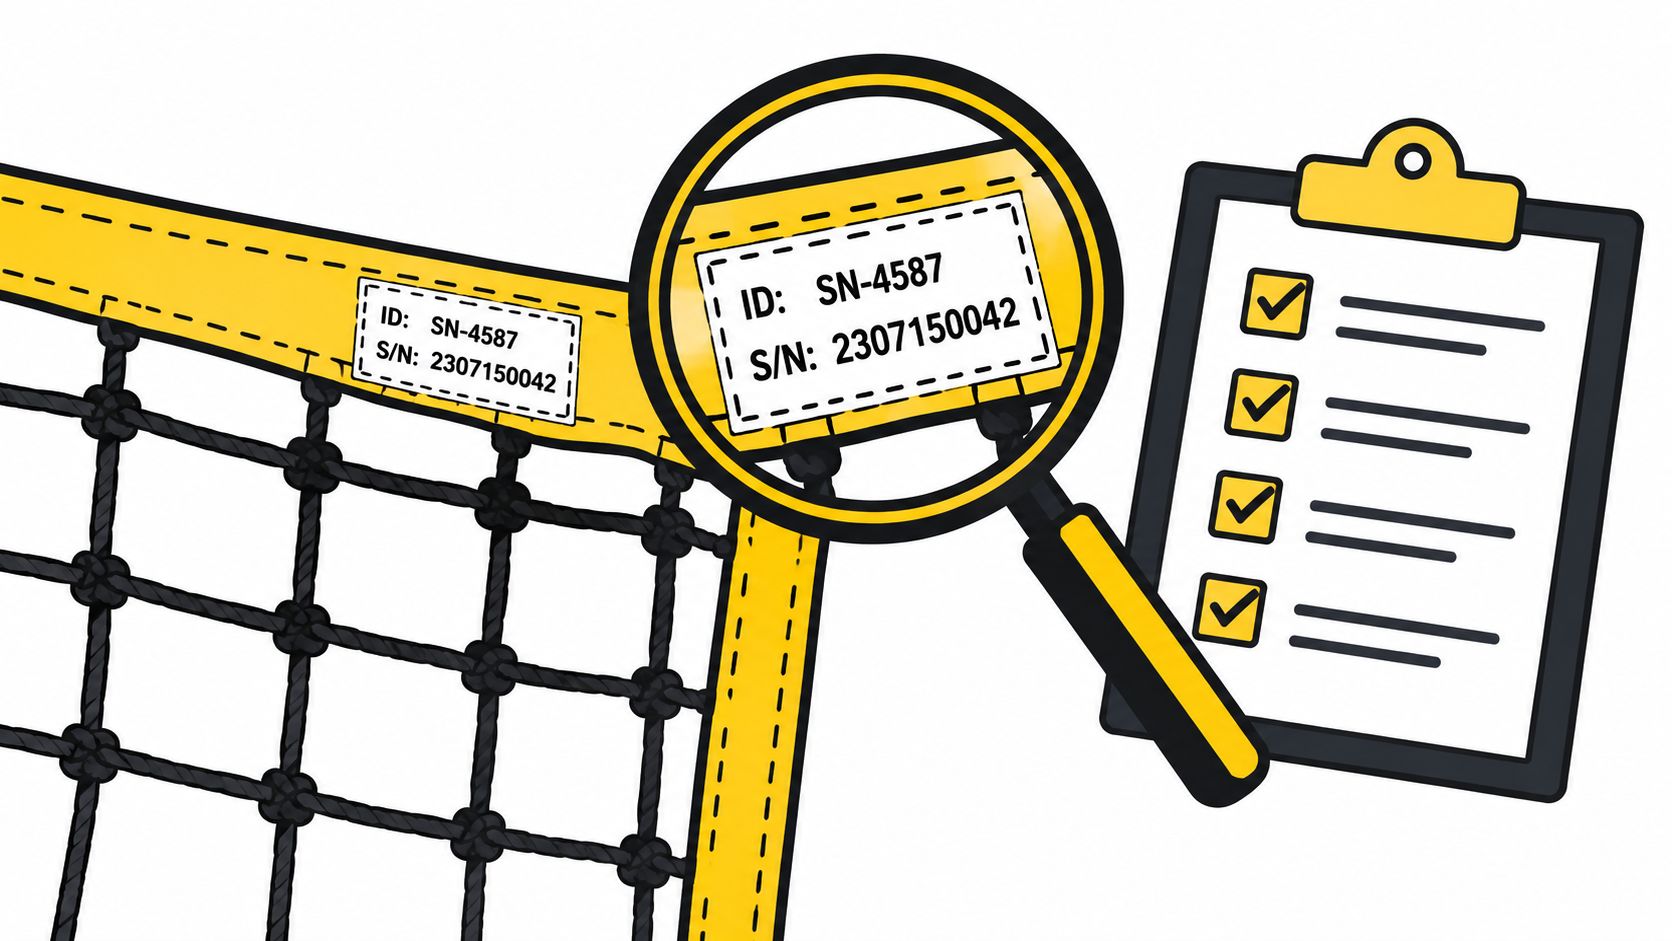
Start with identity, not the fabric. A safety net that cannot be traced is an unverified control, even if it looks clean and new. Check the manufacturer's identification mark, batch or serial number, and date of manufacture or service. Confirm the net type matches the job, because perimeter nets, debris nets and crane-protection nets are not interchangeable.
The paperwork matters just as much as the labels. WorkSafe New Zealand requires nets to carry manufacturer identification and removable test-mesh labels, and says handover records should show testing within the previous 12 months, plus a valid ID and current test label attached. That makes the inspection an auditable control record, not a casual look-over. WorkSafe New Zealand safety-net requirements
Practical rule: If the label, certificate or serial number cannot be matched to the net on the ground, the net is out of service until the gap is closed.
A sensible form field set is simple: net ID, certificate number, location, next inspection date, and pass or remove decision. The same fields fit a broader workplace inspection checklist, so net checks sit alongside other site inspections. If a net has been repaired, the record should show documented testing or written manufacturer approval. On delivery, ask for the certificate before the net goes up, not after it is already installed.
What fails this check
- Missing or unreadable markings: Remove the net.
- No current test or certification record: Remove the net.
- Incorrect net type for the task: Remove the net.
- Unapproved repair or patching: Remove the net.
Record the result in the equipment register so the same net can be tracked across sites and jobs.
2. Mesh, Net Body and Stitching Condition
Once the net identity checks out, move straight to the mesh and body. Cuts, tears, burn marks, abrasion, chemical contamination and holes all reduce the net's ability to arrest a fall or hold debris. Check the openings as well. If the mesh is stretched, distorted or enlarged, a person or object can pass through when the load comes on.
Give extra attention to wear points. The centre of the net may stay in better condition than the areas that rub against steel, concrete, scaffold members or rough edges. UV exposure and weathering also leave clear signs. Faded, brittle or stiff sections are not cosmetic. They point to ageing material and a weaker net body.
The decision is simple. If the damage affects strength, remove the net. Do not patch it on site unless the manufacturer has approved the repair in writing. Tape repairs and improvised stitching do not show that the mesh will hold under load.
What to look for on the walkaround
- Cuts and tears: Compare them with the manufacturer's criteria where those criteria exist. If they cannot be measured, remove the net.
- Burns and spatter damage: Treat welding or oxy-cutting damage as a fail.
- Frayed or loose stitching: Remove the net if the construction is no longer intact.
- Chemical contamination: Remove the net if the material has been exposed to solvents or other damaging products.
A good inspection record includes defect photos, a short description of the damage and the remove-from-service decision. Mark the wear points so the next inspector checks the same spots. That helps show progression before a small mark becomes a structural fault.
A net that has started to fail often fails at the same friction point again. Mark that point and watch it, don't just scan past it.
Keep storage clean too. Between jobs, nets should stay covered and away from direct sunlight, solvents and welding spatter.
3. Perimeter Ropes, Lacing and Connection Points
Start at the edge. A net can look sound in the middle and still fail at the perimeter if the rope is slack, damaged or laced badly. Check that the perimeter rope runs continuously around the net, sits where the system design expects it, and shows no cuts, flattening or broken fibres. Loose ends, slipped knots and unapproved joins need a remove call.
Connections need the same discipline. Inspect clips, shackles and panel joins for secure fixing, correct spacing and the right hardware for the system. A shackle without a locking pin is a release point, especially where vibration, movement or repeated handling can work it loose. Where the manufacturer requires torque or tension checks, record the actual result. Hand feel is not enough.
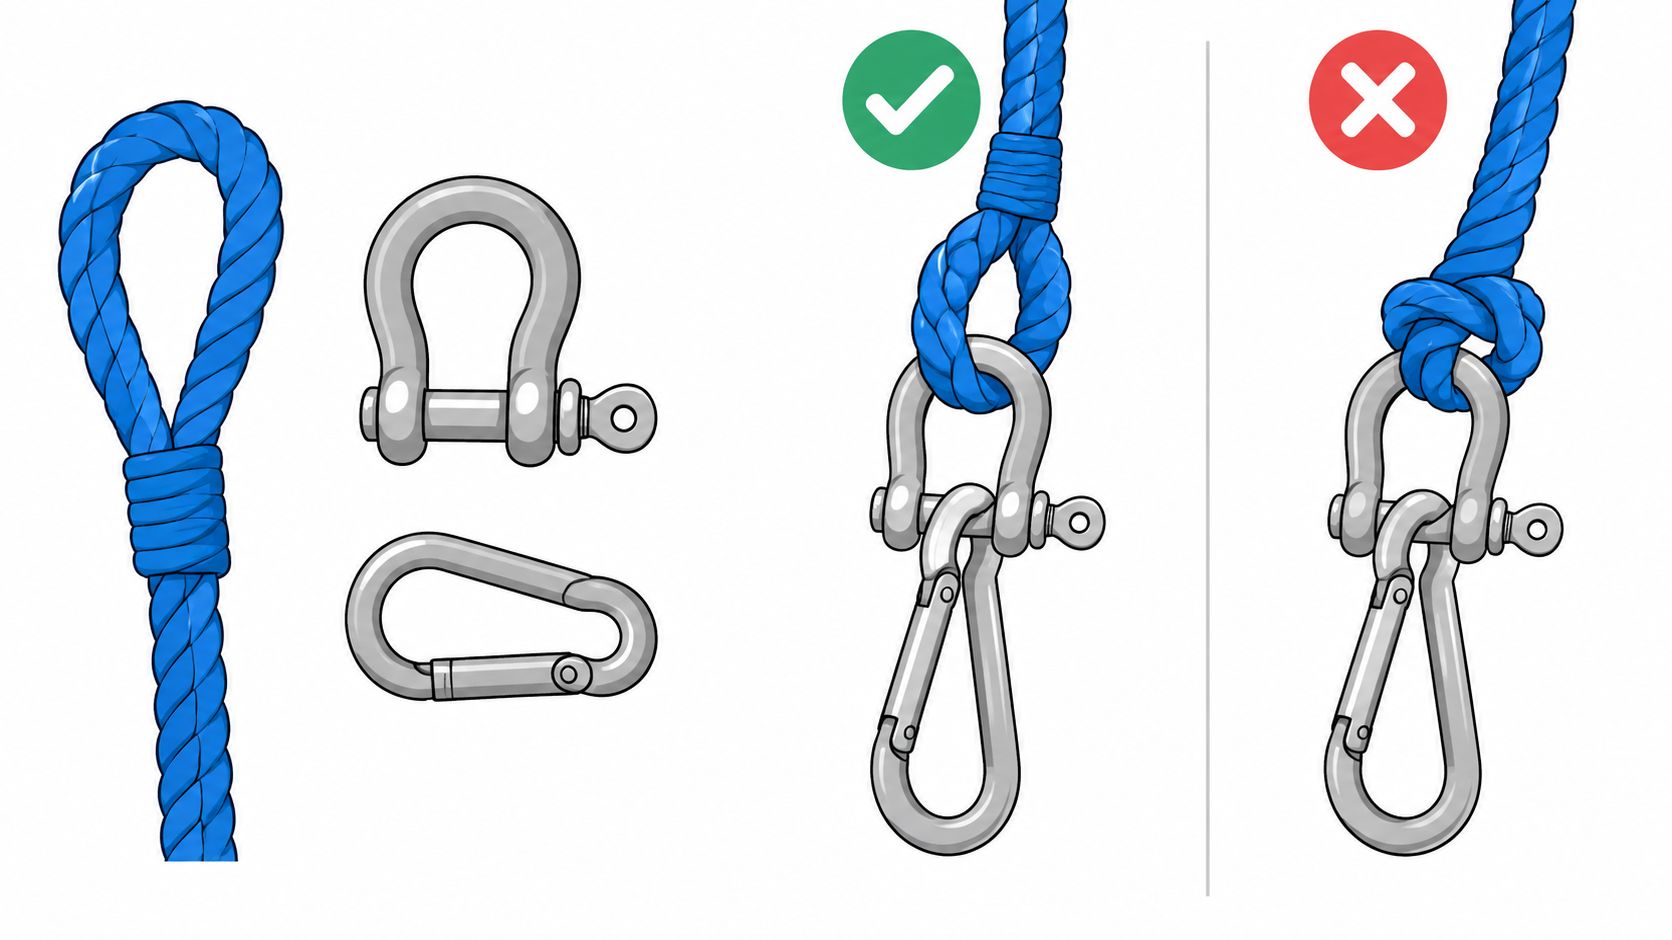
The record should identify who owns each connection point and who must approve any change. That matters on multi-trade sites. One crew may install the net, another may work beside it, and a later crew may move plant or materials through the same area. If a connection has been altered, the net stays out of service until it is checked and accepted again.
Pass: the rope is continuous, tight, correctly laced and the hardware is secure.
Remove: the rope is slack, joined with an unapproved knot, or any locking hardware is missing.
Use the installation drawing as the reference point, and note any approved deviation on the inspection record. After hoisting, cutting or moving materials near the net, check every connection again. A short note is not enough unless it identifies the defect, the exact location and the action taken.
4. Anchorage, Brackets and Supporting Structure
A net is only as sound as the structure holding it. Inspect every bracket, post, outrigger, frame and tie point. Confirm the brackets suit the system and are fixed to structure that can carry the design load. Look for cracks, corrosion, distortion and any sign of looseness at the fixing.
Support failures often start with change, not wear. A scaffold bay removed by another trade, a bracket cut by mistake, or a tie point reused for another load all change how the net performs. Where the net is fixed to concrete, check for pull-out and cracking around resin anchor bolt fixings, because a damaged fixing changes performance even when the bracket still looks sound. If the anchorage is unclear, stop work at that level until a competent person confirms the design.
WorkSafe Queensland says a safety net used as a control measure must be designed by an engineer or competent person for its intended purpose, made from material designed to minimise injury, and installed so a falling person will not strike anything below and is as close as possible beneath the fall surface. Treat that design basis as part of the inspection, not background paperwork. WorkSafe Queensland site inspection report
Record who owns each anchorage point and who must be told before it is altered. Check the structure after windy weather, heavy loading or nearby building changes. If a support has changed, the net stays unchecked until the inspection is repeated.
Stop-work point: If the net's support has been altered and no competent person has re-checked the setup, remove or isolate it. Do not “monitor it”.
5. Position, Deflection and Clearance Below the Net
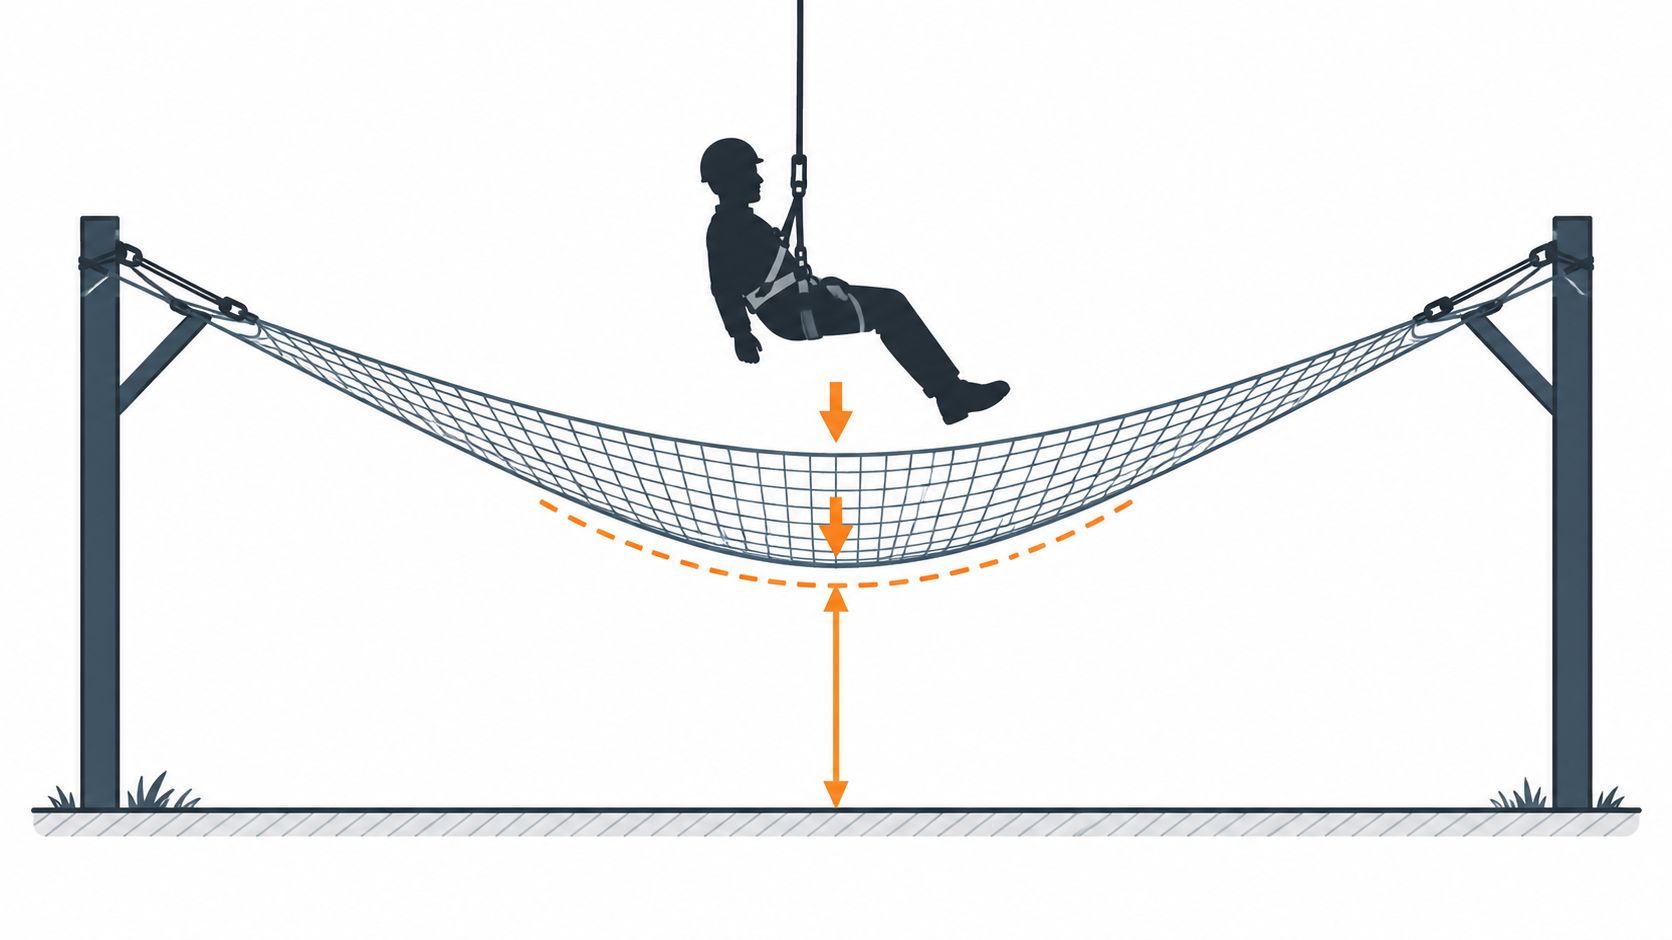
Clearance is a common miss on site. A net can be present and tensioned, yet still fail the task if it sits too high, too low, or too close to stored material or plant below. Start with the installed height. Confirm the net sits where a falling person will be caught before striking the ground or any lower obstruction.
Safe Work Australia guidance says a safety net should be hung as close as practicable beneath the work area and no more than 2 metres below it. It also says the net should be securely anchored, sufficiently tensioned and clear of accumulated material. The practical point is simple. A visual check does not prove the drop distance is safe, and it does not prove the deflection zone is clear. Safe Work Australia falls guidance
Measure the space below the net. Include plant, stacked materials, equipment and anything else that could be struck if the net sags under load. A net set too loosely may let a person hit something below. A net set too tightly may not deflect enough to arrest the fall properly.
Record the measured clearance, the net position to the work surface, and any sag or deflection note. Capture the obstruction status and the release-to-use decision in the same record. That is where fall protection systems record helps, because the supervisor needs the result on site, not after the shift ends.
- Measured clearance
- Net position to work surface
- Deflection or sag note
- Obstructions below the net
- Release-to-use decision
Recheck after a new floor goes in, a slab is poured, or stockpiles move the space below. A net that passed yesterday can fail once the below-net clearance changes. If the clearance is out, remove the area from use until the setup is corrected and the record is updated.
6. Coverage, Gaps and Edges
A net with a weak perimeter gives a false sense of cover. Walk the whole edge and check corners, columns, slab edges, lift shafts, stair openings, service risers and joins between net sections. If there is a gap, the hazard is still live, even where most of the opening looks covered.
Follow the current work sequence, not just the original drawing. A building setback, a balcony, a change in façade order, or a section of net removed for access can open a new exposure. Where cuts are made for materials or access, confirm they are closed by approved means and signed off before work continues.
Walk the whole edge, and treat uncovered edges as live hazards. Gaps at slab edges and openings are one of the common failures in working on heights safety, so check every transition where one trade hands over to another.
A site plan should show net coverage by level so gaps are visible to every trade. That prevents the usual problem where one crew assumes another crew has already reinstated the section. If the net has been cut, moved or partly removed, require sign-off before the area is reopened.
Practical rule: If a person can walk to an edge that is not fully covered, the protection is incomplete.
The inspection record should note the exact location of any gap and who owns the corrective action. If the gap cannot be closed immediately, isolate the area and stop the related work. For teams working across several floors, recheck coverage after each stage, not at random intervals.
7. Debris, Post-Impact Checks and Removal From Service
A net full of debris is not ready for use. Look for tools, offcuts, concrete splash, timber, water, and rubbish. These loads reduce deflection and can turn loose material into a strike hazard for workers below.
Clear the debris without anyone standing on the net. Then inspect the system again. Any fall or impact into the net means the net is out of service until a competent person has checked it and confirmed it is fit to reuse. Manufacturer instructions still apply, and some require removal after specific impact types.
What the record needs
- Reason for removal from service
- Date of removal
- Who approved reinstatement
- Any impact or debris event
- Replacement or repair outcome
Safe Work Australia's falls guidance says nets should be inspected after installation, relocation, or repair, and SafeWork NSW says components exposed to a fall must be inspected by a competent person and withdrawn from use when wear or defects are found. Visual condition alone does not prove the net is safe. Safe Work Australia model code on falls, SafeWork NSW safety checklist for working at heights
Keep the debris check at the end of each shift while work continues above the net. Report any impact through the incident process, not as an informal call-out. If the net is out of service, tag it clearly and leave the tag in place until a competent person signs it back in.
7-Point Safety Net Inspection Comparison
| Item | Implementation complexity | Resource requirements | Expected outcomes | Ideal use cases | Key advantages |
|---|---|---|---|---|---|
| Net certification, markings and records | Low–moderate (document checks on arrival) | Certificates, equipment register, inspector time | Verify compliance and traceability | Incoming nets, hire returns, audits | Quick verification; basis to reject unverified nets; traceability |
| Mesh, net body and stitching condition | Low (visual and simple measurements) | Torch, tape/measuring gauge, camera | Detect cuts, UV/abrasion and compromised strength | Routine inspections, after weather/exposure | Early detection of wear; clear pass/fail criteria |
| Perimeter ropes, lacing and connection points | Moderate (edge inspection, overhead access) | Tension/check tools, spare clips/shackles, competent inspector | Ensure continuous edge load path and secure connections | Installation, after hoists or site changes | Reveals installation errors; often simple, quick fixes |
| Anchorage, brackets and supporting structure | High (structural checks and access) | Access equipment, design/installation drawings, structural expertise | Confirm support capacity and compliant fixings | Initial install, after structural changes or heavy loads | Identifies systemic failure risks; enforces coordination |
| Position, deflection and clearance below the net | Moderate–high (measurement vs design) | Design drawings, measuring tools, load/deflection data | Ensure arrest zone clears ground/obstructions | Start of job, after level changes or new stacks below | Validates net performance under expected deflection |
| Coverage, gaps and edges | Low–moderate (perimeter walk and verification) | Site plans, markers, inspector time | Full fall-exposure coverage; closure of openings | Perimeter checks, after trade penetrations or cuts | Locates actual fall points; prompts additional protections |
| Debris, post-impact checks and removal from service | Moderate (post-impact inspection and record keeping) | Tagging system, manpower for debris removal, inspection records | Remove compromised nets; ensure safe reinstatement | After any impact, end-of-shift checks on active sites | Prevents reuse of damaged nets; documents incidents and reinstatement |
Turn the Checks Into a Standing Inspection Routine
A net inspection only helps if the same fields are captured every time. The core record should include net ID and markings, inspection date and inspector, location and level, pass or remove decision, defects found, corrective action and owner, escalation contact, and reinstatement sign-off. Add photos where the defect could be misunderstood later, especially on cuts, slack lacing, anchor damage, gaps at edges and any post-impact event.
Set the frequency from the installation design and the manufacturer's instructions. Where work sits above the net, add a per-shift debris check. Where the net has been moved, repaired, struck, or exposed to hot work, treat that as a fresh inspection trigger, not a note for later. The form should make it easy to isolate the net, assign an action, and stop the area reopening until the right person signs it off.
A digital form system can hold those fields without losing the trail. Safety Space's drag-and-drop inspection forms and equipment register can do that in one place, with site or project records, corrective actions and status tracking kept together. That's useful when a WHS officer needs to show why a net stayed out of service, or why it was released again after reinspection. Keep the record tight. Keep the escalation clear. If the net can't be proven safe, remove it.
Safety Space can hold your net inspection form, action tracking and equipment register in one system, so the site team can record defects, isolate failed nets and release them only after competent sign-off. If this checklist needs to become a live site process instead of a paper form, visit Safety Space and set up the inspection fields your crews use.
Ready to Transform Your Safety Management?
Discover how Safety Space can help you implement the strategies discussed in this article.
Explore Safety Space FeaturesRelated Topics
Safety Space Features
Explore all the AI-powered features that make Safety Space the complete workplace safety solution.
Articles & Resources
Explore our complete collection of workplace safety articles, tools, and resources.