
A workplace risk assessment is a hands-on process for finding things on your job site that could seriously harm someone and figuring out what to do about them. It's not about creating pointless paperwork; it’s a core part of running a safe and legally compliant operation, especially in high-risk industries like construction and manufacturing.
Why a Workplace Risk Assessment Is Not Just Paperwork
Think of a risk assessment as the foundation of a safe work environment. It's a bit like a pre-flight check for a plane. Pilots don't just give the plane a quick once-over; they systematically check the engines, controls, and structure to find any potential failures before they become catastrophic mid-air.
An assessment is your systematic check of the worksite. It's about proactively finding the loose bolts, unguarded machines, or unsafe procedures before they lead to an injury.
This process is also a fundamental legal requirement. Every business in Australia has a primary duty of care to ensure, so far as is reasonably practicable, the health and safety of its workers. A documented risk assessment is how you prove you've taken practical steps to meet that obligation.
The Real Cost of Ignoring Risks
Failing to properly assess what could go wrong on-site has severe consequences that go far beyond a slap on the wrist for non-compliance. The human cost is obviously the most significant.
In 2024 alone, 188 Australian workers died from traumatic injuries at work, with vehicle incidents and falls from height being the leading causes. High-risk industries like construction and manufacturing accounted for a staggering 80% of these fatalities, showing just how critical proper risk management is. You can find more detail in recent Australian work health and safety statistics.
Beyond the tragic loss of life, the impact on a business is very real. A serious incident can lead to:
- Financial Penalties: Regulators can and do impose heavy fines for safety breaches. These fines can cripple a small business or seriously dent a larger one's bottom line.
- Project Delays: An incident shuts down the worksite. This means investigations, equipment being quarantined, and lost work hours that completely derail project timelines.
- Reputational Damage: Word of an unsafe worksite spreads fast, making it harder to win contracts, attract skilled workers, and keep the trust of your clients.
Protecting People and Profits
At the end of the day, a workplace risk assessment isn't a box-ticking exercise. It's a practical tool that directly connects your legal duties to the real-world safety of your team on the ground.
By identifying and controlling hazards, you’re not only protecting your workers from harm but also protecting your business from the huge financial and operational fallout that follows an incident. It is one of the most direct ways to ensure your projects run smoothly and your business stays viable.
The Five Steps of a Practical Risk Assessment
A workplace risk assessment doesn't need to be a complicated, academic exercise. Far from it. It’s a practical, hands-on process that you can break down into five straightforward steps. Following this structure makes sure you systematically cover all your bases, from spotting hazards to making sure your fixes actually work.
This simple process helps you find risks, protect your people, and secure your business operations.
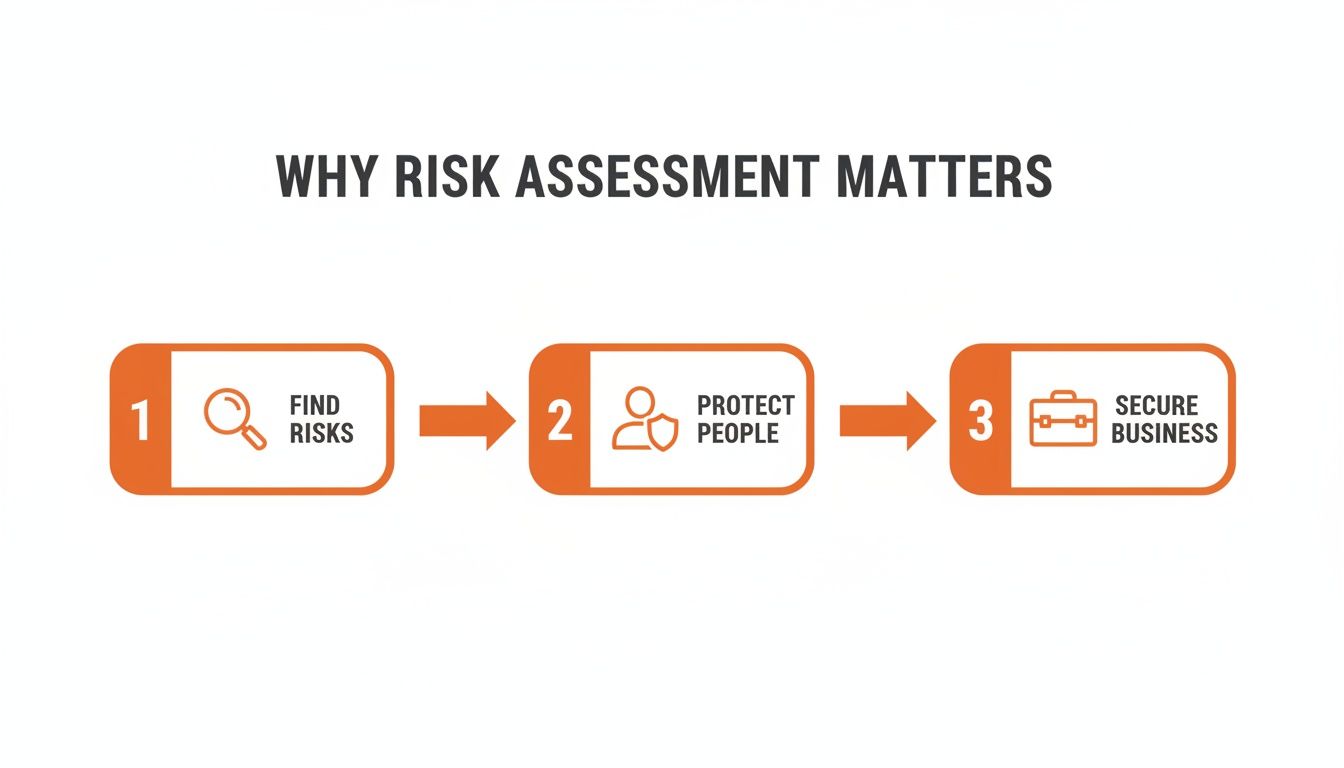
The core idea is to move from identification to action, creating a loop that keeps your worksite safe and productive day in, day out.
1. Identify the Hazards
First things first: you need to figure out what could actually cause harm. A hazard is anything with the potential to hurt someone, whether that's a piece of machinery, a chemical substance, or even a stressful work process. Don't overthink it at this stage; just get out there and look for the obvious and not-so-obvious dangers.
The best way to do this is to get out on the factory floor or the job site. A physical walk-through isn't optional, it's essential.
Here are a few practical ways to get started:
- Walk the Site: Watch how tasks are really being done, not just how the manual says they should be. Look for worn-out equipment, trip hazards like trailing cables, or missing safety guards on machinery.
- Talk to Your Workers: The people doing the job every day know the real risks better than anyone. Ask them about near misses, frustrations with certain equipment, or the shortcuts they feel forced to take. Their insights are invaluable.
- Check Manufacturer Instructions: Equipment manuals and chemical safety data sheets often list specific hazards and safe operating procedures. This is critical information that’s easy to overlook but can prevent serious incidents.
2. Decide Who Might Be Harmed and How
Once you have a list of hazards, the next step is to think about who might be affected. And it's not just about the person operating the machine; you need to think bigger.
Consider everyone who could possibly come into contact with that hazard.
A welding station in a manufacturing plant, for example, doesn't only pose a risk to the welder. It could also harm:
- Nearby Workers: They could be exposed to fumes or welding flash.
- Cleaners or Maintenance Staff: They might handle equipment or waste materials without knowing the specific risks involved.
- Visitors or Contractors: They'll be unfamiliar with your site's unique dangers and need clear guidance.
For each group, get specific about how they could be harmed. An unguarded conveyor belt could cause a serious entanglement for an operator, but for a visitor walking past, it might just be a trip hazard. This level of detail is key to finding the right solutions.
3. Evaluate Risks and Decide on Controls
This is where you figure out how serious each hazard actually is. You need to look at both the likelihood of something going wrong and the severity of the potential injury. We’ll cover a simple scoring matrix in the next section to make this much easier.
After sizing up the risk, you have to decide on control measures to either eliminate the hazard completely or, at the very least, reduce the risk.
A good workplace risk assessment doesn’t just find problems; it provides clear, actionable solutions. The goal is to make the workplace safer, not just to create a long list of dangers.
The best controls are always the ones that get rid of the hazard entirely. If that isn't possible, you work your way down the hierarchy to less effective measures, like personal protective equipment (PPE). For instance, engineering a noisy machine to be quieter is always better than just handing out earplugs. After identifying risks, implementing control measures like those outlined in A Technical Guide to PPM Preventive Maintenance is essential to reduce operational risk for assets.
4. Record Your Findings and Implement Them
A risk assessment that only exists in your head is useless for legal compliance and offers zero help to your team. You need to write it down. Your record needs to show that you've done a proper check, identified who might be affected, and dealt with all the significant hazards you found.
Keep the record simple and clear. It should state the hazard, the risk level you assigned it, and the control measures you've decided to put in place. This document becomes your action plan.
Most importantly, you have to actually implement the controls. A plan sitting in a folder does nothing to protect people. Assign clear responsibility for each action item and set a firm deadline for completion.
5. Review Your Assessment and Update It
Your workplace isn't static, it's constantly changing. New equipment comes in, procedures get updated, and workers come and go. Because of this, your risk assessment can't be a one-time event that you file and forget.
You have to review it regularly to make sure it stays relevant and effective.
Set a schedule for reviews, annually is a good starting point, but also be ready to update it immediately if any of these things happen:
- There is an accident or a near-miss.
- You bring in new machinery, substances, or work processes.
- Workers raise new concerns about a particular task or area.
This five-step cycle provides a repeatable and practical framework for any construction or manufacturing site. By following it, you create a living process that actively protects your team and your business.
How to Score Risks Using a Simple Matrix
Okay, so you've walked the floor and identified a list of potential hazards. What's next? The reality is you can't fix everything at once. You need a way to figure out which issues demand your immediate attention.
A frayed electrical cord on a rarely-used piece of equipment is a problem, sure. But it's not in the same league as an unguarded drive belt on a conveyor that runs all day. This is exactly where a risk matrix becomes a very useful tool.
Think of it as a simple visual tool that helps you sort and prioritise hazards based on two key questions:
- Likelihood: How likely is it that someone could get hurt?
- Severity: If they do get hurt, how bad could it be?
By plotting these two factors, you can quickly see which hazards are low-risk annoyances and which are high-risk emergencies. It gives you a clear, logical way to decide where to focus your resources first.
Defining Likelihood and Severity
To make the matrix work, we need to put some definition around those two terms. You don't need a crystal ball for this; it’s about making a reasonable, informed judgement based on what you know about your workplace.
Likelihood is just the probability of an incident happening. A simple five-point scale works well here:
- Rare: Has almost never happened and is highly unlikely to.
- Unlikely: Not expected to happen, but it’s possible.
- Possible: Could happen from time to time.
- Likely: Will probably happen sooner or later.
- Almost Certain: It’s almost guaranteed to happen, and probably often.
Severity is all about the consequences if an incident does happen. Again, a five-point scale keeps things clear:
- Insignificant: No real injury, maybe a quick trip to the first-aid kit.
- Minor: Requires medical attention, but the person is back at work the next day.
- Moderate: The injury results in lost work time.
- Major: A serious, life-altering injury causing long-term disability.
- Catastrophic: A fatality or multiple serious injuries.
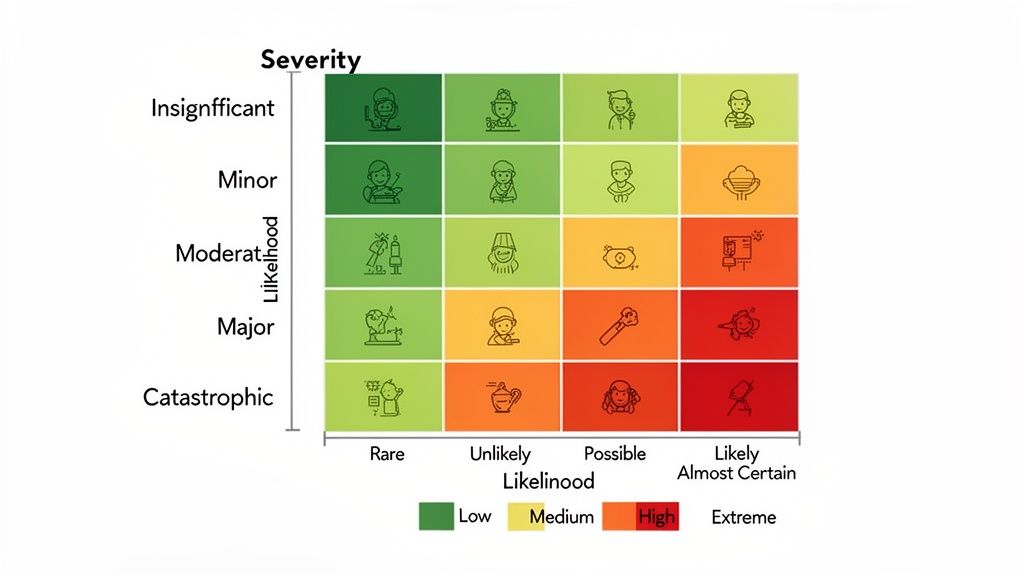
Simple 5x5 Risk Assessment Matrix
The easiest way to visualise this is with a classic 5x5 matrix. You simply find the box where the Likelihood and Severity scores for a specific hazard intersect. The resulting number and colour give you a clear indication of the risk level, helping you decide what to tackle first.
| Likelihood | Severity: 1 (Insignificant) | Severity: 2 (Minor) | Severity: 3 (Moderate) | Severity: 4 (Major) | Severity: 5 (Catastrophic) |
|---|---|---|---|---|---|
| 5 (Almost Certain) | 5 (Low) | 10 (Medium) | 15 (High) | 20 (Extreme) | 25 (Extreme) |
| 4 (Likely) | 4 (Low) | 8 (Medium) | 12 (High) | 16 (Extreme) | 20 (Extreme) |
| 3 (Possible) | 3 (Low) | 6 (Medium) | 9 (Medium) | 12 (High) | 15 (High) |
| 2 (Unlikely) | 2 (Low) | 4 (Low) | 6 (Medium) | 8 (Medium) | 10 (Medium) |
| 1 (Rare) | 1 (Low) | 2 (Low) | 3 (Low) | 4 (Low) | 5 (Low) |
This simple tool instantly cuts through the noise. A score of 20 or 25 is an immediate red flag, while a score of 1-4 can likely be addressed in due course.
Putting the Risk Matrix into Action
Let’s go back to that manufacturing floor example. You've spotted an unguarded rotating shaft on a machine that’s used every single day.
First, assess the likelihood. Workers are close to it constantly, and it’s completely exposed. You’d probably rate the likelihood as (4) Likely.
Next, the severity. Anyone making contact with that powerful shaft is looking at a catastrophic injury, amputation or worse. So, you rate the severity as (5) Catastrophic.
Now, by combining those scores, you can move from just knowing about a hazard to truly understanding its urgency.
Multiplying 4 (Likelihood) x 5 (Severity) gives you a risk score of 20. On the matrix, that lands squarely in the red ‘Extreme Risk’ category.
This isn’t just a number; it’s a direct instruction. It tells you to stop what you're doing and implement controls immediately, before anyone else works near that machine. If you want to dive deeper into customising your own charts, you can learn more about how a risk management matrix is built.
Using a simple scoring system like this removes the guesswork. It gives you a consistent, defensible method for evaluating every hazard, making your entire risk assessment process far more effective and manageable.
Real-World Risk Assessment Examples: Construction & Manufacturing
Theory is one thing, but seeing a workplace risk assessment in action is where it all clicks. Applying the five-step process and a risk matrix to everyday scenarios is how these tools jump off the page and onto the worksite.
Let's walk through two practical examples from high-risk industries, one from construction and one from manufacturing, to see exactly how to break down a task, spot what could go wrong, and land on practical controls to keep people safe.
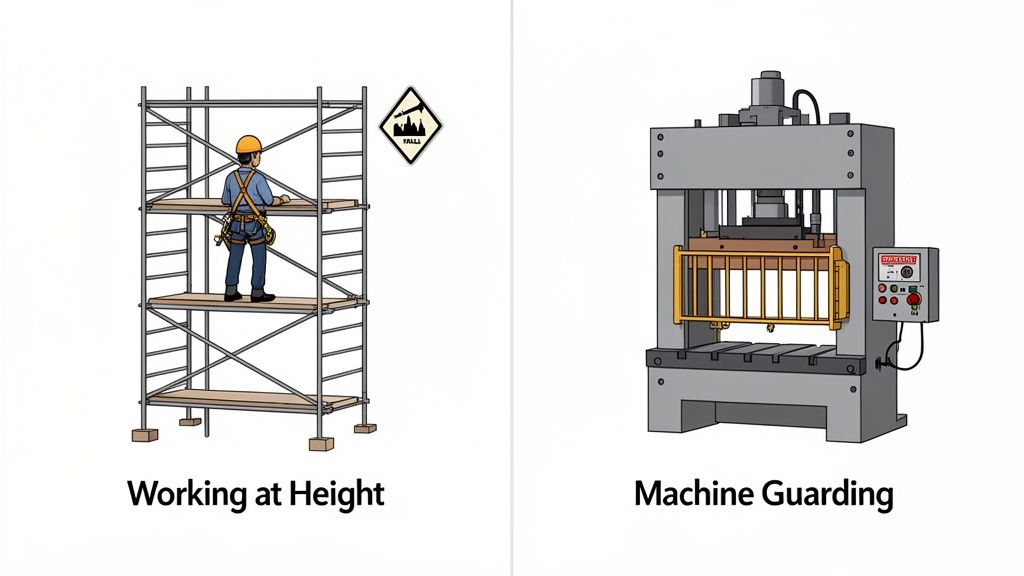
Construction Example: Working at Height on Scaffolding
Working on scaffolding is a daily reality on construction sites across Australia, but it's also one of the most hazardous tasks. A fall from even a couple of metres can be catastrophic. Let's run this through our five-step process.
Step 1: Identify the Hazards A quick walk-around and a chat with the scaffolding crew brings several potential hazards to light:
- Falls from height: The most obvious one. Someone could fall from an unguarded edge, through an opening, or while climbing the structure.
- Dropped objects: Tools, bricks, or debris could easily be knocked off the platform, putting anyone below in the line of fire.
- Scaffold collapse: The whole structure could fail if it’s assembled incorrectly, overloaded with materials, or built on unstable ground.
- Bad weather: High winds can make the scaffold unstable, while rain can make surfaces dangerously slippery.
Step 2: Decide Who Might Be Harmed and How It’s not just about the workers on the scaffold. The risk extends further.
- Scaffolders: They’re at risk of falls, particularly during the erection and dismantling phases.
- Tradespeople (Bricklayers, Painters): At risk of falls and dropped objects while performing their work on the platform.
- Ground workers and the public: Anyone passing by could be struck by falling materials.
Step 3: Evaluate the Risks and Decide on Controls Using our risk matrix, a fall from height is (4) Likely and the severity is (5) Catastrophic. That gives it an extreme risk score of 20, which demands immediate and robust controls.
A risk assessment isn't finished until you've identified specific, practical controls. Just listing the dangers is only half the job.
Here are the practical controls we need to put in place:
- Proper Erection: First things first, ensure the scaffold is built by a competent and ticketed person, strictly following the manufacturer's specifications.
- Guardrails and Toeboards: Install complete guardrails (top rail and mid-rail) plus toeboards on all working platforms. This is non-negotiable for preventing falls and stopping objects from sliding off.
- Harness Use: Mandate fall arrest harnesses for anyone working outside of a fully guarded platform.
- Exclusion Zones: Cordon off the area directly below the scaffolding. This simple step is crucial for protecting people on the ground from falling objects.
Step 4 & 5: Record, Implement, and Review All these findings are documented in a Safe Work Method Statement (SWMS). The site supervisor is responsible for making sure these controls are in place before any work starts. The assessment is then revisited daily in pre-start talks and updated if the scope of work changes.
Manufacturing Example: Operating a Metal Press
In a manufacturing plant, a metal press exerts incredible force. It’s a powerhouse of productivity but also incredibly dangerous if not managed properly. An unguarded press presents a severe risk of crushing and amputation.
Step 1: Identify the Hazards The hazards here are clear and severe:
- Crushing/Amputation: An operator's hands or limbs could get caught in the point of operation.
- Mechanical Failure: The machine could malfunction and cycle unexpectedly when it’s not supposed to.
- Ejected Parts: A workpiece or a piece of the die could fracture and fly out at high speed.
- Electrical Hazards: Faulty wiring creates a risk of electric shock, especially for maintenance crews. For more on electrical safety, the NFPA 70E Electrical Safety Guidance is an excellent resource.
Step 2: Decide Who Might Be Harmed and How
- Machine Operators: They face the highest and most immediate risk of entanglement and crushing injuries.
- Maintenance Staff: They’re exposed to electrical shock or unexpected machine movement during repairs and servicing.
- Nearby Workers: Anyone in the vicinity could be struck by ejected parts.
Step 3: Evaluate the Risks and Decide on Controls A crushing injury from the press is (3) Possible and the severity is (5) Catastrophic, giving it a high-risk score of 15. This calls for immediate and reliable controls, with a focus on engineering the hazard out completely.
Practical controls include:
- Machine Guarding: Install fixed physical guards that make it impossible for any part of a person's body to reach the danger zone. If that’s not practical for the task, use light curtains or two-hand controls that force the operator's hands to be clear.
- Lockout/Tagout (LOTO) Procedures: A strict LOTO system is essential. The machine must be de-energised and physically locked out before anyone performs maintenance or cleaning.
- Emergency Stops: Make sure E-stops are clearly marked, easy to reach, and tested regularly.
Step 4 & 5: Record, Implement, and Review The risk assessment for the press is formally recorded and tied directly to the machine's operating and maintenance procedures. All operators get specific training on these controls. The assessment is then reviewed annually, or immediately if there's a near-miss or malfunction.
If you’re interested in exploring other risk assessment models, our guide on the https://safetyspace.co/bowtie-risk-assessment method offers another powerful perspective.
Common Risk Assessment Pitfalls and How to Avoid Them
Even with a perfect five-step process and a risk matrix, a risk assessment can still completely miss the mark. The real difference between a document that gathers dust and one that actually prevents injuries often comes down to avoiding a few common mistakes.
These traps can render all your hard work useless, leaving your team exposed despite your intentions. Too often, assessments become a box-ticking exercise instead of a practical safety tool. Let's walk through the most frequent errors and, more importantly, the simple ways to get them right.
Mistake 1: The One-Person Job
One of the fastest ways to write an irrelevant risk assessment is to have one person do it alone, sitting in an office. When you don’t involve the people actually doing the work, you miss out on their hands-on knowledge of what really happens day-to-day.
A document written in isolation is a work of fiction. It will never account for the unofficial shortcuts people take, their frustrations with a particular machine, or the near-misses that never make it into a formal report.
The Fix: Get out on the floor and make it a collaboration. Before you even think about writing, walk the site and have genuine conversations with the operators, tradies, and labourers. Ask them what they’re worried about. Their insights are the secret ingredient to creating a document that is not only accurate but also respected by the crew.
Mistake 2: Being Too Generic
Grabbing a generic, off-the-shelf template and calling it a day is another classic failure. A risk assessment for "welding" that doesn't consider the poor ventilation in your specific workshop or the flammable materials stored ten feet away is fundamentally useless.
Every single worksite is different. Each has its own layout, its own quirks, its own unique set of problems.
A workplace risk assessment must be specific to the task, the environment, and the people involved. If it could apply to any job site, it's not good enough for yours.
The Fix: Always assess the task where it actually happens. Look at the specific machine being used, note the surrounding environment, and consider the exact materials involved. A site-specific assessment is what helps you spot the real hazards, like the trip risk from that cracked concrete floor or the blind corner that’s a nightmare for forklift traffic. A generic template will miss these every time.
Mistake 3: The 'File and Forget' Problem
This is probably the most common pitfall of them all. You do the hard work, write the assessment, file it away, and breathe a sigh of relief. Job done. But workplaces are living things; they change constantly. An assessment from six months ago might be totally obsolete now that you’ve installed a new piece of equipment or brought a new apprentice onto the team.
This "file and forget" mentality turns a living safety tool into a dead piece of paper.
The Solution:
- Schedule Regular Reviews: Don't leave it to chance. Put reminders in your calendar to review every risk assessment at least annually, or more frequently for high-risk activities.
- Link it to Daily Work: Make the assessment part of the daily routine. A quick review of the key hazards and controls during a pre-start or toolbox talk keeps the information fresh and front-of-mind.
- Update After Incidents: If there's an accident or even a near-miss, your first step should be to pull out the relevant risk assessment. That incident is blunt feedback telling you that your controls might not be working as well as you thought.
Using Digital Tools to Manage Risk Assessments
Anyone who's tried to manage a workplace risk assessment process using stacks of paper or tangled spreadsheets knows it’s a recipe for disaster. Documents get lost, versions become outdated, and just trying to track who has done what across different sites turns into a full-time job. This is where moving from manual methods to a digital approach makes a world of difference.
Digital tools are built to handle the entire risk assessment lifecycle in one central place. Instead of starting from scratch every single time, you can build a library of templates for common jobs. This makes sure every assessment for a specific task, like welding or operating a forklift, is done consistently and correctly, no matter who is on the tools that day.
From Clutter to Clarity
The most immediate win you get from a digital system is control. Forget chasing signatures or wondering if a critical control was actually put in place. A central dashboard gives you a live, real-time view of every risk across your entire operation, whether you run one site or twenty.
This bird's-eye view is crucial for genuine oversight. You can instantly see which assessments are complete, which are overdue, and where your highest-risk activities are happening right now. For businesses that rely on subcontractors, it’s a straightforward way to manage their compliance without creating an administrative nightmare.
Digital tools turn your risk assessment from a static document into a live management system. They connect your plans to the reality on the ground, making safety visible and accountable.
Practical Benefits You Can Use Today
Shifting your workplace risk assessment process to a dedicated platform isn’t just about going paperless. It’s about making the whole process faster, smarter, and more reliable.
You’ll see the advantages straight away:
- Time-Saving Templates: Build standard forms for common tasks that can be pre-filled with known hazards and controls. This slashes repetitive data entry and keeps everyone on the same page.
- Automated Reminders: Never miss a review date again. A good system automatically notifies you when an assessment is due for its annual review or needs an update after an incident.
- Centralised Records: Prove your compliance in a heartbeat. All your risk assessments are stored in one secure, searchable hub, ready for an audit or inspection whenever you need them.
By adopting these tools, you spend less time buried in admin and more time focused on the controls that actually keep people safe. If you're managing complex operations, exploring how enterprise risk assessment software can give you that single source of truth is the next logical step.
Your Risk Assessment Questions, Answered
Even with a perfect plan on paper, questions always pop up when you're out on site. Let's tackle some of the most common ones that safety managers and business owners ask when they’re getting their hands dirty with workplace risk assessments.
The goal here is simple: give you straight, practical answers so you can move forward with confidence and clarity. The better you get a handle on the nuts and bolts, the more effective your assessments will be at actually stopping incidents before they happen.
How Often Should I Review a Risk Assessment?
There isn't a single, rigid rule for every situation, but a solid rule of thumb is to review every risk assessment at least once a year. That said, some events should trigger an immediate review.
You'll need to update your assessment straight away if:
- An accident or even a near-miss happens.
- You bring in new machinery, substances, or change up your work procedures.
- Your crew raises new concerns about a specific job or area.
- You change the physical layout of the worksite.
Think of your risk assessment as a living document. It’s not a "set and forget" task you tick off a list.
Who Should Be Involved in a Risk Assessment?
A risk assessment should never be a solo mission carried out from an office. To get a real, ground-level picture of the risks, you absolutely have to involve the people who do the work day in and day out. That means getting out on the floor and having a proper chat with your team.
The person operating a machine every day knows its quirks and dangers far better than anyone else. Ignoring their input means you're missing the most valuable information you have.
Get a good mix of people in the room (or on the site), including:
- The workers who actually perform the task.
- Supervisors or team leaders from that area.
- Your health and safety representative, if you have one.
Is a Risk Assessment a Legal Requirement?
Yes, absolutely. Under Australian Work Health and Safety (WHS) laws, every business has a primary duty of care to manage workplace risks. A documented risk assessment is precisely how you prove you're actively identifying and controlling hazards to keep your people safe.
It's not just good practice; it's a fundamental part of your legal obligations.
Still drowning in paper and spreadsheets to manage your risk assessments? Safety Space cuts through the clutter, giving you a single, easy-to-use platform with a real-time view across all your sites. See how it works with a free demo and expert H&S consultation.
Ready to Transform Your Safety Management?
Discover how Safety Space can help you implement the strategies discussed in this article.
Explore Safety Space FeaturesRelated Topics
Safety Space Features
Explore all the AI-powered features that make Safety Space the complete workplace safety solution.
Articles & Resources
Explore our complete collection of workplace safety articles, tools, and resources.