
When it comes to managing workplace risks, where do you start? The hierarchy of control measures gives you a clear, structured game plan. Think of it as a safety pyramid: you always tackle the problem from the top with the most reliable methods, like removing a hazard completely, before you even consider less effective options like personal protective equipment (PPE).
Breaking Down the Hierarchy of Control Measures
At its core, the hierarchy of control is a logical framework for making workplaces safer. Instead of just reacting when something goes wrong, it forces you to proactively manage risks by getting to the source of the problem. A leaky pipe illustrates the point: a bucket under the drip is a low control; replacing or repairing the pipe is higher up. Fixing the floor beats only warning people to tread carefully.
This framework isn't just a suggestion from a textbook; it's a legal requirement. In Australia, the Work Health and Safety (WHS) Act 2011 legally mandates that businesses follow this hierarchy, emphasising that the highest levels of control must be prioritised wherever possible. It's not just about compliance, either, it gets results. Workplaces that implement elimination or substitution measures report up to a 40% reduction in injury rates compared to those relying mainly on PPE.
A Visual Guide to Controlling Hazards
To really get your head around this system, it helps to see it laid out visually. This diagram shows the five levels, ranked from the most effective at the top to the least effective at the bottom.
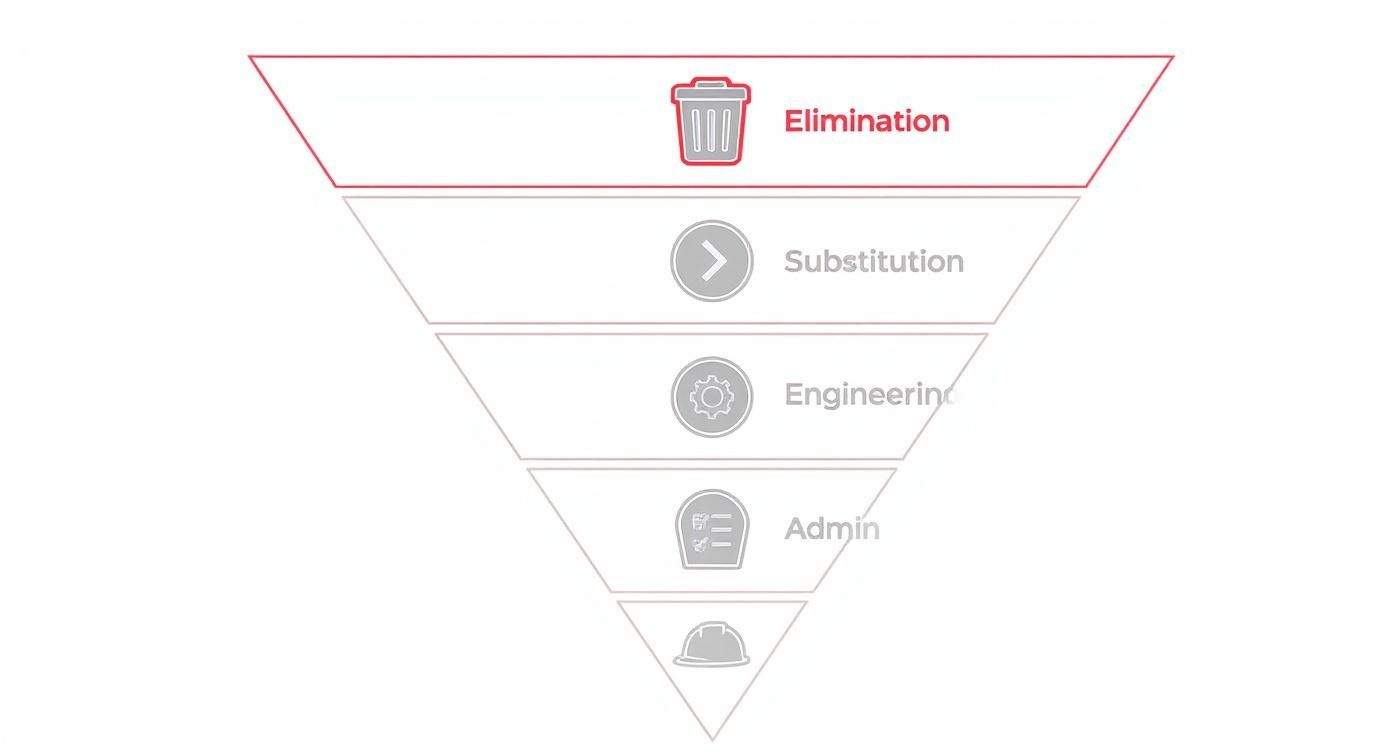
This inverted pyramid makes it clear where your efforts should be focused. The top three levels, Elimination, Substitution, and Engineering Controls, are all about controlling the hazard itself. The bottom two levels, Administrative Controls and PPE, rely on people's actions, which makes them far less reliable.
The most practical takeaway from the hierarchy is this: it forces you to solve the root problem rather than just managing its symptoms. True safety comes from removing or isolating hazards, not just equipping people to work around them.
The goal here is to create a work environment where safety is built-in, not bolted on as an afterthought. Understanding the different types of hazards in the workplace is the first step. In the next sections, we’ll get into each of these five levels, with practical examples for industries like construction and manufacturing.
The Hierarchy of Control at a Glance
To quickly summarise, here’s a simple breakdown of the five levels of control, ranked from the most effective to the least. This table gives you a clear overview of the principle behind each level.
| Control Level | Principle | Effectiveness |
|---|---|---|
| Elimination | Physically remove the hazard completely. | Most Effective |
| Substitution | Replace the hazard with a safer alternative. | Very Effective |
| Engineering | Isolate people from the hazard with physical barriers or systems. | Moderately Effective |
| Administration | Change the way people work through procedures, signs, and training. | Less Effective |
| PPE | Protect the worker with personal protective equipment. | Least Effective |
As we explore each of these levels, remember that the goal is always to start at the top of this list and work your way down only when higher-level controls aren't reasonably practicable.
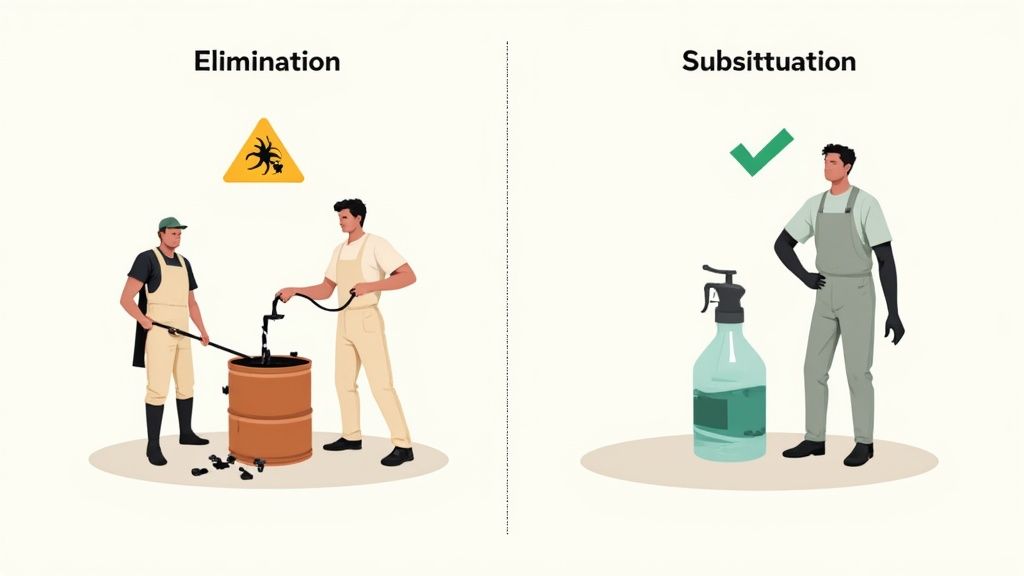
1. Elimination and Substitution: The Most Effective Controls
Right at the top of the hierarchy of control, you'll find Elimination and Substitution. These are the most powerful and reliable strategies you can use. Why? Because they deal with hazards at the source, rather than just trying to manage the fallout. Think of it as fixing a problem for good, not just putting a temporary patch on it.
Elimination is exactly what it sounds like: physically removing the hazard from the workplace entirely. If the hazard doesn't exist, it simply can't cause harm. This is the gold standard in workplace safety and should always be the first option you consider.
Substitution is the next best thing. This is where you replace a hazardous process or material with a safer alternative. The hazard might not be gone completely, but you've significantly dialled down the risk.
Putting Elimination into Practice
Getting your head around elimination requires a shift in thinking. Instead of asking, "How can we do this job safely?", the real question becomes, "How can we get the result we want without doing this hazardous job at all?".
Here are a few real-world examples of what elimination looks like on the ground:
- Working at height: Rather than sending workers up ladders to assemble components, can the process be redesigned so everything is put together at ground level? This completely removes the risk of a fall from height.
- Manual handling: Instead of having your team lift heavy materials, bring in mechanical aids like cranes or forklifts. This eliminates the manual handling risks that lead to sprains and strains.
- Trip hazards: Reroute cables and hoses overhead or through floor channels instead of letting them snake across walkways. The trip hazard is gone for good.
Elimination is so effective because it's a one-and-done solution. It doesn't rely on people remembering to do the right thing every single time. Once the hazard is gone, you get to avoid all the recurring costs of training, supervision, and personal protective equipment (PPE).
When to Use Substitution
Sometimes, completely removing a hazard just isn't feasible. The next logical step is to substitute it with something less dangerous. This control is still incredibly effective because it permanently lowers the level of risk baked into a task.
The key here is to do a proper assessment to make sure the new material or process doesn't accidentally introduce new, unexpected hazards. You want to lower the overall risk, not just trade one problem for another.
The core idea behind substitution is simple: if you can't get rid of the risk, reduce its severity. Swapping a highly toxic chemical for a less toxic one is a classic example. It reduces potential harm to both your people and the environment.
Common examples of substitution include:
- Chemicals: Replacing nasty solvent-based paints with water-based or low-volatile organic compound (VOC) alternatives.
- Equipment: Swapping out a noisy machine for a quieter model to reduce noise exposure, or using an electric tool instead of a petrol-powered one to get rid of exhaust fumes in a confined space.
- Materials: Using pre-fabricated components in construction to minimise the need for on-site cutting, which produces hazardous dust and noise.
The Benefits and Challenges
While Elimination and Substitution are the most effective hierarchy of control measures, they aren't always easy to implement. The main hurdle is often the initial cost or the need to fundamentally redesign a work process. It can take a significant upfront investment to buy new equipment or reconfigure a manufacturing line.
But here’s the thing: the long-term benefits almost always outweigh these initial costs.
By designing the hazard out from the start, you slash the chances of incidents, which can lead to lower insurance premiums. You also avoid the endless cycle of expense and management that comes with less effective controls like PPE. Choosing these top-tier controls is a direct investment in a safer, more productive workplace.
Engineering and Administrative Controls: The Middle Tiers
When you can’t completely eliminate or substitute a hazard, you’re not out of options. You simply move down to the middle tiers of the hierarchy of control. This is where most day-to-day safety planning happens. It’s the hands-on, practical stuff for managing risks that are part of the job.
These middle tiers are Engineering Controls and Administrative Controls. They tackle the same problem from two different angles. Engineering controls physically change the work environment, whereas administrative controls change how people work within that environment.
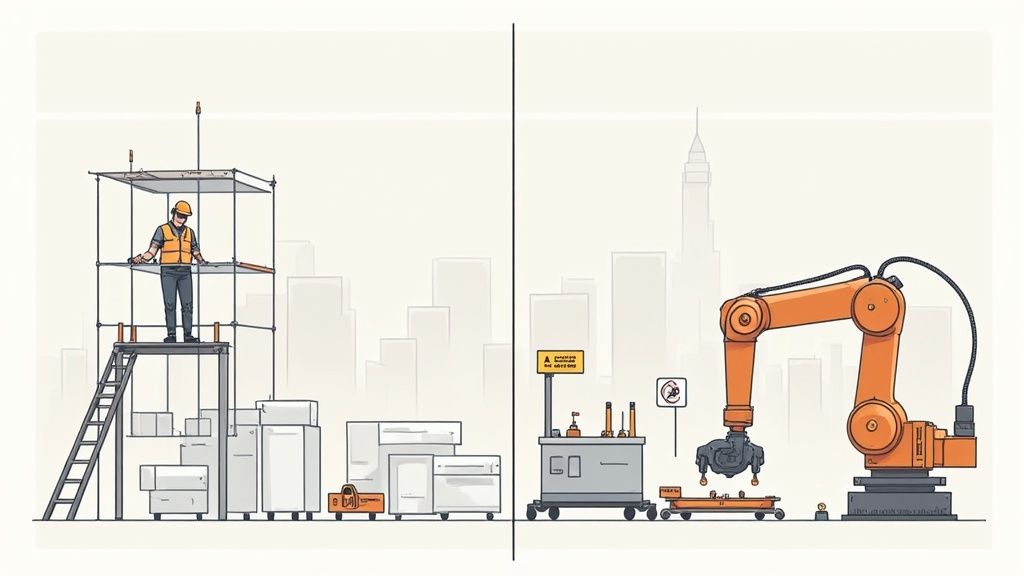
Isolating People from Hazards with Engineering Controls
Engineering controls involve making physical changes to a plant, a piece of equipment, or a process to cut down or prevent exposure to a hazard. The big advantage here is that they’re built right into the workplace, creating a permanent, physical barrier between your team and the risk.
Think of it like putting a guard rail around an open pit. The rail physically stops someone from falling in, and it works whether they’re paying attention or not. This is exactly why engineering controls are far more reliable than lower-level controls, which count on people to always follow the rules.
Here are a few real-world examples:
- Machine Guarding: Installing fixed guards around the moving parts of a conveyor belt or press to make contact impossible.
- Ventilation Systems: Using local exhaust ventilation to suck up and remove harmful fumes right at the source, before they ever reach a worker’s breathing zone.
- Soundproof Enclosures: Building an enclosure around a noisy generator to slash the noise level for everyone working nearby.
- Interlock Systems: Designing a machine to automatically shut down the moment a safety guard is opened.
These controls are so effective because they don’t need constant human effort to function. Once they're in place, they provide a steady, consistent layer of protection.
Changing How People Work with Administrative Controls
Moving further down the hierarchy, we get to administrative controls. These are all about the systems, procedures, and rules you establish to make work safer. Unlike engineering controls that change the physical setup, administrative controls focus on changing what your workers do.
This level of the hierarchy of control measures is all about procedures and information. It covers everything from writing a Safe Work Method Statement (SWMS) to simply putting up warning signs.
Administrative controls are fundamentally about giving people the right information and procedures to work safely. However, their effectiveness depends entirely on people remembering and following those instructions every time, making them less reliable than a physical barrier.
Examples of administrative controls include things like:
- Safe Work Procedures: Developing documented, step-by-step instructions for performing high-risk tasks.
- Training and Supervision: Giving workers the knowledge they need to spot hazards and providing the oversight to make sure they stick to procedures.
- Job Rotation: Limiting a worker’s exposure time to a specific hazard, like noise or vibration, by rotating them through different tasks.
- Warning Signs and Labels: Using clear signs to alert people to dangers like "High Voltage" or "Confined Space".
A key part of administrative controls in the construction world involves sticking to strict regulations. For a deeper look into these regulatory requirements, you might find resources on understanding building codes helpful.
Comparing Engineering and Administrative Approaches
The main difference really boils down to reliability. Engineering controls are passive and protective by design. Administrative controls are active and demand constant human compliance. A machine guard works 24/7, but a worker might forget a procedure during a hectic shift.
| Control Type | How It Works | Reliability | Example |
|---|---|---|---|
| Engineering | Physically isolates the hazard from the person. | High. It is built into the environment and works independently of human action. | A guard on a saw that prevents contact with the blade. |
| Administrative | Changes how the person works around the hazard. | Lower. It relies on people consistently following rules and procedures. | A rule that says "wear gloves when using the saw". |
Often, the smartest solution is to use both together. For instance, you could install a ventilation system (engineering) to clear out welding fumes and implement a rule requiring a "hot work" permit before anyone starts welding (administrative). This kind of layered approach creates a much more robust safety net.
Putting these principles into practice makes a real, measurable difference. Data from the Australian Bureau of Statistics (ABS) shows that industries that align their compliance with the hierarchy of controls have seen a steady drop in work-related injuries, with claims falling from over 120,000 in 2010 to around 90,000 in 2020.
Using Personal Protective Equipment as a Last Resort
Personal Protective Equipment, or PPE, sits right at the bottom of the hierarchy of controls for one very simple reason: it’s the least reliable way to keep people safe.
Think of it as the last line of defence, not your go-to strategy. Relying on hard hats, gloves, or respirators to manage a serious risk is like slapping a band-aid on a gushing pipe instead of just fixing the leak. It might seem like a solution, but it doesn't solve the underlying problem.
The big issue with PPE is that it doesn't actually remove the hazard from the workplace. It just puts a temporary barrier between the person and the danger. If that barrier fails, or if someone forgets to use it, or uses it incorrectly, they are completely exposed.
The Problem with Relying on PPE
Unlike a guard rail that's permanently bolted in place, PPE demands constant, conscious effort. It’s often uncomfortable, especially during a long shift or in miserable weather, which is a major reason why it sometimes isn't worn properly or at all.
Beyond that, a proper PPE program requires a huge amount of ongoing administrative work. You have to nail every single step:
- Correct Selection: Picking the exact right equipment for a specific hazard.
- Proper Fitting: Making sure gear like respirators forms a perfect seal for each individual.
- Ongoing Training: Regularly showing your team how to use, check, and look after their gear.
- Consistent Supervision: Having eyes on the ground to make sure the rules are being followed, day in and day out.
For a deeper look into these responsibilities, you can check out the detailed personal protective equipment requirements that apply across Australian workplaces. It's a continuous cycle of management that never really ends.
The core issue is that PPE places the entire burden of safety on the individual worker. It asks them to remember, inspect, and correctly use equipment every single time, without fail, in order to stay safe from a hazard the business has not removed.
The stats tell the same story. According to Safe Work Australia, around 60% of serious workplace injuries in Australia are linked to businesses not putting higher-level controls in place. It shows that leaning too heavily on PPE is a common thread when things go badly wrong. You can find out more by reviewing these key workplace safety findings.
A Checklist for a Proper PPE Program
So, what do you do when you’ve exhausted all higher-level controls and PPE is your only remaining option? You have to do it right. A half-baked program is almost as bad as none at all.
Here’s a simple checklist to make sure your PPE program is actually effective:
- Hazard Assessment: Have you properly assessed the specific risks to know exactly what PPE is needed? A generic, one-size-fits-all approach is a recipe for failure.
- Selection and Fit: Is the gear compliant with Australian Standards and properly fitted to each individual worker? Remember, one size rarely fits all, especially with items like masks and safety glasses.
- Training: Has everyone received hands-on training on how to use, clean, and store their PPE? This must include understanding the equipment's limitations.
- Maintenance and Inspection: Is there a proper system for regularly checking PPE for damage and wear, and a clear process for replacing it when it’s no longer effective?
- Supervision and Enforcement: Are your supervisors actively monitoring that PPE is being used correctly and consistently enforcing the rules?
PPE absolutely has its place. But it’s the final piece of the puzzle, used only after you’ve worked your way down the hierarchy and tried everything else first. It should be a final safeguard, never your starting point.
Applying the Hierarchy in Construction and Manufacturing
Talking about the hierarchy of controls in theory is one thing. Seeing it in action on a busy construction site or a humming factory floor is where it really clicks. These are high-risk environments, and applying the hierarchy properly is often the difference between a near-miss and a tragedy.
The goal here isn't to create more paperwork. It's about making safety practical and embedding it into the way you work. Let's break down how this framework applies to real-world scenarios, starting from the top of the pyramid and working our way down.
Tackling Risks on the Construction Site
Construction sites are fluid, dynamic environments. A hazard that didn’t exist yesterday can become a major threat today, which makes risk management a constant challenge. By applying the hierarchy of controls, you bring a much-needed dose of structure and predictability to site safety.
A classic example everyone deals with is the risk of falling from height. Let's walk through the controls:
- Elimination: The absolute best approach is to design the work so no one has to go up high in the first place. Think pre-fabricated wall panels that are built on the ground and then craned into position. If no one is on the scaffolding, the fall risk is completely gone. Simple.
- Engineering Controls: If working at height is unavoidable, the next best thing is to physically separate people from the hazard. This is where you bring in properly erected scaffolding with full guardrails or use mobile elevating work platforms (MEWPs) with safety cages. These create a physical barrier.
- Administrative Controls: Now we’re getting into procedures. This includes things like creating clear "no-go" zones under active overhead work, running daily toolbox talks on fall prevention, and ensuring everyone is properly trained. A solid construction site safety management plan is a critical administrative control that ties all these procedures together.
- PPE: At the very bottom of the list is the fall arrest system: a harness and lanyard. This is your last line of defence. It doesn't stop the fall; it just catches the worker after they’ve fallen. That’s why it’s a last resort, not a first choice.
The key takeaway for construction is this: design out the risk wherever you can. Thinking about safety during the planning phase and opting for safer methods like pre-fabrication will always beat handing out more harnesses on the day.
Another common hazard is silica dust from cutting concrete. Instead of just giving workers dust masks (PPE), a better approach is using wet-cutting methods or on-tool dust extraction systems (engineering controls). Even better? Ordering pre-cut materials so there’s no cutting on-site at all (elimination).
For a deeper look into how these principles apply to other site risks, check out this superintendent's guide to comprehensive security in construction.
Managing Hazards in a Manufacturing Setting
Factory floors have their own set of challenges, often centred around powerful machinery and repetitive tasks. The hierarchy gives us a clear, systematic way to tackle these risks head-on.
Let’s take the risk of a worker getting their hand caught in a machine.
- Elimination: Can we get a human out of the danger zone entirely? Using a robot for a hazardous cutting or pressing task completely removes the person from the point of operation. Problem solved.
- Engineering Controls: If a human operator is necessary, the next step is to install physical guards that make it impossible to reach into the moving parts. Interlock switches, which automatically shut the machine off when a guard is opened, are another fantastic example of an engineering control.
- Administrative Controls: These are your procedural safeguards. Think lockout/tagout (LOTO) procedures to ensure machines are de-energised before maintenance, clear safe work instructions posted at the machine, and regular, specific training on its hazards.
- PPE: The final layer might be gloves or safety glasses, but let's be honest, these do absolutely nothing to stop a machine from crushing a hand if it gets too close.
In manufacturing, engineering controls like machine guarding and proper ventilation systems have been game-changers, dramatically reducing injuries and illness. These physical changes bake safety into the environment by default.
To bring it all together, the table below shows how you can apply the hierarchy to common hazards across both sectors.
Hierarchy of Controls Applied to Industry Hazards
| Hazard | Elimination/Substitution | Engineering | Administrative | PPE |
|---|---|---|---|---|
| Working at Height (Construction) | Assemble components at ground level. | Use scaffolding with guardrails or MEWPs. | Implement exclusion zones and permit systems. | Use fall arrest harnesses. |
| Hazardous Chemicals (Manufacturing) | Replace a toxic solvent with a water-based one. | Install a local exhaust ventilation system. | Provide chemical safety training and labels. | Wear respirators and chemical-resistant gloves. |
| Loud Noise (Both) | Purchase quieter equipment (substitution). | Build soundproof enclosures around machinery. | Rotate jobs to limit individual exposure time. | Provide earplugs or earmuffs. |
By consistently applying this framework, you shift from simply reacting to incidents to proactively building a safer workplace where risks are managed at their source. It's about being smart and systematic, not just compliant.
A Practical Process for Putting Controls in Place
Knowing the theory is one thing, but actually putting it into practice on a busy site is a whole other challenge. A structured process is your best friend here. It takes the guesswork out of managing risk and gives you a consistent, logical, and legally defensible way to make decisions.
Think of it as a simple cycle: identify, control, and review.
The first step, always, is to identify the hazard and assess the risk. You can’t control what you don’t know about. This means looking at a specific task or work area, figuring out what could actually harm someone, and then getting real about how serious that harm could be.
Work from the Top Down
Once you’ve identified a risk, you absolutely have to start at the top of the hierarchy. No shortcuts. Ask the elimination question first: “Can we get rid of this hazard completely?” If you can, great. Job done.
If elimination isn't on the cards, you move down just one level to substitution. You only ever move to a lower-level control, like engineering or admin controls, after you’ve determined that the more effective options above it aren't reasonably practicable.
This top-down approach isn't just best practice; it's a core legal requirement in Australia. You have to be able to justify why a higher-level control wasn't implemented before settling for something less effective. Good documentation is your proof.
What Does ‘Reasonably Practicable’ Actually Mean?
The term “reasonably practicable” is the heart of Australian WHS law. It means doing what is reasonably able to be done to ensure health and safety, after you've considered all the relevant factors.
This isn't an excuse to just pick the cheapest option. It’s a balancing act that involves weighing up:
- The likelihood of the hazard actually causing harm.
- The degree of harm that might result if it does.
- What you know, or should reasonably know, about the hazard and the ways to control it.
- The availability and suitability of different ways to manage the risk.
- The cost of the control, but this is a big but, only after you've assessed the risk. Cost can’t be the main reason for not implementing a control if the risk of serious injury or death is high.
Finally, after you've picked a control and put it in place, you must review its effectiveness. Did it work as intended? Did it accidentally introduce any new, unexpected hazards? This review loop is what ensures your safety systems actually get better over time, rather than just becoming a box-ticking exercise.
The hierarchy of control isn't a new concept; it's a foundational part of occupational health and safety strategies in Australia. Regulatory frameworks have long prioritised controls that get rid of hazards altogether, with other measures following in descending order of effectiveness. You can discover more insights about this structured safety approach on paris21.org.
This is where using a safety management platform like Safety Space becomes so valuable. It helps you document your risk assessments, record your justification for choosing certain controls over others, and set reminders to track review dates. It creates a clear, undeniable audit trail that shows you're doing your due diligence.
Common Questions About the Hierarchy of Controls
Even with a clear framework, plenty of questions pop up when you try to apply the hierarchy of control measures in the real world. Let's tackle some of the most common ones to help you avoid mistakes and use the system properly.
Why is PPE Considered the Least Effective Control?
I get asked this one a lot. The answer is simple: it doesn't get rid of the hazard. PPE just puts a temporary barrier between a person and the danger, and it relies entirely on that person using it perfectly, every single time.
Think about it. It can be uncomfortable, fit poorly, or just get forgotten. The moment any of those things happen, the worker is completely exposed again.
Can I Use More Than One Type of Control at Once?
Absolutely. In fact, you almost always should. Layering different controls is the most robust and practical way to manage risk.
For example, you might install a new ventilation system (engineering) to capture dust at the source, but you could also limit the time workers spend in that area (administrative). This creates a much stronger safety net. If one control fails or isn't enough on its own, another is there to back it up.
How Do I Decide What is "Reasonably Practicable"?
This isn't just a suggestion; "reasonably practicable" is a legal requirement in Australia. It's a balancing act, weighing the seriousness of a risk against the cost, time, and effort needed to control it.
You have to weigh up:
- The likelihood of something happening and how severe the harm could be.
- Whether a suitable control measure is actually available.
- What you know (or really should know) about the hazard and the ways to fix it.
- The cost of the control in relation to the risk. Cost alone is never a good enough reason to ignore a control if the risk is high.
The biggest mistake I see people make is jumping straight to the bottom of the hierarchy. It's so common to see teams hand out PPE as the first and only step, completely skipping over elimination, substitution, or engineering. Not only is this far less effective, but it also fails to meet your legal duties. Always, always start at the top.
Ready to move your safety management from messy spreadsheets to a smarter system? Safety Space gives you the tools to implement, track, and review your control measures properly. Get your free demo and see how it works.
Ready to Transform Your Safety Management?
Discover how Safety Space can help you build a safer, more compliant workplace with our comprehensive safety management platform.
Book a Free DemoRelated Topics
Safety Space Features
Explore all the AI-powered features that make Safety Space the complete workplace safety solution.
Articles & Resources
Explore our complete collection of workplace safety articles, tools, and resources.